Showing posts with label friendship. Show all posts

Wednesday, September 25, 2013

Telescoping Card

With the dog being sick and having a moment of temporary insanity (as I thought I lost my Ipad), the cards are definitely not in my favor this week. I'm looking forward to Friday once more so that school can be done until Monday.  But unfortunately I still have two more days until Friday arrives, so alas who knows I'll be dealt until then.  Enough negativity and onto the positive of my day, my remarkable creation for this evening.

Even though today was not the best of days, I decided that I wanted to make a card that I've been wanting to try for a while.  It's a telescoping design that I found on fellow card maker, Julie Davidson's, blog.  She even had a video tutorial that I'll post at the end of my blog for tonight.  First, I used my Big Shot and circle framelits to create the scalloped and middle circle.  Once these were completed, I used my Silhouette sketch pens to write "Thank you for being a friend" and then I cut out the next circle so that everything was lined up correctly.  Finally I cut out the scalloped circle and the regular circle on top with my Silhouette as well since it was easier to cut out the whole thing.  I then used a flower stamp to add a bit of color to the two white circles.  I then stamped "to my friend " on the inside of the smaller circle.  After the two circles were stamped, I glued the larger circle and scalloped circle together.  Repeating this for the smaller circle and the small scalloped circle.  Once the circles were attached, I laid the largest circle on top of the scalloped circle and took my 1/4" hole punch and punched a hole through both of them.  I then put a teal brad through the hole and closed it.  Then opening up the second circle and laying the smaller scalloped circle in the middle, I used my hole punch to punch through those two layers and put another teal brad through that hole and closed it.  I had to make sure that the sentiment was upside down so that it would be right side up when it was opened up completely.  I then open it up and punched a hole through the top of the scalloped circle for the ribbon.  The card is different then the cards that I have created previous for this project, but I am trying to use a different technique or fold once a week to keep my project more interesting.  Until next time, happy carding everyone!

Fold all together

Opened up completely


Tuesday, September 24, 2013

Hello Friend

While today didn't start out any better than yesterday since I woke up to a sick dog again at 2:30 in the morning, but my day did get better when I got to school.  My day was not as crazy as yesterday and that helped as well.  It was a very tiring day since I didn't get much sleep, but I made it through the day.  Once I got home, I searched Pinterest and then decided that I need a nap before making tonight's creation.  Let's discuss the skinny of tonight's card.

Tonight I used my Silhouette sketch pens to write "Hello Friend" on the overlay.  Once the sentiment was written, I used my Silhouette to cut out the overlay so that the sentiment was in the correct location.  Using my trimmer, I cut out four rectangles that are all different sizes.  Once the rectangles were cut out, I glued the pattern paper on top of the solid pink.  I then overlapped them on my card and I tired to make sure that both sides had the same amount of space.  After that part of the card was glued down, I used the Mixed Bunch stamp set to stamp the flower and the center.  I used a dark purple (Elegant Eggplant) and a dark pink (Melon Mambo) for the flower since you can't really tell the colors in the picture.  I adhered the flower onto the card with dimensionals to make it pop off the paper a little more.  Finishing my card, I custom cut the card and adhered the overlay onto it.  This card turned out exactly how I envision it.  The layout could be used for several different occasions.  I will be making this card again, but changing the theme to something else.  Until next time, happy carding everyone.

Thursday, September 19, 2013

Friendship

After the last few weeks of feeling tired, today was no different, but I found the energy to make a more challenging card then I have in the past few days.  Even though I received my Big Shot in the mail today, I decided to wait to use it until tomorrow when I receive the rest of the toys that go along with it.  Besides receving goodies in the mail today, it was a normal Thursday so let's discuss tonight's creation instead of boring you with today's events.

For tonight's creation, I was inspired by a similar card that I found on Pinterest.  Since one of my friends ordered 18 cards and wanted one of them to have a red theme with a cute friendship quote, I thought the design of the card would be prefect.  Since I now have a trimmer that I really like, I have tried creating the card and the overlay with it.  This will help put less wear and tear on my Silhouette.  After cutting my card and overlay out, I designed two different sized squares using the Silhouette Design Studio. It would have been much easier if I would have had two square punches that were closer in size, but I used what I had.  Once the squares were designed, I search my paper for different shades of reds that went together as well as a sheet of designer paper.  After the paper was chosen, I cut out my squares and adhered them together.  I aligned two of the squares on the overlay so that there was an even amount of space on each side.  I then placed the third square in the middle.  Once the squares were in place, I punched out a butterfly using the Elegant Butterfly Punch.  After all of the elements were adhered to the card, I stamped "a friend is someone who makes it easy" on the bottom of the card.  I really like how tonight's card turned out and how well the shades of red go together.  Until next time, happy carding everyone.


Tuesday, September 10, 2013

HEAT WAVE!!

Today was blistering, record breaking heat across the state caused for many unhappy students as well as unhappy teachers at school.  As the building I teach in is out of date, unfortunately the amenities such as air conditioning do not exist; and we are left to bake like cookies for Christmas.  Ohh a September snowfall sounds wonderful right about now, minus all the traffic and other issues associated with it (just the cold will do for me).  As if the heat wasn't enough, my fiance made me run in the scorching heat after he got home from work.  Alas nothing a good shower can't wash away, after teaching and running all day I was left burnt not only by the sun but the physical activity today gave me.  A quick simple card was in store, but as you will find from reading this blog, it was more then I had bargained for!

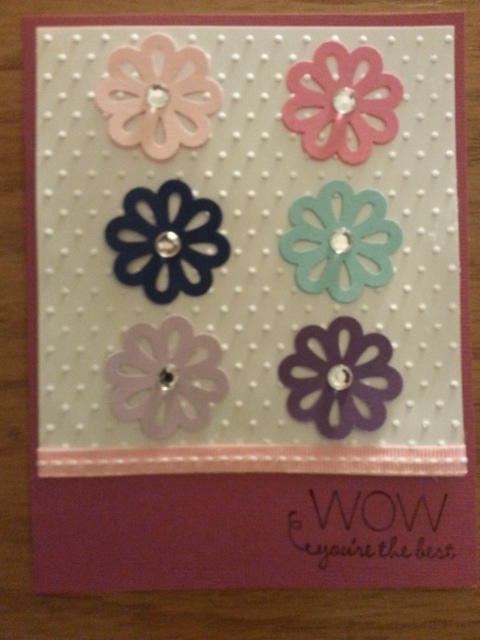
I decided to go with a pre-made card since I am trying to use them up.  I don't really need them when I can custom cut my own, but at the same time I don't want them to go to waste.  After I picked the color of my pre-made card, I picked out the other elements for my card.  I chose three colors that went well together and then found a lighter shade of the colors.  I then punched out six different colored flowers and once they were completed I added rhinestones to the middle.  I then cut out my overlway, when this was completed I embossed it to make it pop more.  Then adding some ribbon to the card,  I thought about adding a bow.  Unfortunately the bow didn't turn out the way I wanted so I decided against it and will save it for another day.  Once the ribbon was in place, I glued the flowers onto the card trying to keep them equally spaced in distance from one another.  I then glued the base onto the overlay and my card was almost complete.  I used the Friendly Phrase set to stamp "WOW you're the best." but just when I thought I was done, it appeared that I had stamped the phrase upside down.  So I had to remove the overlay from the card with extra care so it wouldn't rip.  Finally getting out another I glued the overlay back on.  This time I doubled checked to make sure the stamp was facing the right direction and thus the card was complete.  Until next time, happy carding everyone!


Friday, September 6, 2013

One (100) Hundred!

It's official, I have officially created a new card daily for the last 100 days of my life.  While this accomplishment is an uplifting moment in my card creation life, I also realize that many people have helped me on this journey.  My friend Jessica, who helped come up with the idea of doing a card for a year.  My fiancee, who has endured many tireless nights with me crawling to bed much later then expected.  As well as my best friend Chris, who many a times has helped me edit my blogs (on such tireless nights where sometimes what I write doesn't really make sense).  Without these people and the countless others in my life who have been with me during the journey over the last 100 days, I'm not entirely sure where I would be with this project.  All things considered I've reached a milestone, and to celebrate that milestone I am dedicating this card to all those (listed and unlisted) who have helped me with my cards over the last 100 days!

When I think of characters who are good friends, the first two people I think of are Pooh and Piglet, growing up they were the best of friends.  Now before you jump to the conclusion that I am comparing my friends to characters from a book, no I am not but rather just the friendship they have.  With my creative juices coursing through my veins I took my owl punch and decided to use it to create Pooh.  Using red and yellow I punched a total of three owls to create Pooh, he required a little bit more attention to detail as his outfit needed to be placed in just the right spot or else my red would overhang like a beer gut (and we all know that Pooh doesn't drink!  An extra owl punch was used for his head (complete with ears!), and to add in the finer details I used a fine tip Sharpie to draw them on.  Using my word windows I was able to create arms and legs for him, while they are not the most perfect appendages I feel that they fit the simplistic feel for tonight's creation.  Repeating the process with a new color scheme for Piglet, I found that my biggest challenge for him came in the form of ears.  So instead of attempting to make them freehand with a pair of scissors, I used my Silhouette to trim out to even/perfectly shaped lobes.  Drawing in his smile/eyes and lines on his shirt (just like Pooh) with my Sharpie another remarkable creation took shape.

Once the two most important pieces of the card were completed, I custom cut my base and overlay.  I decided to get a bit creative and embossed the overlay with clouds.  Just to make the paper pop and give a bit of depth to my 2-D creations, this was followed up by a creative word window cut with my Silhouette.  Inside the box I put forth my dedication stamp for my friends who've helped me on this journey "A friend is someone who makes it easy," so thank you to all that have supported me and I hope to collect more followers as the days go by!  I can't wait to see what the next 100 days hold but until next time, happy carding everyone!


Friday, July 12, 2013

Friend to Friend

Today I went with probably the most complicated design of a card that I have done in awhile, many shapes and folds and little details made this quite the challenge.  While searching for today's card on Pinterest, I came across a blog for a creation called the "Double Punch Blossom," thankfully the blogger made a great tutorial video to demonstrate the process of creating this card.  As I feel the right words will elude me while I attempt to blog with my own take.  Either way I must give credit where it's due and link to the blog I found found this wonderful challenge, at the end of this post.

First, I had to cut a piece of of white paper to size at 4" by 12" and scored lines using a scoring board at 2", 4", 8", and 10" this way we have a window pane of sorts.  Next, I gently bent the card in half and lined up the creases 2" and 10" make then I placed my Blossom punch directly in the center of the score lines.  Then I had to cut two pieces of patterned paper to size at 2" by 4".  I glued them on each end of the white base.  After I glued them on, I used my punch again to cut out the paper that was hanging over.  It was kind of hard to line them up and I was afraid I was going to mess it up or something.  Then I stamped a flower for the center and cut it out using the punch again.  I punched out a 1" circle and stamped a design on it for the middle of the flower and I added a rhinestone to the center to add a little bling.  Then I folded my card up and used foam squares to make the flower pop out more.  Finally, I added "Friends to Friends" on the front of the card and in the inside "a friend is someone who makes it easier."  I know my words can't give this card justice, so I suggest watching the video (http://juliedavison.blogspot.com/2012/04/double-punched-blossom-card-tutorial.html)


Monday, July 1, 2013

Friendship

Today started bright and early with a morning run with my boyfriend, it was a workout that really drained me physically and by the end of the day teaching I was just as drained mentally!  Using a new stamp that I got from Stampin up last week, I did the simple effect of stamping it to paper and then punched around them to give nice separation between flower and the background.  I then created the purple lace bottom with my Silhouette with similar shapes to help mimic the flowers.  After looking at what I had I felt it was too bland so using adhesive squares it really popped off the page.  When placed as a complete work on the card stock, I knew it was meant to be.  For the word "friendship" I used a simple black sketch pen and a nice cursive font to draw attention to curves in each letter.  Large enough to be noticed, but also enough open space in the letters to give a free spirited feeling to the text.  Until next time, I float away to sleep and bid you farewell friends, time to unwind.