
Showing posts with label Sassy Salutations. Show all posts
Showing posts with label Sassy Salutations. Show all posts
Wednesday, February 12, 2014
Thank you for all of the support!
Unfortunately, last night was end my card a day streak. I had a really bad migraine when I got home from school and I end up in bed for 14 hour. Thankfully, it was gone in the morning so I could go to school. I am just thankful that I have people in my life that understand what I am going through and are their to support me when I have a rough day. There has been a lot of people that I have helped me get through this rough patch of migraines over the past year and I am greatly for all of them. If it wasn't for them, I don't know how I would have kept going through all of the bad days. I just want to say thank you and I am so very grateful that you are a part of my life. Tonight's creation is dedicated to everyone that has been there for me and is still there for me to this day. I won't be the person I am without all of you. Thank you! Until next time, happy carding everyone.

Tuesday, February 4, 2014
Rough Day
Today was one of those day where I should have just stay in bed all day. I wasn't feeling well to begin with, but then we received some bad news that one of my cousins past away. It was a blessing since she couldn't move or talk anymore, but it is still hard to hear. Her beautiful smile and personality will be greatly missed. Since I wasn't really feeling in the card creating mood so I just created a Thank You card. It doesn't really fit how the day ended, but I have great co-workers that let me cry on their shoulder after I heard the news. If it wasn't for them, I won't have made it though the last few hours of school. They are great people and I love how they come together when people really need them. Thank you to everyone that helped me make it through the afternoon today. It was greatly appreciated. Until next time, happy carding everyone.

Stampin UP Supplies: Rich Razzberry Cardstock & Ink, Coastal Cabana Ink, Melon Mambo Ink, Whisper White Cardstock, Sassy Salutations Stamp Set
Thursday, January 30, 2014
A Simple Card
Since I had to prepare for my shoe swap tomorrow night, I didn't have much time left over to create tonight's card. I settled on an easy card since I wanted to get to bed a little bit early. My simple card turned out great and I really like it. Sometimes the simple cards turn out the best. Just because it is simple doesn't mean it is any less of a card. It is still created from the heart and the person still joins the thought and effort put into it. I sometimes feel bad when I make an easy card since I know that I am not challenging myself, but I have to remember that I live a busy life and I can't always challenge myself everyday. On another note, I got another package from my Secret Sister today and I received a stamp set with coordinating punch that I have been wanting to buy for awhile now. Who knew getting "happy mail "would make going to the mailbox so much more exciting. Until next time, happy carding everyone.

Stampin UP Supplies: Whisper White Cardstock, Rich Razzleberry Cardstock & Ink, Petite Petals Stamp Set & Punch, Sassy Salutations Stamp Set, Pearls, Decorative Dots Embossing Folder
Friday, December 27, 2013
Thinking of You!
Today we received a Christmas card in the mail that didn't have good news in it so I decided to make a thinking of you card for my cousin. She has had it pretty rough for the past several years and can't seem to catch a break. I wanted to make her a card to let her know that we are thinking about her even if we are 400 miles apart. This card was pretty simple to make, but most thinking of you cards are pretty simple as well. I used the Swallowtail stamp to stamp the large butterfly onto a piece of white card stock. I then cut it down to size so it would fit onto my card base. Once that was finished, I stamped "Thinking of You" from the Sassy Salutations stamp set. I think the card turned out pretty neat even though it was simple to make. I hope this card will pick my cousin's spirits up a little bit and let her know that her family in Wisconsin is thinking about her in this difficult time. Until next time, happy carding everyone!


Sunday, November 24, 2013
Thank You!
Today I booked my first Stampin Up workshop so I thought I would make a simple Thank You card for the occasion. Never thought I would be booking workshops, but I am excited. Using my trimmer, I cut out the base and overlay for this card. I then used the Sassy Salutations and Regarding Dahlias to make the front of the card. There is a little more white space then I would have liked, but it still came out pretty good. This would be a great card to give to a customer after they purchased some products from me. Until next time, happy carding everyone.


Tuesday, November 19, 2013
Minnie Mouse
Tonight's creation is a Minnie Mouse for one of my best friend's niece. This card was pretty easy to make, but a lot of fun at the same time. Using my big shot, I made the bow and circles with the Gift Bow Bigz Die and Circle Framelits. Once all of the pieces were cut, I assembled the bow together. I then adhered the circles together to make it look like a Mickey Mouse head. To finish my card, I stamped "Happy Birthday" from the Sassy Salutation stamp set in white ink. This card turned out super cute. Making cards for children is a lot of fun since sky is the limit with them. They are interested in a lot of different things when they are younger. The hard part is just keeping up with everything, but my students at school help me out sometimes. Until next time, happy carding everyone.


Thursday, November 14, 2013
Dahlias
All week I have been preparing for the Craft Show on Saturday. I have made 90 cards in the past 6 days and it has been a lot of work, but I have enjoyed every minute of it. Making cards is a passion of my mine and it is a lot of fun. I hope that I can share my passion with people at the Craft Show. Tonight's creation was inspired/cased from Cynthia Millan, it is very similar but different at the same time. Let's discuss tonight's card.

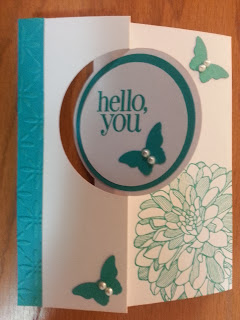

Using my trimmer, I cut a piece of card stock that would fit the thinlit. I then used the Circle Thinlit from Stampin UP to create the base of the card. The card stock was cut extra long so there was an extra flip for someone to write a message. Once the base was cut out, I punch out 2.5" and 2" circles. I then used the Regarding Dahlias stamp set to stamp the flower and "hello, you" onto the card. After the was finished, I punched out butterflies using the Bitty Butterfly Punch and placed two pearls in the center of them. Once everything was put together, I embossed the colored strip of paper and adhered it to the card. Even though this card was cased, it turned out wonderful and it has to be one of my favorite cards that I made this week. I could use this card for a few different occasions or to simply let someone know that I am thinking about them. Until next time, happy carding everyone.


Monday, November 11, 2013
Criss Cross Christmas Card
My new Silhouette has finally arrived and I am so excited to use it again. But I decided I want to create a criss cross card instead. There is something about using a different fold that I find a lot of fun. It makes the card more exciting for the person receiving it. Here are the intrusions if you want to recreate my creation (http://www.splitcoaststampers.com/resources/tutorials/criss_cross_card/). Time to go make more cards for the craft show and hopefully play with my Silhouette for a little bit. Until next time, happy carding everyone.

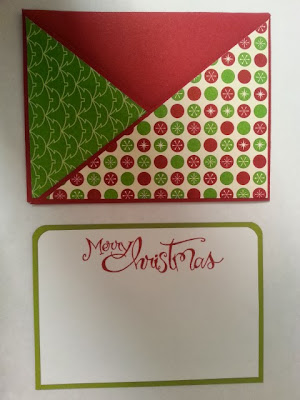

The card all put together.

The inside and outside of the card.
Sunday, October 27, 2013
Fall Leaves
Even though my Silhouette locked up on me last night, I decided I couldn't let it get me down today. It will either get fixed or I will have to buy a new one. Instead of sitting around doing nothing, I decided to rearrange my craft room. It didn't turn out exactly the way I wanted, but someday when we own a house, it will be prefect. For now though, this will have to do. Enough about my craft room and on wards with tonight's creation.

Tonight's creation was inspired from Pinterest. I pinned a card that was very similar to the one that I created and one of my co-workers wanted me to make it for her. Using my trimmer, I cut the base of the card and the two overlays. I made the second overlay an half of an inch smaller on both sides so that when I cut it in the three sections it lined up. Once they were cut, I used a dot stamp from the Beyond the Basics to create the yellow dots on the overlay. I then stamped three fall leaves randomly on the overlay using the Magnificent Maple in three different colors. To finish the overlay, I stamped "Thinking of You" from the Sassy Salutations stamp set. Once the overlay was complete, I cut the overlay into three 2" sections. I then placed them on the white overlay with about a 1/4" in between each section. This card turned out pretty neat. The background would have been easier if I would have had the Gorgeous Grunge stamp set, but I used what I had on hand. Until next time, happy carding everyone.

Friday, October 18, 2013
Christmas Bulbs!
It is finally Friday. I thought this day was never going to come, but it has finally arrived and I am ready for a very busy weekend. This week has been extremely long with meetings, parent-teacher conferences, and of course the day to day responsibilities of being a teacher. Even though this week has been exhausting, I have been looking forward to receiving more Stampin UP goodies. I even used a few of my new goodies on tonight's creations. Let's discuss tonight's creation.
Using my new Blossom Petals Punch, I punched out four small petals in primary colors to make the Christmas bulbs. I then used the Modern Label to punch out two separate black labels. Once that was done, I cut them into thirds so that I could use the two end pieces as the base of the bulbs. After the bulbs were completed, I used my Bird punch and punched out three branches in black. Then I removed the leaves to give it the appearance of a power cord. Once the string of lights were completed, I stamped "Merry Christmas" from the Sassy Salutations stamp set. Since there was a lot of white space I decided to stamp snowflakes random on the overlay until I was satisfied with it. This was not the card I planned on creating tonight, but when you talk on the phone for over an hour and play with your new goodies, time seems to get away from. This is a simple creation and the person receiving it will enjoy it none the less. Until next time, happy carding everyone!

Using my new Blossom Petals Punch, I punched out four small petals in primary colors to make the Christmas bulbs. I then used the Modern Label to punch out two separate black labels. Once that was done, I cut them into thirds so that I could use the two end pieces as the base of the bulbs. After the bulbs were completed, I used my Bird punch and punched out three branches in black. Then I removed the leaves to give it the appearance of a power cord. Once the string of lights were completed, I stamped "Merry Christmas" from the Sassy Salutations stamp set. Since there was a lot of white space I decided to stamp snowflakes random on the overlay until I was satisfied with it. This was not the card I planned on creating tonight, but when you talk on the phone for over an hour and play with your new goodies, time seems to get away from. This is a simple creation and the person receiving it will enjoy it none the less. Until next time, happy carding everyone!

Saturday, October 12, 2013
Mr. Potato Head
Today I was able to spend some quality time with my best friend in the whole world. As it turns out I received the best news I've had in a while, as she is moving back home in December! Who needs presents, when you have good friends that you can depend on. While spending time together for the first time in over 6 months we were able to reconnect and catch up on each others lives. While social media (mainly Facebook) is a nice way to keep track of friends, nothing matches meeting face to face. Onward with the creation for tonight, while browsing blogs yesterday I lucked out and found that one of blogs I subscribed to was offering this beautiful "Mr. Potato Head" SVG file. As he is a very creative individual, I was able to customize a lot of different features and in the next paragraph I will tell you how I did it!
Using my Silhouette, I cut out the different pieces that make up Mr. Potato Head. After putting him together, I decided that he needed something more and I cut out a birthday hat to go his head. Once Mr. Potato Head was completed, I then used my Silhouette to cut out some confetti and place it randomly around him. Using my Sassy Salutations stamp set, I stamped "Happy Birthday" onto the card. To make the stamp show up the way it does, I used my stamp markers to color the words individually and then cleaned the stamp to stamp the other word. This card did not turn out the way I envisioned since I cut Mr. Potato Head way to big and had to make a giant card for him. My nephew will enjoy this card for one of his birthdays and what kid doesn't like to receive an extra large card for their birthday. This card brought back memories from my childhood like it probably does for most people that had a Mr. or Mrs. Potato Head when growing up. Until next time, happy carding everyone!

Using my Silhouette, I cut out the different pieces that make up Mr. Potato Head. After putting him together, I decided that he needed something more and I cut out a birthday hat to go his head. Once Mr. Potato Head was completed, I then used my Silhouette to cut out some confetti and place it randomly around him. Using my Sassy Salutations stamp set, I stamped "Happy Birthday" onto the card. To make the stamp show up the way it does, I used my stamp markers to color the words individually and then cleaned the stamp to stamp the other word. This card did not turn out the way I envisioned since I cut Mr. Potato Head way to big and had to make a giant card for him. My nephew will enjoy this card for one of his birthdays and what kid doesn't like to receive an extra large card for their birthday. This card brought back memories from my childhood like it probably does for most people that had a Mr. or Mrs. Potato Head when growing up. Until next time, happy carding everyone!

Wednesday, October 2, 2013
Recipe for disaster
While I would consider last nights card a total failure, I know that between the pressure of my sinuses and the completion of an Ipad uninstall/reinstall it's been quite the week. These things have been weighing an extra load on me both mentally as well as psychically so I am definitely geared up and ready for the weekend once more. On the brighter side of things, some of my second graders are finally starting to digest what I am teaching. This was most evident today in class as one of them was able to complete a lesson in just over five minutes. Most impressive, and while I am trying to boast my teaching abilities it does make me feel that I am doing my job (which I will admit some days are harder to get through then others). Coming home and making a creation and writing this blog for you is a piece of meditation in itself, so onward with tonight's remarkable creation!
Tonight I decided to create an easy card, not only because I felt I've earned but because I needed to. Last nights castrophe of a card made me feel like I failed as a creative individual. But reminded by my friend Chris, that our failures are what we look back on and know how we've improved. I found the inspiration for this card by searching Pinterest after school, it took a couple tries to get it right so essentially I created two cards for this evening. Stamping out six flowers from the "Flower Shop" collection (a collection that I frequently use in my creations). Once the stamping was completed, I was able to use my punch and create the final product. Colorful flowers with flowers as unique as autumn foliage, it adds variety to the cards I create. Placing the flowers on the cards was simple as I used adhesive and evening spaced them, three to a card. Using a simple "thank you" placed in the center of the card above the flowers tonight's creation was complete. Simple, easy, not so remarkable but fun none the less to make; until next time happy carding everyone!


Tonight I decided to create an easy card, not only because I felt I've earned but because I needed to. Last nights castrophe of a card made me feel like I failed as a creative individual. But reminded by my friend Chris, that our failures are what we look back on and know how we've improved. I found the inspiration for this card by searching Pinterest after school, it took a couple tries to get it right so essentially I created two cards for this evening. Stamping out six flowers from the "Flower Shop" collection (a collection that I frequently use in my creations). Once the stamping was completed, I was able to use my punch and create the final product. Colorful flowers with flowers as unique as autumn foliage, it adds variety to the cards I create. Placing the flowers on the cards was simple as I used adhesive and evening spaced them, three to a card. Using a simple "thank you" placed in the center of the card above the flowers tonight's creation was complete. Simple, easy, not so remarkable but fun none the less to make; until next time happy carding everyone!


Sunday, September 29, 2013
Thinking of You!
Being able to relax was definitely the change of pace my body needed today, as my cold is progressively getting better I hope to feel even better for school tomorrow. After taking a nap (after all everyone else in apartment tends to sleep on Sunday), I decided to make another creation from Julie Davidson's blog. Keep reading or skip to the end, where I will post a link to the video for those who are interested.
Starting with two pieces of cardstock which are going to be used as the base of the card (a) I scored them at 1/4" on one side. Placing a piece of sticky strip on both of the scored ends, I then put the two pieces to the side to use later. Stamping a total of nine flowers (three of each design) I used my Pansy punch to give them the flower shape. It's very evident that I have been using my flower punches a lot lately as it doesn't take nearly as much time to line them up. Once the flowers were done, I used my trimmer to cut a piece of window sheet into the lengths were needed for this card. After the window sheet was done, I put adhesive onto the back of one flower and then place the window. Then using the same flower on top so that the flower can be viewed from both sides. I repeated this step three more times until I had all flowers for my card complete. Removing the backing on the sticky strip and then started lining up my flowers on the scored side of one piece of the cardstock. I had to make sure that the flowers weren't too close to the edge or they would stick out of the card. Once the flowers were in position, I removed the backing from the other piece of cardstock and affixed them together. This made my card base and when I opened up the card, the flowers were given the appearance as if they were floating in the air. I added a scalloped border on both sides of the folded part since they didn't line up quite right. This gave it an look of grass which really tickled my fancy as to how well that turned out. After the inside was complete, I added a 3" circle and three more matching flowers to the front of the card. When everything was adhered down, I stamped "thinking of you" from Sassy Salutations in the center of the circle and thus completing my card. I love how this card turned out. I am already started thinking about different themes that I could use for this card. Someone might be receiving a floating snowflake card for Christmas. Until next time, happy carding everyone.


Measurement Guide
(a) Base of the Card: 4.5" by 5.5" (2 pieces)
Link to the video tutorial: http://juliedavison.blogspot.com/2013/07/papillion-potpourri-floating-pop-up-card.html
Starting with two pieces of cardstock which are going to be used as the base of the card (a) I scored them at 1/4" on one side. Placing a piece of sticky strip on both of the scored ends, I then put the two pieces to the side to use later. Stamping a total of nine flowers (three of each design) I used my Pansy punch to give them the flower shape. It's very evident that I have been using my flower punches a lot lately as it doesn't take nearly as much time to line them up. Once the flowers were done, I used my trimmer to cut a piece of window sheet into the lengths were needed for this card. After the window sheet was done, I put adhesive onto the back of one flower and then place the window. Then using the same flower on top so that the flower can be viewed from both sides. I repeated this step three more times until I had all flowers for my card complete. Removing the backing on the sticky strip and then started lining up my flowers on the scored side of one piece of the cardstock. I had to make sure that the flowers weren't too close to the edge or they would stick out of the card. Once the flowers were in position, I removed the backing from the other piece of cardstock and affixed them together. This made my card base and when I opened up the card, the flowers were given the appearance as if they were floating in the air. I added a scalloped border on both sides of the folded part since they didn't line up quite right. This gave it an look of grass which really tickled my fancy as to how well that turned out. After the inside was complete, I added a 3" circle and three more matching flowers to the front of the card. When everything was adhered down, I stamped "thinking of you" from Sassy Salutations in the center of the circle and thus completing my card. I love how this card turned out. I am already started thinking about different themes that I could use for this card. Someone might be receiving a floating snowflake card for Christmas. Until next time, happy carding everyone.

Front of the Card

Inside of the Card
(a) Base of the Card: 4.5" by 5.5" (2 pieces)
Link to the video tutorial: http://juliedavison.blogspot.com/2013/07/papillion-potpourri-floating-pop-up-card.html
Tuesday, September 17, 2013
Rainbow Starbrust
Today was a much better day then yesterday. My pounding headache has put me in funk and left me without words to describe yesterday's creation. Best part of today was seeing smiles faces as they departed the classroom with a new bit of knowledge. Today, I taught them the home row. Being a teacher is great and the most rewarding part is knowing that I taught them something that they will use for many years to come. Enough about keyboarding and kids, time to discuss tonight's creation.
Tonight's card was inspired by a card that I found on Pinterest during my lunch break. Since I was feeling much better then yesterday, I decided to make today's card a little more extreme in color. I choose different pattern paper in various rainbow colors to make the brightest part of the card. Once the patterns were chosen, I cut them in 3" strips and then cut them diagonally from point to point which created a nice triangle shape. After I made six triangles, I placed them in order on the overlay that was ran trough my Xyron to apply adhesive to the whole thing. After the paper was placed on the overlay, I trimmed off the excess paper that was hanging over the edge. I then cut off 1 1/2" from the bottom of the overlay so that I had room on the card to stamp a salutation once the card was complete. Before completing the card, I had to stamp three flowers from the Flower Shop stamp set in colors that went with my starburst background. Once the flowers were stamped, I wanted for the ink to dry so it would not be smear and then I punched them out using the Pansy Punch. I then arranged them in the middle of the card overlapping in the middle so that "thank you" would fit in the middle by the flowers. Until next time, happy carding everyone.

Tonight's card was inspired by a card that I found on Pinterest during my lunch break. Since I was feeling much better then yesterday, I decided to make today's card a little more extreme in color. I choose different pattern paper in various rainbow colors to make the brightest part of the card. Once the patterns were chosen, I cut them in 3" strips and then cut them diagonally from point to point which created a nice triangle shape. After I made six triangles, I placed them in order on the overlay that was ran trough my Xyron to apply adhesive to the whole thing. After the paper was placed on the overlay, I trimmed off the excess paper that was hanging over the edge. I then cut off 1 1/2" from the bottom of the overlay so that I had room on the card to stamp a salutation once the card was complete. Before completing the card, I had to stamp three flowers from the Flower Shop stamp set in colors that went with my starburst background. Once the flowers were stamped, I wanted for the ink to dry so it would not be smear and then I punched them out using the Pansy Punch. I then arranged them in the middle of the card overlapping in the middle so that "thank you" would fit in the middle by the flowers. Until next time, happy carding everyone.

Monday, September 16, 2013
Thank you!
After a long day at school and coming home with a migraine, I decided that an easy card was in order. I searched my Pinterest board for a card sketch that caught my eye. I found one that was simpler to the card that I made, but I didn't included all of the elements that were in the sketch. But enough with the chitchat and let's discuss tonight's card.
When making this card, I picked out the overlay of the card first and then based the rest of the colors around it. Once the overlay was cut out, I decided on a dark gray card base. I then picked out three colors that went well with the overlay and stamped three flowers from the Flower Shop stamp set. After the ink was dried, I punched them out using the Pansy Punch. They did not line up perfectly, but after they were placed on the card you can't really tell that there is more white space in one area then another. Once the flowers were completed, I used my Silhouette to cut out a circle that the three flowers could be placed around. I then glued the flowers onto the circle and then onto the overlay. Using Sassy Salutations stamp set, I stamped "thank you" in the middle of the circle. Once the card was completed or so I thought, I decided that something was missing so I added rhinestones to the middle of each flower and thus my card was completed. As you can see, I didn't follow the sketch exactly, but it turned out remarkable anyway. Until next time, happy carding everyone!


Monday, September 9, 2013
Thank You!
After a shortened work with Labor Day taking away Monday last week, I wasn't quite sure what to expect going into another week of school. Turns out it was quite a manic Monday, keeping busy with meetings and a full day of teaching at school I had little time to myself when I got home. It seemed as quickly as I arrived home, I had to turn around and run back out the door to go to Baraboo. I was officially orientated as Stampin Up Demonstrator today, which while it was a time consuming process to learn new things after the day that was a Monday at school: I was thankful to be given the opportunity to learn something new. Enough of the chatter and onward with the skinny on tonight's remarkable creation.
Using my Silhouette, I cut out all the required pieces for the card. As this was the simplest part of tonight's creation I wonder what it would be like if I didn't have a Silhouette. My hands would ache, and I'm certain the blogs would be a lot shorter (thus hands aching from card cutting). Once the pieces were cut out I then used my butterfly stamp and made three equal butterflies to place on the card. After punching the butterflies I scored them down the middle to give them a more 3-D appearance to essentially let them flutter off the card into the summer night. I then used a custom cut light blue overlay and began placing them onto the card. While the final card was a modification of what I had envisioned through a card I pinned on Pinterest, I was quite satisfied with the results. There are few areas that I can see room for improvement, but for a 30 minute card it's not half bad if I do say so myself. Onto bed until next time, happy carding everyone :)

Using my Silhouette, I cut out all the required pieces for the card. As this was the simplest part of tonight's creation I wonder what it would be like if I didn't have a Silhouette. My hands would ache, and I'm certain the blogs would be a lot shorter (thus hands aching from card cutting). Once the pieces were cut out I then used my butterfly stamp and made three equal butterflies to place on the card. After punching the butterflies I scored them down the middle to give them a more 3-D appearance to essentially let them flutter off the card into the summer night. I then used a custom cut light blue overlay and began placing them onto the card. While the final card was a modification of what I had envisioned through a card I pinned on Pinterest, I was quite satisfied with the results. There are few areas that I can see room for improvement, but for a 30 minute card it's not half bad if I do say so myself. Onto bed until next time, happy carding everyone :)

Saturday, August 31, 2013
Thank You!
On yet another seasonally warm summer day, my fiance and I paid a visit to his parents house to assist in fixing his father's car. While the boys played outside, my future mother-in-law and I hung out inside enjoying every bit of air conditioning that we could get. So while the bulk of the day was spent inside, the afternoon hours grew into early evening I knew another simple card was in order. Recently I have been on a Pinterest kick finding all sorts of cool ideas to base my cards off of. It is a way to make things easier when someone else's creative gets my hamster wheel turning. Time to explain how I made tonight's creation.
Since I was feeling lazy after spending the day away from home, I decided to go with a per-cut card. Using my Mosaic punch, I punched out four colored designer paper ornaments. Now using a solid color paper, I then used my Bitty Butterfly punch. Once the butterflies took shape I used glue dots and placed them in the center of my multi-color ornaments. Then I attached the finished pieces to my base card evenly spacing them on the bottom in no particular order. To wrap up the card, I stamped "thank you" above the ornaments on the right side. I could have tied this card together with ribbon and bow, but I took the easy way out and now have a finished creation. Weather it is remarkable or not it is much like art "it in the eye of the beholder." Until next time, happy carding everyone!

Since I was feeling lazy after spending the day away from home, I decided to go with a per-cut card. Using my Mosaic punch, I punched out four colored designer paper ornaments. Now using a solid color paper, I then used my Bitty Butterfly punch. Once the butterflies took shape I used glue dots and placed them in the center of my multi-color ornaments. Then I attached the finished pieces to my base card evenly spacing them on the bottom in no particular order. To wrap up the card, I stamped "thank you" above the ornaments on the right side. I could have tied this card together with ribbon and bow, but I took the easy way out and now have a finished creation. Weather it is remarkable or not it is much like art "it in the eye of the beholder." Until next time, happy carding everyone!

Friday, August 30, 2013
Embroidered Blossom Card
Making the most of my last few days before school starts, I decided that I wanted to attempt a card with a bit more challenge then I have put myself up to as of late. Inspired by a YouTube video that I found on Pinterest, I found the card was cute and using a needle and thread give the card an extra personal touch. Instead of using yet another tool, as it seems every card I create requires something I don't have (except for time).

Using my Silhouette, I cut out the main components of the card (two overlays and a base). I then glued the purple overlay onto my card base. I punched a 1/4" hole on the top and the bottom of my card where I wanted to place the stem. After they were punched, I undertook the most challenging part of this card! Threading my needle with green string and placing it from the bottom of one hole and out through the other. In order for the string to stay in place after it went through the bottom hole, I placed a dimensional on the back and placed the end of the string on it. I wanted my stem to look thick so I repeated this process a total of four times. Once my stem was completed, I cut off the extra string and stuck the end to the dimensional. I then added four more dimensionals on the back of the overlay and placed it on top of the purple overlay. Next, I took my Blossom punch and did a total of three (two white and one purple) to make the flower appear layered. Once the blossoms were finished, I used my 1/4" hole punch and punched a hole where there was a petal. Using a dimensional on the back of the flower, I then threaded my needle with purple string which allowed me to create petals with an embroidered look (thus the blog title!) I came in from one of the outer petals and went across to the length of the petal on the opposite side. Repeating this process until the whole flower was complete. Once the flower was completed, I placed dimensional's on the back of the other white blossom and then glued the purple on top, once again turning to to give the effect of laying. I then added a few more more dimensional's to the embroidered flower and placed it on the card. After the flower was completed, I used my Silhouette to cut out a strip of grass and two leaves. Putting dimensional's on the grass and adhering it to the bottom of the card I then punched holes on each end of the leaves to stretch my thread across the length of the leaf. This time I did not put a dimensional on the back since it would have given it too much height. Instead I used mini glue dots to hold the two leaves in place. Once I was done embroidering, I stamped "Feel Better" from Sassy Salutations.
Here is the link to the tutorial (http://www.youtube.com/watch?v=xZ0ItIA4CxA#at=49) that I used to make this card just in case my steps are not clear enough. Until next time, happy carding everyone.

Measurement Guide
(a) Card Base: 7" by 10"
(b) Purple Overlay: 6.75" by 4.75"
(c) White Overlay: 6.5" by 4.5"
(d) Grass: 4.5" by 1.25"
Subscribe to:
Posts (Atom)