
Showing posts with label Big Shot. Show all posts
Showing posts with label Big Shot. Show all posts
Friday, January 3, 2014
You make me happy when skies are gray!
After looking at Pinterest for inspiration, I came across that was similar to the one I made tonight. I added my own little twist though so it was my own creation. Using my favorite stamp Flower Shop, I stamped two flowers and then punched them out. Also, I stamped the yellow overlay with yellow flowers from the Flower Shop stamp set. I then stamped the center flowers from the Petite Petals stamp set and punched them out with the coordinating punch. Using my stamp markers, I colored in the stamp from the See Ya Later stamp set. Once everything was stamped, I cut three strips that were 1", 3/4", and 1/2" thick, and cut them to look like banners. After my banners were adhered together, I used my Big Shot to cut out the white overlay with the Deco Framelit and I cut out the saying using a framelit from the Chalk Talk framelit collection. I then used my Big Shot to emboss the Deco shape using the Arrow Textured Impression Embossing Folder. This card turned out great. I love how everything came together. I am not usually a banner type of person when it comes to cards, but I am beginning to love them more and more. Until next time, happy carding everyone.


Wednesday, January 1, 2014
Happy 2014!
Wow, 2014. I still can't believe another year has past, but we have a lot doing on this year. One of my best friends is getting married in October and in March, I am welcoming my first nephew into the world. Plus we are planning our own wedding so it will be a busy, but exciting and fun year all at the same time. Well enough about what is going to happen this upcoming year and let's discuss the first creation in 2014.
Since today is the 1st day of the year, I decided to stamp "Make a Wish" from the Perfect Pennants stamp set, since everyone is setting their new goals/resolutions and making wishes for the upcoming year, onto a banner that I cut out using my framelits. Using my Big Shot again, I cut out the backing for the banner as using the next size banner framelit from the one that the stamp is on. Once the banners were done, I cut three 1" strips of paper of paper and then used my hexagon punch to make them look like banners. I then cut them down to the size that I wanted so that all three banners were visible at the bottom of the card. After that was finished, I adhered everything onto the overlay. This is one of the cards that I will be sending my Stampin UP Secret Sister this month and I think it turned out great. I hope she likes it just as much as I enjoyed making it. Until next time, happy carding everyone.

Since today is the 1st day of the year, I decided to stamp "Make a Wish" from the Perfect Pennants stamp set, since everyone is setting their new goals/resolutions and making wishes for the upcoming year, onto a banner that I cut out using my framelits. Using my Big Shot again, I cut out the backing for the banner as using the next size banner framelit from the one that the stamp is on. Once the banners were done, I cut three 1" strips of paper of paper and then used my hexagon punch to make them look like banners. I then cut them down to the size that I wanted so that all three banners were visible at the bottom of the card. After that was finished, I adhered everything onto the overlay. This is one of the cards that I will be sending my Stampin UP Secret Sister this month and I think it turned out great. I hope she likes it just as much as I enjoyed making it. Until next time, happy carding everyone.

Sunday, December 29, 2013
Another Happy New Year Card
Since New Year's is right around the corner and there are a few people I want to send card to, I decided to make another New Year's card. Also, Miss Kate Cuttables had a very cut "Happy New Year's" title today so I couldn't resist not using it. Using my Silhouette, I cut out all of the different layers for the title. After it was adhered together, I can the overlay through the Big Shot so the background was embossed stars. Once again, I love how this card turned out. It is super colorful and I hope that it will brighten the person's day who is receiving it. Until next time, happy carding everyone.


Wednesday, December 25, 2013
Last Christmas Card for the Year!
Today being Christmas in all, we spent the day with both of our families. It gets to be a little much, but unfortunately that is how it worked out this year. Even though it was a lot of eating, we had a lot of fun visiting with our families and everything. I got some really great presents that I wasn't expecting either, but those are the best kind. Enough about how our Christmas went, let's discuss tonight's creation.

Since Christmas is over now, I had to make one last Christmas card before I started making cards until about October or November next year. First, I stamped the Santa onto a piece of white cardstock. I then used my Big Shot and circle framelits to cut out the Santa along with another bigger circle for the border. Once that finished, I used my trimmer to cut out the card base, two overlays, and then the two overlays for the little saying. To finish the card, I stamped "He's making a list and checking it twice..." from the Santa's List stamp set. This card was pretty simple to make, but it was just what I needed after a long day of visiting and driving. I will miss making Christmas cards, but it is nice to focus on other themes that I have been neglecting since November. Until next time, happy carding everyone.

Merry Christmas Everyone!!!!
Tuesday, December 24, 2013
3D Paper Stars!
Today's creation looks like a simple card, but it was a little bit more work than just that. Using my Silhouette, I cut out three stars. Once the stars were cut out, I scored them the top of the point to the center of the star. I did this for each of the five points and then I fold on the score lines. After I fold all five points, I then took two of the points together and creased them. Again, I did this with all five points and this is what makes it a 3D star. I did find a video that I will post at the bottom of my blog. The directions are not exactly like the ones that I followed, but it will still be helpful. Once the 3D stars were finished, I punched out three smaller stars for the card. To finish the card, I used my Big Shot to cut out the word "Merry" with the expression thinlits and run the overlay through to emboss it with strips. I then stamped "Christmas" in the middle of one of the strips so it lined up with Merry. This card turned out great. I didn't know if the stars were going to turn out first, but they did. Until next time, happy carding everyone.


Video Tutorial: https://www.youtube.com/watch?v=l7Zm0wF3Pm8
Monday, December 23, 2013
Owl Christmas
Since my card was done so early today, I almost forgot to post it. Today's creation was inspired by Pinterest. Using my owl punch, I punch out the different pieces that I need for the owls. I then cut out triangles for their hats. I used my mini scalloped circle punch to decorate the hats a little bit more. Once the owls were finished, I cut out my overlay and then used my scallop edge border punch to give it a nice border. I then ran the other overlay through the Big Shot to make it look like wood. To finish my card, I stamped "Merry Christmas" onto a white piece of paper and punched it out with the word window punch. I then used my modern label punch for the background. This card turned out super cute. I love how adding the border to the card makes it pop a little bit more. Christmas is 2 days away and I don't know what I will do with myself after that since I have been making Christmas cards since November. Good thing there are other holidays. Until next time, happy carding everyone.


Thursday, December 19, 2013
Christmas Wreath
Tonight's inspiration came from Pinterest. Using my Mosaic punch and coordinating stamp set, I created the wreath for this card. I then ran part of the overlay through my Big Shot to emboss poinsettias on it. To finish the card, I stamped "Merry Christmas" on the green overlay of the card and attached a bow to the wreath. The wreath didn't turn out exactly the way I wanted it since I couldn't get the spacing right to save my life. Overall though, it turned out pretty good. Until next time, happy carding everyone.


Thursday, December 5, 2013
Penguin
Since one of my best friend's favorite animal is a penguin, I decided to make her a special Christmas card just for her. Using my Silhouette, I cut out the different layers of my penguin on ice. Once it was all cut out, I adhered him together. The penguin was much easier to assemble then the bear the other night. After the penguin was altogether, I embossed the overlay with snowflakes. This card turned out super cute and I know she is going to love it. Until next time, happy carding everyone.


Wednesday, December 4, 2013
Owls
Tonight I decided to finish my card order for three owl cards. I found my inspiration on Pinterest, but changed it to make it work with the tools that I had. Using my Big Shot, I cut two holes into the overlay with the circle framelits. Once those were cut out, I embossed the overlay to make it look like a tree. I then used my Owl Punch to punch out two owls and the different pieces to complete them. Once the owls were completed, I used dimensionals to raise the overlay up so that I the owls appeared to be in the tree looking at each other. After the card was completed, I felt that it was missing something so I used my Bird Punch and added some green leaves to it. This card is very cute. The owls may not be your traditional colors or patterns, but that is what makes it fun. Until next time, happy carding everyone.


Tuesday, November 19, 2013
Minnie Mouse
Tonight's creation is a Minnie Mouse for one of my best friend's niece. This card was pretty easy to make, but a lot of fun at the same time. Using my big shot, I made the bow and circles with the Gift Bow Bigz Die and Circle Framelits. Once all of the pieces were cut, I assembled the bow together. I then adhered the circles together to make it look like a Mickey Mouse head. To finish my card, I stamped "Happy Birthday" from the Sassy Salutation stamp set in white ink. This card turned out super cute. Making cards for children is a lot of fun since sky is the limit with them. They are interested in a lot of different things when they are younger. The hard part is just keeping up with everything, but my students at school help me out sometimes. Until next time, happy carding everyone.


Saturday, November 16, 2013
Gobble Gobble
Today was the craft show and it didn't go as well as I hoped. Everyone has their good and bad days at the craft show, you learn from it and move on. Besides the craft show, I spent the rest of the afternoon relaxing for the first in what seems like weeks. It was very nice and just what I needed after a long week. Enough about my day, let's discuss tonight's creation.
Tonight I decided to create a Thanksgiving card since I have been doing Christmas so much lately. The inspiration for this card came from Pinterest of course. I wanted to make the turkey so it stood out and wasn't like a normal one that you would see on a card. I used my scoring board to score a 1.5" strip of pattern paper. Once it was scored every 1/4", I fold it back and forth until it was finished. Instead of making it into a rosette, I made it into a fan for the turkey's feathers. I then used my Silhouette to cut out the different layers of the turkey body. After the turkey's body was adhered together, I glued it onto the fan. It looked a little weird at first since half of the body was floating in the air. I then embossed the white overlay with leaves using my Big Shot. After the card base was finished, I used my dimensionals to bring down his feet so they were attached to the base of the card and then used one by his head to keep it flat as well. After the turkey was adhered down, I created a banner for the bottom of the card where I stamped "Happy Thanksgiving." To get the ends of the banner somewhat perfect, I used one side of my hexagon punch to create the banner appearance. This card turned out very neat. It is different then traditional Thanksgiving cards that you see in the store, but that is what makes it unique. Until next time, happy carding everyone.

Tonight I decided to create a Thanksgiving card since I have been doing Christmas so much lately. The inspiration for this card came from Pinterest of course. I wanted to make the turkey so it stood out and wasn't like a normal one that you would see on a card. I used my scoring board to score a 1.5" strip of pattern paper. Once it was scored every 1/4", I fold it back and forth until it was finished. Instead of making it into a rosette, I made it into a fan for the turkey's feathers. I then used my Silhouette to cut out the different layers of the turkey body. After the turkey's body was adhered together, I glued it onto the fan. It looked a little weird at first since half of the body was floating in the air. I then embossed the white overlay with leaves using my Big Shot. After the card base was finished, I used my dimensionals to bring down his feet so they were attached to the base of the card and then used one by his head to keep it flat as well. After the turkey was adhered down, I created a banner for the bottom of the card where I stamped "Happy Thanksgiving." To get the ends of the banner somewhat perfect, I used one side of my hexagon punch to create the banner appearance. This card turned out very neat. It is different then traditional Thanksgiving cards that you see in the store, but that is what makes it unique. Until next time, happy carding everyone.

Thursday, November 14, 2013
Dahlias
All week I have been preparing for the Craft Show on Saturday. I have made 90 cards in the past 6 days and it has been a lot of work, but I have enjoyed every minute of it. Making cards is a passion of my mine and it is a lot of fun. I hope that I can share my passion with people at the Craft Show. Tonight's creation was inspired/cased from Cynthia Millan, it is very similar but different at the same time. Let's discuss tonight's card.

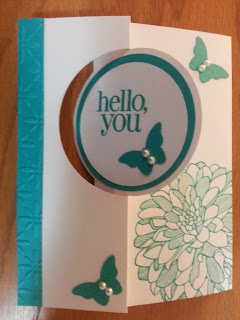

Using my trimmer, I cut a piece of card stock that would fit the thinlit. I then used the Circle Thinlit from Stampin UP to create the base of the card. The card stock was cut extra long so there was an extra flip for someone to write a message. Once the base was cut out, I punch out 2.5" and 2" circles. I then used the Regarding Dahlias stamp set to stamp the flower and "hello, you" onto the card. After the was finished, I punched out butterflies using the Bitty Butterfly Punch and placed two pearls in the center of them. Once everything was put together, I embossed the colored strip of paper and adhered it to the card. Even though this card was cased, it turned out wonderful and it has to be one of my favorite cards that I made this week. I could use this card for a few different occasions or to simply let someone know that I am thinking about them. Until next time, happy carding everyone.


Tuesday, November 12, 2013
Stampin UP Thinlits
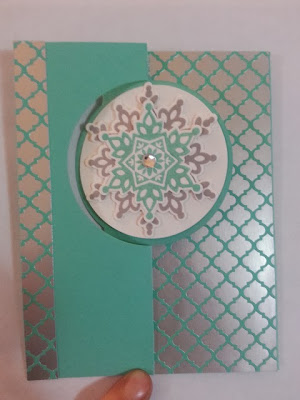
Using my thinlits from Stampin UP, I created tonight's creation. I made the paper extra long instead of the recommend size so that it had an extra flip for someone to write a nice Christmas message. It turned out pretty neat with the Christmas designer paper and the festive flurry snowflakes. Until next time, happy carding everyone.

Thursday, November 7, 2013
Simple Festive Flurry
Today was crazy busy with everything that I had to do at school and after school. Thankfully I didn't get another migraine so I could actually do what I need to get done. After returning home, I decided that it was going to make a simple card since I wanted to go bed at a decent time. Tonight's card was cased from a picture I saw on Stampin' Connections. Since the colors went so well together, I didn't want to change it. Enough about my day and inspiration and let's discuss tonight's creation.
Using my trimmer, I cut out the different card base and the different overlays needed. I then proceeded to stamp the snowflakes from the Festive Flurry stamp set onto white card stock. To cut them out, I used my Big Shot with matching framelits. After everything was cut out, I assembled the card together and stamped "Merry Christmas" on the bottom of the white overlay. I love absolutely love how tonight's card turned out. Until next time, happy carding everyone.

Using my trimmer, I cut out the different card base and the different overlays needed. I then proceeded to stamp the snowflakes from the Festive Flurry stamp set onto white card stock. To cut them out, I used my Big Shot with matching framelits. After everything was cut out, I assembled the card together and stamped "Merry Christmas" on the bottom of the white overlay. I love absolutely love how tonight's card turned out. Until next time, happy carding everyone.

Sunday, November 3, 2013
Another Snowman!
Today has been a very productive day for me. I have created four cards and that includes the creation for today's blog. On top of being creative I also made pasta salad and washed the sheets (mind you it's Sunday and only 3 p.m.) We should set our clocks back an hour more often as I wish I could be this productive all the time. It helped that I had a friend coming over so that motivated me as well so I wasn't worrying about my card after he went home. But enough about my day and onward with the blog.
This card is a little bit out of my comfort zone since I usually have an overlay on my card base. Cutting a piece of designer paper that was about 2" thick for the top of the card I then cut out the deco label and the word "Merry" from the Deco Label Framelits and Expression Thinlits. These items are very unique in shape and without my trust Big Shot (as the Silhouette is out for repair) I was able to create them with ease. Then I stamped my snowman onto the label using colors that matched with the strip of paper at the top of the card. Once that I was completed, I adhered everything together. I felt like something was missing so I took one of my Merry Christmas stamps and only colored in the word "Christmas." After it was stamped onto a piece of white paper, I cut around the edges so it had the same about of white on all sides. Using my scissors, I cut a triangle off one end to make it look like a banner. I am not exactly sure how I feel about tonight's creation, but it turned out pretty well. It is a little bit different not using an overlay, but I need get out of my shell and be more creative. This will help me grow as a card maker and expand my card collection that much more as well. Until next time, happy carding everyone.

This card is a little bit out of my comfort zone since I usually have an overlay on my card base. Cutting a piece of designer paper that was about 2" thick for the top of the card I then cut out the deco label and the word "Merry" from the Deco Label Framelits and Expression Thinlits. These items are very unique in shape and without my trust Big Shot (as the Silhouette is out for repair) I was able to create them with ease. Then I stamped my snowman onto the label using colors that matched with the strip of paper at the top of the card. Once that I was completed, I adhered everything together. I felt like something was missing so I took one of my Merry Christmas stamps and only colored in the word "Christmas." After it was stamped onto a piece of white paper, I cut around the edges so it had the same about of white on all sides. Using my scissors, I cut a triangle off one end to make it look like a banner. I am not exactly sure how I feel about tonight's creation, but it turned out pretty well. It is a little bit different not using an overlay, but I need get out of my shell and be more creative. This will help me grow as a card maker and expand my card collection that much more as well. Until next time, happy carding everyone.

Saturday, November 2, 2013
Origami Christmas Tree
What a day! It couldn't have went better if I asked. We went to look at the venue for our wedding since it is booking up fast. Even though everything was died, we still fell in love with the place and booked it for June 13th, 2015. They have a lot of projects that want to get down so who knows how it will look come 2015. Non the less, we are super excited to have one thing checked off our list. Enough about the venue and onto tonight's remarkable creation.
Being a person that likes to try new things, I decided tonight was the night to create an origami Christmas tree. After watching a video (which I will post at the bottom of my blog), it was quite easy to make. It looks a lot more complicated then it really is. I started with cutting out four squares that were all different sizes. I then folded each square from one point to the other point and then did the other side as well. I then folded it in half one way and then in half the other way. Using my bone folder, I made sure the folds were creased very well. Once the paper was folded, I pushed in the middle lines on both sides to make a triangle. I then took one of the sides and fold into the center where the middle line is and repeating this on both sides. Once all of the squares were completed, I stacked them to create the tree. After my Christmas tree was created, I punched out a star using my Creative Memories for the top of the tree. This card turned out pretty cool even though it is not perfectly lined up. Even my cat thought it was cool since she tried running off with the pieces several times. Until next time, happy carding everyone.

Measurement Guide
(a) Square: 3" by 3"
(b) Square: 2.5" by 2.5"
(c) Square: 2" by 2"
(d) Square: 1.5" by 1.5"
(e) Card: 5.5" by 4.25"
(f) Overlay: 5.25" by 4"
Video: http://penguinstamper.blogspot.com/2011/12/origami-christmas-tree.html
Being a person that likes to try new things, I decided tonight was the night to create an origami Christmas tree. After watching a video (which I will post at the bottom of my blog), it was quite easy to make. It looks a lot more complicated then it really is. I started with cutting out four squares that were all different sizes. I then folded each square from one point to the other point and then did the other side as well. I then folded it in half one way and then in half the other way. Using my bone folder, I made sure the folds were creased very well. Once the paper was folded, I pushed in the middle lines on both sides to make a triangle. I then took one of the sides and fold into the center where the middle line is and repeating this on both sides. Once all of the squares were completed, I stacked them to create the tree. After my Christmas tree was created, I punched out a star using my Creative Memories for the top of the tree. This card turned out pretty cool even though it is not perfectly lined up. Even my cat thought it was cool since she tried running off with the pieces several times. Until next time, happy carding everyone.

Measurement Guide
(a) Square: 3" by 3"
(b) Square: 2.5" by 2.5"
(c) Square: 2" by 2"
(d) Square: 1.5" by 1.5"
(e) Card: 5.5" by 4.25"
(f) Overlay: 5.25" by 4"
Video: http://penguinstamper.blogspot.com/2011/12/origami-christmas-tree.html
Friday, November 1, 2013
Christmas Stamp-a-Stack
Tonight was such a blast. I couldn't have asked for a better group of people to send 3 hours with creating Christmas cards. It is amazing what you learn from other people that seems so simple, but yet it isn't something you would have thought of. Like last time, I learned a new trick that just amazed me since I didn't think of it before. Instead of using a whole sheet of paper for an overlay, she just cut 2" strips for the edges so that it looked like there was an overlay underneath. It is the little things that just have me in aww lately. Since the cards were pre-cut for me and scored, I won't go into much detail about the cards, but if you have any questions, please don't hesitate to e-mail me. Let's discuss tonight's five creations.
Creating these five cards was a lot of fun since we got to use so many different tools that Stampin UP has to offer. Besides the tools, we got to use a lot of the new holiday stamp sets as well. Just when I thought I was done ordering from the Holiday catalog, I found more things that I want to get now. It was just cool to see how many different tools and stamps you could use for just one card. Until next time, happy carding everyone.


Creating these five cards was a lot of fun since we got to use so many different tools that Stampin UP has to offer. Besides the tools, we got to use a lot of the new holiday stamp sets as well. Just when I thought I was done ordering from the Holiday catalog, I found more things that I want to get now. It was just cool to see how many different tools and stamps you could use for just one card. Until next time, happy carding everyone.


My Personal Favorite


Thursday, October 31, 2013
Happy Halloween!
Halloween is about craving pumpkins, dressing up, and going trick or treating. The kids at school were super excited to dress up tonight in their costumes and get lots of candy. I am not completely sure their stomachs have recovered from all of the goodies that they ate at school, but I know that won't stop them from eating more candy. Tomorrow they will all be crashing from their sugar high. Enough about Halloween and my student's, let's discuss tonight's creation.
Since it is Halloween, I decided to take a break from Christmas cards and create a card in honor of the holiday. Using my Big Shot, I used my Deco Label Framelits to create the two overlays. Once those were cut out, I stamped the pumpkin on the white overlay and then stamped on the face. I then stamped the hat and star on separate piece. After they were dry, I used my scissors to cut them out. Cutting out stamps is not that bad as I thought it was going to be. My fiance asked why I don't cut out more stamps since it looked so great. I then adhered the hat and star on top of the pumpkin. Finishing my card, I stamped "Happy Halloween" on the bottom. Even though I got called the Grinch of Halloween since I didn't hand out candy tonight, I still enjoyed the holiday and can't wait to celebrate it with a child of my own one day. Until next time, happy carding everyone!

Since it is Halloween, I decided to take a break from Christmas cards and create a card in honor of the holiday. Using my Big Shot, I used my Deco Label Framelits to create the two overlays. Once those were cut out, I stamped the pumpkin on the white overlay and then stamped on the face. I then stamped the hat and star on separate piece. After they were dry, I used my scissors to cut them out. Cutting out stamps is not that bad as I thought it was going to be. My fiance asked why I don't cut out more stamps since it looked so great. I then adhered the hat and star on top of the pumpkin. Finishing my card, I stamped "Happy Halloween" on the bottom. Even though I got called the Grinch of Halloween since I didn't hand out candy tonight, I still enjoyed the holiday and can't wait to celebrate it with a child of my own one day. Until next time, happy carding everyone!

Friday, October 25, 2013
Double Slider Card
Since I have created clean and simple cards this week, I decided to create a card that I haven't created yet for this project. It is called the Double Slider Card. It looks complicated, but if you read the directions before starting, you will have no problem putting it together. Instead of boring you will every direction, I will attach the instructions at the bottom of my blog. This remarkable creation was a lot of fun to make and I will be using it for several different occasions in the future. Creating this card was just what I needed after a very overwhelming day of meetings at school. Until next time, happy carding everyone.


Front of the Card

Card Slide Open
Wednesday, October 23, 2013
Presents!
Today started out slow, but by the time school was out it seemed to pick up stream. While I had grand plans to do a very remarkable (and rather elaborate one at that), I felt it was in my best interest to take it easy tonight. While tonight's creation uses elements I've used over the last few months, it seems only fitting that it all comes together nicely for this Christmas card. Enough wit the excuses already let's get down to business explaining tonight's card.
Using my trimmer, I cut out all of the elements besides the bows for the presents. I used a flower punch for the bows and then placed a rhinestone in the middle. After everything was cut out, I embossed the white overlay with snowflakes using my Big Shot. Once that was done, I adhered everything to the card and then stamped "Happy Holidays to you & yours" from the Joy to the World stamp set. I absolutely love this card. It was quite simple to make, but it pops off the paper well. Until next time, happy carding everyone.

Using my trimmer, I cut out all of the elements besides the bows for the presents. I used a flower punch for the bows and then placed a rhinestone in the middle. After everything was cut out, I embossed the white overlay with snowflakes using my Big Shot. Once that was done, I adhered everything to the card and then stamped "Happy Holidays to you & yours" from the Joy to the World stamp set. I absolutely love this card. It was quite simple to make, but it pops off the paper well. Until next time, happy carding everyone.

Measurement Guide:
(a) Solid Square: 1.5" 1.5"
(b) Patterned Square: 1.25" by 1.25"
(c) Strip: .25" by 1.5"
(d) Green Overlay: 4" by 2.25"
(e) Small White Overlay: 3.75" by 2"
(f) White Overlay: 6.75" by 4.75"
(g): Card Base: 10" by 7"
Subscribe to:
Posts (Atom)