
Showing posts with label Christmas Tree. Show all posts
Showing posts with label Christmas Tree. Show all posts
Friday, December 20, 2013
Punch Art Christmas Tree
Once again, my inspiration for tonight's creation came from Pinterest. Using my Creative Memories heart punch, I punched out 11 hearts. After I laid them out, I decided they didn't pop off the card enough so I used my ink dauber and went around the edges of the heart. I then punched out a modern label and cut it in half for the stump. I adhered the modern label on the back of one of the hearts. I then adhered the hearts to the overlay to make it look like a Christmas tree. After my tree was finished, I punched out a star using my Creative Memories star punch in yellow glitter paper. To finish the card, I punched out little scalloped circles to put on the tree. This card turned out pretty cool. Who would have known how many different things you can make with punches. The more punch art I do, the more I can't wait to order all of my punches in January. Until next time, happy carding everyone.

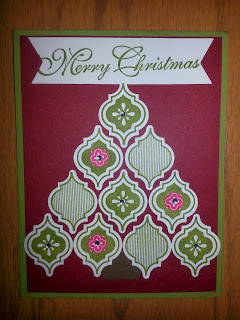
Monday, December 16, 2013
Mosaic Christmas Tree
Tonight's creation was made with a few different punches. To make the Christmas tree, I used the Mosaic Punch with coordinating stamp set. I then used the hexagon punch to make the trunk of the tree by only punching out half of a hexagon. To finish the card, I cut a strip of paper and to make it look like a banner, I used the hexagon punch again for the ends. This card didn't completely turn out the way I would have hoped, but it turned out none the less. Until next time, happy carding everyone.

Saturday, November 2, 2013
Origami Christmas Tree
What a day! It couldn't have went better if I asked. We went to look at the venue for our wedding since it is booking up fast. Even though everything was died, we still fell in love with the place and booked it for June 13th, 2015. They have a lot of projects that want to get down so who knows how it will look come 2015. Non the less, we are super excited to have one thing checked off our list. Enough about the venue and onto tonight's remarkable creation.
Being a person that likes to try new things, I decided tonight was the night to create an origami Christmas tree. After watching a video (which I will post at the bottom of my blog), it was quite easy to make. It looks a lot more complicated then it really is. I started with cutting out four squares that were all different sizes. I then folded each square from one point to the other point and then did the other side as well. I then folded it in half one way and then in half the other way. Using my bone folder, I made sure the folds were creased very well. Once the paper was folded, I pushed in the middle lines on both sides to make a triangle. I then took one of the sides and fold into the center where the middle line is and repeating this on both sides. Once all of the squares were completed, I stacked them to create the tree. After my Christmas tree was created, I punched out a star using my Creative Memories for the top of the tree. This card turned out pretty cool even though it is not perfectly lined up. Even my cat thought it was cool since she tried running off with the pieces several times. Until next time, happy carding everyone.

Measurement Guide
(a) Square: 3" by 3"
(b) Square: 2.5" by 2.5"
(c) Square: 2" by 2"
(d) Square: 1.5" by 1.5"
(e) Card: 5.5" by 4.25"
(f) Overlay: 5.25" by 4"
Video: http://penguinstamper.blogspot.com/2011/12/origami-christmas-tree.html
Subscribe to:
Comments (Atom)