Thanksgiving is only 75 days away, so I decided there was no better time then the present to start making Turkey Day theme cards. With more unseasonable temperatures it felt more like summer and less like fall today. While I enjoy many parts of summer I look forward to cool fall days (mainly because I have no AC in my classroom like I said yesterday). Somehow over the years of my youth, the turkey has been transformed into quite a character weather pilgrims hat or plethora of colors on his tail feathers. Enough chit chat and onto the gobble.
Tonight I used my Silhouette to cut the different layers of the turkey. After all of the layers were cut out, the turkey needed some dressing. Dressing the turkey was not the easiest tonight since he had multiple layers that overlapped with one another and they needed to be placed just right. Once the turkey was finished, I used my trimmer to cut a custom overlay to fit the pre-made cards that I am trying to use up. After the overlay was cut out, I ran it through my Cuttlebug and embossed fall leaves onto the background. Then completing my card, I complied the pieces together to give an overall feeling of completion to the card. Until next, happy carding!
Showing posts with label Cuttlebug. Show all posts
Wednesday, September 11, 2013
Tuesday, September 10, 2013
HEAT WAVE!!
Today was blistering, record breaking heat across the state caused for many unhappy students as well as unhappy teachers at school. As the building I teach in is out of date, unfortunately the amenities such as air conditioning do not exist; and we are left to bake like cookies for Christmas. Ohh a September snowfall sounds wonderful right about now, minus all the traffic and other issues associated with it (just the cold will do for me). As if the heat wasn't enough, my fiance made me run in the scorching heat after he got home from work. Alas nothing a good shower can't wash away, after teaching and running all day I was left burnt not only by the sun but the physical activity today gave me. A quick simple card was in store, but as you will find from reading this blog, it was more then I had bargained for!
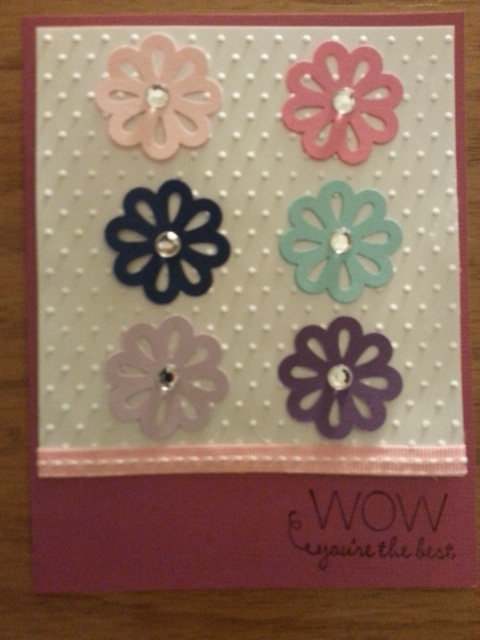
I decided to go with a pre-made card since I am trying to use them up. I don't really need them when I can custom cut my own, but at the same time I don't want them to go to waste. After I picked the color of my pre-made card, I picked out the other elements for my card. I chose three colors that went well together and then found a lighter shade of the colors. I then punched out six different colored flowers and once they were completed I added rhinestones to the middle. I then cut out my overlway, when this was completed I embossed it to make it pop more. Then adding some ribbon to the card, I thought about adding a bow. Unfortunately the bow didn't turn out the way I wanted so I decided against it and will save it for another day. Once the ribbon was in place, I glued the flowers onto the card trying to keep them equally spaced in distance from one another. I then glued the base onto the overlay and my card was almost complete. I used the Friendly Phrase set to stamp "WOW you're the best." but just when I thought I was done, it appeared that I had stamped the phrase upside down. So I had to remove the overlay from the card with extra care so it wouldn't rip. Finally getting out another I glued the overlay back on. This time I doubled checked to make sure the stamp was facing the right direction and thus the card was complete. Until next time, happy carding everyone!
Monday, September 9, 2013
Thank You!
After a shortened work with Labor Day taking away Monday last week, I wasn't quite sure what to expect going into another week of school. Turns out it was quite a manic Monday, keeping busy with meetings and a full day of teaching at school I had little time to myself when I got home. It seemed as quickly as I arrived home, I had to turn around and run back out the door to go to Baraboo. I was officially orientated as Stampin Up Demonstrator today, which while it was a time consuming process to learn new things after the day that was a Monday at school: I was thankful to be given the opportunity to learn something new. Enough of the chatter and onward with the skinny on tonight's remarkable creation.
Using my Silhouette, I cut out all the required pieces for the card. As this was the simplest part of tonight's creation I wonder what it would be like if I didn't have a Silhouette. My hands would ache, and I'm certain the blogs would be a lot shorter (thus hands aching from card cutting). Once the pieces were cut out I then used my butterfly stamp and made three equal butterflies to place on the card. After punching the butterflies I scored them down the middle to give them a more 3-D appearance to essentially let them flutter off the card into the summer night. I then used a custom cut light blue overlay and began placing them onto the card. While the final card was a modification of what I had envisioned through a card I pinned on Pinterest, I was quite satisfied with the results. There are few areas that I can see room for improvement, but for a 30 minute card it's not half bad if I do say so myself. Onto bed until next time, happy carding everyone :)
Labels:
bitty butterfly punch,
Card making,
card making ideas,
cards,
creative,
cut out,
Cuttlebug,
design,
homemade cards,
Sassy Salutations,
scrapbooking,
scrapbooking ideas,
silhouette,
Stampin Up,
stamping
Sunday, September 8, 2013
Penguins
Although Christmas is three and a half months away, it is never to early to start working on Christmas cards for family and friends. Each year I have to mail out about 50 to 60 cards plus make ones for the gifts that we give out. So I have a lot of cards to make and waiting until the last minute just doesn't work that well. It's more stressful and my creativity meter goes way down, leaving no fun for me. I've decided to start early so that I will have lots of different designs to mail out (maybe each person will have their own remarkable creation). Enough about how many cards I need to mail out and onto the creation portion of this evenings card.
Since my card from last was quite simple, I decided to use a new technique that I found on Pinterest. Getting the most boring part of the creation out the of the way (cutting out the base and overlay), I then picked out an embossing folder that went along with my Christmas theme. I wanted to give the overlay a little dimension so I added light blue ink to the side that the embossing popped off the page. After the folder was inked, I placed the white overlay on top of the ink and closed the folder. I then ran it through my Cuttlebug to emboss the paper and put the ink on the embossing at the same time. Once that was complete, I put that overlay to the side so it could dry while I created my penguins. Using my Silhouette, I cut out the different layers for these cute birds that are perfect for the Christmas theme. Once all the layers were cut out, I used a glue stick to adhere them. After my penguins were put together, I attached the overlay to the base of my card and then placed the penguins on after that. The technique I used tonight didn't come out exactly like I had envisioned it, but that is what the experience is for. Of course repetition will also help me master this technique and in time I may become perfect at it. Stay cool/warm wherever you are reading this from, until next time happy carding everyone!
:)
Since my card from last was quite simple, I decided to use a new technique that I found on Pinterest. Getting the most boring part of the creation out the of the way (cutting out the base and overlay), I then picked out an embossing folder that went along with my Christmas theme. I wanted to give the overlay a little dimension so I added light blue ink to the side that the embossing popped off the page. After the folder was inked, I placed the white overlay on top of the ink and closed the folder. I then ran it through my Cuttlebug to emboss the paper and put the ink on the embossing at the same time. Once that was complete, I put that overlay to the side so it could dry while I created my penguins. Using my Silhouette, I cut out the different layers for these cute birds that are perfect for the Christmas theme. Once all the layers were cut out, I used a glue stick to adhere them. After my penguins were put together, I attached the overlay to the base of my card and then placed the penguins on after that. The technique I used tonight didn't come out exactly like I had envisioned it, but that is what the experience is for. Of course repetition will also help me master this technique and in time I may become perfect at it. Stay cool/warm wherever you are reading this from, until next time happy carding everyone!
:)
Subscribe to:
Posts (Atom)