
Sunday, June 30, 2013
Happy Birthday!
Sunshine and the fourth of July, two things I look forward to after the school year is done. We must not forget those with birthdays in the summer, so a fitting card for all summer celebrations. Using a new technique called sunburst, the cards life begins as a circle in the center. To emulate the sun rays I cut rectangle pieces of paper diagonally, and then meticulously placed the sharp end of the newly created triangles into the center of the circle. Alternating colors and paper design give the card a real burst of life. After securing all pieces into place, I then trimmed the left over paper off the edges. Leaving me with a fantastic patterned sunburst. Using my Silhouette, I printed the "happy birthday" text and then embossed with a darker border to help separate the text form the burst. Effective and unique, even a little remarkable if I do say so myself. Happy carding everyone. :)

Saturday, June 29, 2013
Happy Birthday!
As far back as I can remember I've always loved the zoo, so many cool unique animals. So when I decided to create a "happy birthday" them card, I thought of all the different one of a kind creatures and picked one of tall stature. Rising taller then any other animal in the zoo makes for a card as neat as the giraffe.
Following a design I found on Pinterest, with my new punches and the ever reliable Silhouette I began the tedious task of creating the giraffe. I had to be careful not to mess up the proportions between legs/torso/neck and head. Giraffes are the curiosity of the zoo, such a long neck and long legs to boot. I almost felt like I was creating a new creature while sizing up and affixing the legs to the torso. Getting the pieces placed down with glue, I had to keep the card at arms lengths to keep everything in order. While the final card may not be a 100% match to my vision, the only thing my design and creativity can do is go up. (Much like the neck of a growing giraffe.)

Following a design I found on Pinterest, with my new punches and the ever reliable Silhouette I began the tedious task of creating the giraffe. I had to be careful not to mess up the proportions between legs/torso/neck and head. Giraffes are the curiosity of the zoo, such a long neck and long legs to boot. I almost felt like I was creating a new creature while sizing up and affixing the legs to the torso. Getting the pieces placed down with glue, I had to keep the card at arms lengths to keep everything in order. While the final card may not be a 100% match to my vision, the only thing my design and creativity can do is go up. (Much like the neck of a growing giraffe.)

Friday, June 28, 2013
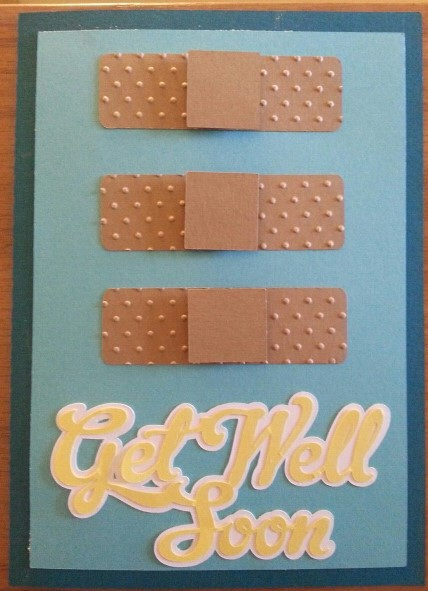
Get Well Soon!
My friend who is doing the same card project as I was suppose to come visit this weekend but unfortunately she was a bit under the weather so she had to postpone her plans to come and visit. So I decided to make a get well card for her, to let her know that even if she isn't her with me creating a card; she is at least here in spirit. Using my Silhouette I was able to create all the elements of the card, the text and band aids included. I felt that using a lighter color theme would help accentuate the feeling better or the "get well" portion to the recipient. Band aids have always signified the "get well" feel for me through out the years, although they can't always heal what ails us I am always remind of getting better soon. Using my Cuttlebug, I embossed the paper to make it stand out a bit more, and found using foam adhesive squares for the center of the band aids really made them pop nicely.

Thursday, June 27, 2013
Thinking of You
Today I had the hope of going to Mt. Olympus with my friend, unfortunately due to some things out of our control, we ended up not going. Probably a good thing though since we would have gotten rained out for a small portion of it. To let her know I was thinking of her on this humid/wet day, I created this fitting "thinking of you card. Using my Silhouette, I cut out the card and the borders and then triple layered the stamps. Putting my newly acquired stamps to use, I applied to white card stock. When doing this unique technique, I had to make sure to not make the teal borders too large or else the stamping would not display as well. Each layer gives a frame within a frame feel, to prefecture execute triple layering. I hope that everyone is enjoying summer (at least here in the Northern Hemisphere). Stay cool, stay dry, and happy carding. :)


Wednesday, June 26, 2013
Happy Birthday!
I am happy to say that my defective punches were returned and as luck may have it I received my new punches in the mail today. It was great to be able to put them to use right way, and I look forward to more experimentation in the coming weeks. This card would be perfect for a birthday for either a boy or girl, but it order to keep the front less cluttered I will hand write in "Happy Birthday" with other text at a later date.

Tuesday, June 25, 2013
Thinking of You
Sometimes inspiration comes natural and sometimes I must rely on other sources to help me do so. Today I searched through the Silhouette Online Store, I found a new item yet to be included in my creations. Today I found "sketch pen images," being that I have never been much for an artist with a pen I decided to purchase a floral design. There were lots of very intricate details which took what seemed like forever to to print, honestly just like the only saying "I'd rather watch paint dry" rang very true. Thankfully sketch pens are effective and neat, completing the card with a simple "thinking of you" at the bottom with a clear-mount stamp.


Monday, June 24, 2013
Thank You
Today I wasn't satisfied with the original card I created for you to see, so out with the old and in with the new. Although I was not on a time crunch to get my card totally finished, Monday's are always a rough day for me. After a long weekend soaking up the sun (I wish), it's hard to come back to reality and find myself back to work. But such is life and the more things change the more they stay the same. Simplicity was key for a quick card today, going with purple boxes complimented by lighter border. I did alternate this only to not create too much of a checkerboard look and to give separation between the squares. A simple white card and stamping "thank you" placed bottom right corner completed one of these easier cards I've made in a while.
.jpg)
.jpg)
Sunday, June 23, 2013
Sympathy Card
Family friends are always hard to lose but as with the blog a few days ago sympathy cards are a fact of life. Today I used a design that was to be put on the back burner with the hopes that I wouldn't have to create another sympathy card for a while. But as it so happens, I needed to make one for a family friend who recently had a bit of a heartbreak. Using my Silhouette I cut out the "butterfly tree" and place it on white card stock with a purple backing card. Soothing colors are a must for sympathy cards, to relax the mood of those receiving. Using my Sketch Pen, I wrote With Sympathy on the bottom of the card. Over complicating a card for an event such as this is not a good idea, as the card is to offer condolences.


Saturday, June 22, 2013
Thank You Card
Today I awoke early for a rummage sale to pick up some items I had seen advertised online for a real bargain. Unfortunately by the time I had arrived (when the sale was supposed to start) there were plenty of people who had put there hands all over it. I didn't leave empty handed, but I was feeling slightly disappointed in myself for not getting the items I wanted. Alas rain on the way home, my spirits were crushed for the hopes of going to the water park for a second day in a row seemed to be doomed. The closer I got to home, the better the weather became and eventually the sun came out and I was able to spend the afternoon getting a burn and enjoying some waves.

But being at the water park all day, I found myself very burnt in both ways as a sunburn and physically drained. After a late night grocery shopping combined with a late dinner, I decided on a design I'd seen executed via another fellow carder. My take on this design was instead of stamping on three separate layers attached to one card, I used my Silhouette Sketch Pens to draw the design on three different panels of paper. Once they were completed, I used the Silhouette again to cut out a backing border of a darker color to compliment the sketches. The final product resulted in a "three layered stamping card" with simple text in the middle. I feel that the the borders as well as the sketches complete this very effectively, drawing the viewers eyes to the center of the card.

Friday, June 21, 2013
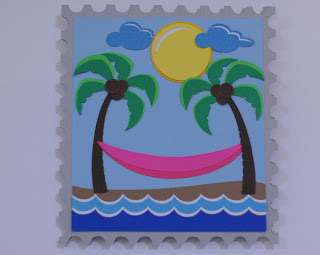
Summer Celebration Card
Today is the summer equinox also known as the longest day of the year! While my friend Chris and I had planned to go to a water park and enjoy the beautiful summer weather, Mother Nature had other plans. She gave us rain this morning followed by more rain into the afternoon, by the time Chris arrived coming from Madison the rain had stopped. We made a decision that based on the fact that there was still the chance for severe storms, we would take a literal rain check for the park. Unfortunately as the afternoon progressed the rain stayed away, and instead of enjoying a humid summer afternoon we spent hours with my mother. In celebration of the first day of summer, I created a design with my ever ready Silhouette. Including some of the summertime's most enjoyed elements, I put sunshine, water, and a hammock; as these all remind me of relaxing on summer afternoons when the sun actually shines! But with the great glory that we are given by the first day of summer, we must also remember this is the beginning of the end; as from this day forth the days only get shorter. Then we wait until the first day of winter (6 months from today) and the countdown from summer begins all over again.

Thursday, June 20, 2013
Sympathy Card
Sympathy cards are always a hard card to give, because whether you knew the person directly or they were just an acquaintance there will be emotions regardless. Soft colors often are best for emotional times as they are easy on the eyes and overwhelming, so I went with a pre-made card that was purple in color. While the purple was okay, as a stand alone it was a bit obtrusive so I added in a white inlay to create a thin purple border. I found the floral design online from the Silhouette Studio Online Store, keeping again with the subtle hues with just enough green to give it life. I placed the tip of the flower in the upper right hand corner allowing the natural curve of the stem to draw a line of site through the card. Ending at the letter S, the natural choice for a fond on this card was one with a nice curvature to keep with the theme. Using a clear mount stamp, the letters were placed on the bottom of the card leaving enough of a gap to keep the white and purple in check.


Wednesday, June 19, 2013
4th of July
It may not be the forth of July yet, but the summer sun is just around the corner. I decided a patriotic them was in order for tonight's card just to get in the holiday spirit. I wanted to do a unique take on an American classic, and found a ribbon like design to create the wave effect. Alternating red and white in accordance with the design of the American flag, I found that 13 strips (just the same as the flag) was a fitting amount. Although the fit may not be perfect, its remarkable. The stars were created with a die cut which I've used for previous creations. Fitting with the thirteen strips, I did fifty stars which didn't turn out perfect, but making them smaller proved to be more a challenge then I was willing to undertake this evening.


Tuesday, June 18, 2013
Thanks!
Although June is generally a month for celebration of a variety of holidays, as well individual accomplishments; sometimes we forget those who give gifts for the variety of occasions. That is why I decided to create a simple "Thank You" card, with a simplistic design that was easy to create and is great for many celebrations. All cut outs were created with my ever reliable silhouette (without it I'd probably go insane!) but that is beyond the point. I chose to go with a light purple with a dark purple border, the soothing tones bring attention to the main focus of the card, as for the hanging banners; I opted for primary colors. Simple on the eyes and the budget as they are readily available at most craft retailers.
I would have never thought 18 days ago that now nearly two thirds of the way through June the creativity would be flowing, but it is and I love it! So thank you everyone for your support and happy carding!!

I would have never thought 18 days ago that now nearly two thirds of the way through June the creativity would be flowing, but it is and I love it! So thank you everyone for your support and happy carding!!

Monday, June 17, 2013
Happy Birthday!

Sunday, June 16, 2013
Congrats!
When you think of childhood, you probably think of teddy bears. They are the friend that never fights back, even in the best of times and worst of times. So only fitting that as you grow, you friends may come and go but teddy bear is a constant.
Today I decided to make a card for the graduate who is a child at heart, featuring none other than a teddy. The bear (complete with hat, robe, and diploma) was created using the Silhouette, simple shapes made this the easy part. Creating letters is a very easy process with the Silhouette system, but I decided to take it a step further this them and create homemade ink dauber.
Ink daubers are used to apply ink, chalk, or paint to paper products. I've been looking at daubers for the past few weeks at Joann's, but they are too expensive so I found a how to blog on Pinterest. after a trip to the local hardware store, I was able to follow the instructions and make my own. They are made with PVC pipe and application wedges. Here is a picture of them as well as the finished piece.


Saturday, June 15, 2013
Happy Birthday!
I splurged and purchased some new punches to be more creative with my "punch art" yesterday, while they are not as cost effective as a pair of scissors; I find them to do the job much more effectively. Using my newly acquired punches I decided to make a card featuring a variety of characters from Sesame Street. This card would be fitting for any young child or adult who has grown up with the show over the years, it's just the way card outta be "simple and easy!"


Friday, June 14, 2013
Father's Day Card
Having already made one Father's Day card, I decided to not let anyone feel left out. So I created a card for my boyfriend's dad, but to be creative I decided to create it from a different point of view: the dog. While searching Pinterest, I found the Slinky Dog from Disney/Pixar film "Toy Story" and knew it was a perfect fit!


Thursday, June 13, 2013
Thinking of You
Today was a simple day, so for a simple day I did a simple card. Cutting out the main components of my design with my Silhouette, I then stamped "Thinking of You" on the card.


Wednesday, June 12, 2013
Card Dividers
Since I am away from home tonight, I decided to finish my card dividers for my card basket. The card dividers are made of chipboard and measures 6" by 6", each has a unique color over the chipboard. Using my silhouette I cut out the letters on vinyl, and found that transfer paper made it super easy to attach them without being messy.


Tuesday, June 11, 2013
Miss You!
Tomorrow, I get to see a friend that I haven't seen in a few years. She finally moved a little closer to my parents house and since I have to be home for a conference, I decided to go have supper with her. We talk often, but do not get to see each other as often as we like. So today's card is for her to show her how much I miss hanging out with her. Her favorite Looney Tune is Tweety Bird so that is what inspired me to make this card.

Tweety was suppose to be made with punches, but I used my Silhouette to make the different sized shapes. The eyes and feet were made with my Creative Memory heart punch. The card was cut out using my Silhouette as well.

Monday, June 10, 2013
Birthday Card
I decide to make a simple birthday card. I used my silhouette to create the card and the cake. Then I used my Cuttlebug to emboss the blue background to say "Happy Birthday."


Sunday, June 9, 2013
Graduation Card
About two week ago, the girl that has lives across the road from my parents graduated High School. I thought it was time that I made a card for her to tell her how proud I am of her. She is like a little sister to me. She has turned into quite the woman over the years and I couldn't be more proud of her. I know she will follow her dreams and do something great with her life.
The card that I decided to make is called a gate fold card because it open like a gate would when you remove the graduation cap band. This card was created using my Silhouette.

The card that I decided to make is called a gate fold card because it open like a gate would when you remove the graduation cap band. This card was created using my Silhouette.

Saturday, June 8, 2013
Get Well Soon
After a few simple cards this week, I decided that I need to step it up my game. As I was looking on Pinterest, I came across this Eeyore that someone made out of punches. So I decided to go to JoAnn's and buy the punches that I needed. While to buy all of the punches that I needed, I would have spent about 40 dollars so I decided that it wasn't worth it. When I got home, I started drawing shapes using Silhouette Studio. I didn't have any measurements to go on so I had to eyeball everything. I used ovals, circles, and hearts to make this Eeyore. I think it turned out pretty well given that I didn't have any directions. After I made Eeyore, I thought about what kind of card I wanted to make with it. My boyfriend suggested that I put a bandage on his foot and make it as a (Get Well Soon) card. I couldn't have came up with a better idea if I tried.


Friday, June 7, 2013
Happy Birthday Card
School is might be over for the summer, but that doesn't mean my life is slowing down anytime soon. Today was a very exhausting day. Since I am tired, I decided to do a very simple card. All I had to do was cut out 5 squares that were the same size and a flower that went along with my color scheme. I used pop up squares to make the flower stick out a little more.


Thursday, June 6, 2013
Just Because Card
Yesterday was the last day of school and being a teacher is not easy. My boyfriend has had to put up with me being crabby and stressed out for the past two weeks. I know that has not been easy, but he has been super supportive and a great listener. I know living with me is not the easiest thing in the world, but I appreciate all that he does and couldn't ask for a better guy. So this card is just for him!
The turtle was designed using my Silhouette as well as the "i love you" phrase. I used the shell to make the different sized layers. The technique I used on the shells is called "Triple Layer Stamping," which is when you put the in-between layers together and stamp the design you want. Then, you put the other layers in-between and match up the stamp design as best as you can. Lining up the stamp design is the hardest part. Finally, I glued the turtle and the phrase onto a per-made card.

The turtle was designed using my Silhouette as well as the "i love you" phrase. I used the shell to make the different sized layers. The technique I used on the shells is called "Triple Layer Stamping," which is when you put the in-between layers together and stamp the design you want. Then, you put the other layers in-between and match up the stamp design as best as you can. Lining up the stamp design is the hardest part. Finally, I glued the turtle and the phrase onto a per-made card.

Wednesday, June 5, 2013
Just Because Card
Today, I decided that I was going to make a card using my Cuttlebug and square punch. This card was very easy and could be duplicated in a lot of different colors as well as different embossing patterns.
.jpg)
.jpg)
Tuesday, June 4, 2013
Thank You Card
Today was a special day for me. One of my students and his mother came to visit me before school started. They came to show their appreciation for all of the hard work I put into this school year. The mother was very grateful for all of the Math help that I gave her son. She said "Without your hard work and dedication, my son would not be where he is today." Besides their very kind words, I received a beach bag full of goodies as well as little notes that went along with some of the goodies. I even got a homemade card!
So tonight's card was inspired by the lovely gift that I got the morning from of on my 3rd Grade boys. I used an easel card from Lori Whitlock's collection. I used mini bards to hold the card up and the "Thank You So Much" was designed using my Silhouette Design Studio. I hope he enjoys it as much as I enjoyed making it for him.

So tonight's card was inspired by the lovely gift that I got the morning from of on my 3rd Grade boys. I used an easel card from Lori Whitlock's collection. I used mini bards to hold the card up and the "Thank You So Much" was designed using my Silhouette Design Studio. I hope he enjoys it as much as I enjoyed making it for him.

Monday, June 3, 2013
Thank You Card!
Tonight, I decided to do something simple. I created a card with a border that I found in the Online Silhouette Store and then stamped "Thank You" at the bottom. It didn't turn out exactly how I wanted it to, but that will happen from time to time.


Sunday, June 2, 2013
Father's Day Fishing Card
Today, I decided to make a Father's Day card since it will be here before we know it. My dad and I love to go fishing together so that is what inspired me to make this card. The
fisherman was a little tricky to put together, but once I figured out where a
certain piece went, it went together nicely.


This card was made using the Silhouette Design Studio.
Saturday, June 1, 2013
Camera Card
I decided to make a camera card today after a friend told me about the welding feature on Silhouette Design Studio.


Subscribe to:
Posts (Atom)