
Showing posts with label design. Show all posts
Showing posts with label design. Show all posts
Sunday, January 5, 2014
Happy Birthday!
Since one of my good friends birthday is at the end of the week, I decided to make her a card tonight using her favorite colors. Tonight's card was made using my Silhouette and an image from Miss Kate Cuttables. Even though it took me a few tries to get everything cut out, it turned out pretty cute and I can't wait to give it to her on Friday. Until next time, happy carding everyone.
Thursday, January 2, 2014
Thank You!
Today was my first day back to school since winter break started a week and a half ago and I am exhausted. It was great to see my 2nd graders today but they wore me out. I love hearing about their breaks and what they got for Christmas. Enough about my day though and the love for my students, let's discuss tonight's creation.
Using my trimmer, I cut the card base, strip of rich razzleberry designer paper, and the different overlays that I needed. I then used the Regarding Dahlias stamp set to stamp the flower and "thank you" onto the small white overlay. Once everything was completed, I then assembled my card. It was a pretty easy card to create. It only took me about 10 minutes to make. I will have to keep this card in mind when I am doing Thank You cards after my wedding. Knowing me though I will change my mind several times before then and have a different one in mind. Until next time, happy carding everyone.

Using my trimmer, I cut the card base, strip of rich razzleberry designer paper, and the different overlays that I needed. I then used the Regarding Dahlias stamp set to stamp the flower and "thank you" onto the small white overlay. Once everything was completed, I then assembled my card. It was a pretty easy card to create. It only took me about 10 minutes to make. I will have to keep this card in mind when I am doing Thank You cards after my wedding. Knowing me though I will change my mind several times before then and have a different one in mind. Until next time, happy carding everyone.

Wednesday, January 1, 2014
Happy 2014!
Wow, 2014. I still can't believe another year has past, but we have a lot doing on this year. One of my best friends is getting married in October and in March, I am welcoming my first nephew into the world. Plus we are planning our own wedding so it will be a busy, but exciting and fun year all at the same time. Well enough about what is going to happen this upcoming year and let's discuss the first creation in 2014.
Since today is the 1st day of the year, I decided to stamp "Make a Wish" from the Perfect Pennants stamp set, since everyone is setting their new goals/resolutions and making wishes for the upcoming year, onto a banner that I cut out using my framelits. Using my Big Shot again, I cut out the backing for the banner as using the next size banner framelit from the one that the stamp is on. Once the banners were done, I cut three 1" strips of paper of paper and then used my hexagon punch to make them look like banners. I then cut them down to the size that I wanted so that all three banners were visible at the bottom of the card. After that was finished, I adhered everything onto the overlay. This is one of the cards that I will be sending my Stampin UP Secret Sister this month and I think it turned out great. I hope she likes it just as much as I enjoyed making it. Until next time, happy carding everyone.

Since today is the 1st day of the year, I decided to stamp "Make a Wish" from the Perfect Pennants stamp set, since everyone is setting their new goals/resolutions and making wishes for the upcoming year, onto a banner that I cut out using my framelits. Using my Big Shot again, I cut out the backing for the banner as using the next size banner framelit from the one that the stamp is on. Once the banners were done, I cut three 1" strips of paper of paper and then used my hexagon punch to make them look like banners. I then cut them down to the size that I wanted so that all three banners were visible at the bottom of the card. After that was finished, I adhered everything onto the overlay. This is one of the cards that I will be sending my Stampin UP Secret Sister this month and I think it turned out great. I hope she likes it just as much as I enjoyed making it. Until next time, happy carding everyone.

Monday, December 23, 2013
Owl Christmas
Since my card was done so early today, I almost forgot to post it. Today's creation was inspired by Pinterest. Using my owl punch, I punch out the different pieces that I need for the owls. I then cut out triangles for their hats. I used my mini scalloped circle punch to decorate the hats a little bit more. Once the owls were finished, I cut out my overlay and then used my scallop edge border punch to give it a nice border. I then ran the other overlay through the Big Shot to make it look like wood. To finish my card, I stamped "Merry Christmas" onto a white piece of paper and punched it out with the word window punch. I then used my modern label punch for the background. This card turned out super cute. I love how adding the border to the card makes it pop a little bit more. Christmas is 2 days away and I don't know what I will do with myself after that since I have been making Christmas cards since November. Good thing there are other holidays. Until next time, happy carding everyone.


Wednesday, December 4, 2013
Owls
Tonight I decided to finish my card order for three owl cards. I found my inspiration on Pinterest, but changed it to make it work with the tools that I had. Using my Big Shot, I cut two holes into the overlay with the circle framelits. Once those were cut out, I embossed the overlay to make it look like a tree. I then used my Owl Punch to punch out two owls and the different pieces to complete them. Once the owls were completed, I used dimensionals to raise the overlay up so that I the owls appeared to be in the tree looking at each other. After the card was completed, I felt that it was missing something so I used my Bird Punch and added some green leaves to it. This card is very cute. The owls may not be your traditional colors or patterns, but that is what makes it fun. Until next time, happy carding everyone.


Friday, November 29, 2013
Owl!
Tonight's creation is another owl card since I need to complete an order before I return to school on Monday. This creation was inspired from Pinterest. Using my trimmer, I cut out the different size overlays and the base. It was a little tricky to figure out the middle overlays for the owl, but after a few tries I figure it out. I then used my Owl Punch and Bird Punch to create the design on the teal overlay. I love how the colors came together. This card turned out great and I can't wait to take it to school on Monday. Until next time, happy carding everyone.


Wednesday, November 20, 2013
Baby Train
Tonight's creation is a baby themed card. I got my inspiration from Pinterest for this card. Using my Big Shot, I made the train carts with the smallest Deco Label framelit. I then used my Silhouette to cut out a scalloped border for the top of the train cart. To finish off the train carts, I used circle punches to make the wheels. Once they were adhered together, I stamped the zoo animals from the Zoo Babies stamp set. I made sure that they would be a little bit covered up by the train cart so that it appeared like they were sitting in the train. To finish the card, I stamped Congratulation at the top of the white overlay. I love how this card turned out. The train cards turned out super cute as well. Until next time, happy carding everyone.


Tuesday, November 19, 2013
Minnie Mouse
Tonight's creation is a Minnie Mouse for one of my best friend's niece. This card was pretty easy to make, but a lot of fun at the same time. Using my big shot, I made the bow and circles with the Gift Bow Bigz Die and Circle Framelits. Once all of the pieces were cut, I assembled the bow together. I then adhered the circles together to make it look like a Mickey Mouse head. To finish my card, I stamped "Happy Birthday" from the Sassy Salutation stamp set in white ink. This card turned out super cute. Making cards for children is a lot of fun since sky is the limit with them. They are interested in a lot of different things when they are younger. The hard part is just keeping up with everything, but my students at school help me out sometimes. Until next time, happy carding everyone.


Saturday, November 16, 2013
Gobble Gobble
Today was the craft show and it didn't go as well as I hoped. Everyone has their good and bad days at the craft show, you learn from it and move on. Besides the craft show, I spent the rest of the afternoon relaxing for the first in what seems like weeks. It was very nice and just what I needed after a long week. Enough about my day, let's discuss tonight's creation.
Tonight I decided to create a Thanksgiving card since I have been doing Christmas so much lately. The inspiration for this card came from Pinterest of course. I wanted to make the turkey so it stood out and wasn't like a normal one that you would see on a card. I used my scoring board to score a 1.5" strip of pattern paper. Once it was scored every 1/4", I fold it back and forth until it was finished. Instead of making it into a rosette, I made it into a fan for the turkey's feathers. I then used my Silhouette to cut out the different layers of the turkey body. After the turkey's body was adhered together, I glued it onto the fan. It looked a little weird at first since half of the body was floating in the air. I then embossed the white overlay with leaves using my Big Shot. After the card base was finished, I used my dimensionals to bring down his feet so they were attached to the base of the card and then used one by his head to keep it flat as well. After the turkey was adhered down, I created a banner for the bottom of the card where I stamped "Happy Thanksgiving." To get the ends of the banner somewhat perfect, I used one side of my hexagon punch to create the banner appearance. This card turned out very neat. It is different then traditional Thanksgiving cards that you see in the store, but that is what makes it unique. Until next time, happy carding everyone.

Tonight I decided to create a Thanksgiving card since I have been doing Christmas so much lately. The inspiration for this card came from Pinterest of course. I wanted to make the turkey so it stood out and wasn't like a normal one that you would see on a card. I used my scoring board to score a 1.5" strip of pattern paper. Once it was scored every 1/4", I fold it back and forth until it was finished. Instead of making it into a rosette, I made it into a fan for the turkey's feathers. I then used my Silhouette to cut out the different layers of the turkey body. After the turkey's body was adhered together, I glued it onto the fan. It looked a little weird at first since half of the body was floating in the air. I then embossed the white overlay with leaves using my Big Shot. After the card base was finished, I used my dimensionals to bring down his feet so they were attached to the base of the card and then used one by his head to keep it flat as well. After the turkey was adhered down, I created a banner for the bottom of the card where I stamped "Happy Thanksgiving." To get the ends of the banner somewhat perfect, I used one side of my hexagon punch to create the banner appearance. This card turned out very neat. It is different then traditional Thanksgiving cards that you see in the store, but that is what makes it unique. Until next time, happy carding everyone.

Thursday, November 14, 2013
Dahlias
All week I have been preparing for the Craft Show on Saturday. I have made 90 cards in the past 6 days and it has been a lot of work, but I have enjoyed every minute of it. Making cards is a passion of my mine and it is a lot of fun. I hope that I can share my passion with people at the Craft Show. Tonight's creation was inspired/cased from Cynthia Millan, it is very similar but different at the same time. Let's discuss tonight's card.

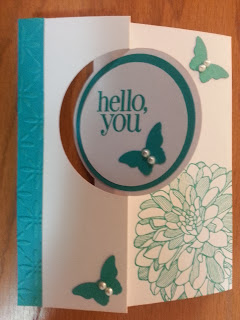

Using my trimmer, I cut a piece of card stock that would fit the thinlit. I then used the Circle Thinlit from Stampin UP to create the base of the card. The card stock was cut extra long so there was an extra flip for someone to write a message. Once the base was cut out, I punch out 2.5" and 2" circles. I then used the Regarding Dahlias stamp set to stamp the flower and "hello, you" onto the card. After the was finished, I punched out butterflies using the Bitty Butterfly Punch and placed two pearls in the center of them. Once everything was put together, I embossed the colored strip of paper and adhered it to the card. Even though this card was cased, it turned out wonderful and it has to be one of my favorite cards that I made this week. I could use this card for a few different occasions or to simply let someone know that I am thinking about them. Until next time, happy carding everyone.


Saturday, November 9, 2013
Thank You
After making 30 cards today that I have already made before, I decide tonight was going to be a super easy card. I also decided to try a new technique that I have wanted to try for a while. To make the flower and thank you different colors, I took my reinkers and put several drops of each color onto a baby wipe. I then took my stamps and ink them up. When they are stamped on paper, it gives a very cool multi-color look to them. Since the card was pretty bare, I added a bird from the Besty's Blossom stamp set and then used my ink daubers to create a border. I am not overly impressed with tonight's creation, but I love the new technique. I will have to get more creative with this technique in the future. Until next time, happy carding everyone.


Monday, November 4, 2013
Caroling Mouse
Since my Silhouette is out for repair and I am limited on Christmas stamps, I decided to use my Cricut tonight. I don't even remember the last time I have created a card with it. Using the Create a Critter 2 and Christmas Cheer cartridges, I cut out the mouse, music notes, and the joy banner. Once all of the pieces were cut out, I adhered them together. I then cut the card base and overlay. After everything was assembled, I adhered the mouse, banner, and music notes onto the overlay. Once it was completed, I thought it was still missing something. A friend suggested that I put rhinestones on the music notes to give it some bling and that's exactly what it needed. By not using my Cricut for a long time, I forgot how weird the measurements are and how much you have to play around with it to get the sizes that you need. But the cards still turned out and that's all that matters. Until next time, happy carding everyone.


Friday, November 1, 2013
Christmas Stamp-a-Stack
Tonight was such a blast. I couldn't have asked for a better group of people to send 3 hours with creating Christmas cards. It is amazing what you learn from other people that seems so simple, but yet it isn't something you would have thought of. Like last time, I learned a new trick that just amazed me since I didn't think of it before. Instead of using a whole sheet of paper for an overlay, she just cut 2" strips for the edges so that it looked like there was an overlay underneath. It is the little things that just have me in aww lately. Since the cards were pre-cut for me and scored, I won't go into much detail about the cards, but if you have any questions, please don't hesitate to e-mail me. Let's discuss tonight's five creations.
Creating these five cards was a lot of fun since we got to use so many different tools that Stampin UP has to offer. Besides the tools, we got to use a lot of the new holiday stamp sets as well. Just when I thought I was done ordering from the Holiday catalog, I found more things that I want to get now. It was just cool to see how many different tools and stamps you could use for just one card. Until next time, happy carding everyone.


Creating these five cards was a lot of fun since we got to use so many different tools that Stampin UP has to offer. Besides the tools, we got to use a lot of the new holiday stamp sets as well. Just when I thought I was done ordering from the Holiday catalog, I found more things that I want to get now. It was just cool to see how many different tools and stamps you could use for just one card. Until next time, happy carding everyone.


My Personal Favorite


Tuesday, October 29, 2013
Lovely As a Tree
Tonight's creation didn't take me very long to create. I just had to experiment a little bit to make the image come out just right. To get the two shades of trees, I stamped the image twice on a scrap piece of paper and then stamped it onto the white overlay. Once that was dry. I inked the stamp up again and lined it up with the previous stamped and stamped the image. It created a nice shadow effect. After the trees were done, I stamped "With Sympathy" in the right-hand corner. Even though this card was clean and simple, it shows the person that you care and that you are thinking about them. Until next time, happy carding everyone.


Wednesday, October 16, 2013
Snowman!
Today went pretty fast. It seemed like I sat down to write some lesson plans for next week and it was already time for Computer class. As I walked around the room in my various classes, I was happy to see the students using the home row. It has been a struggle to keep their hands on the home row since bad habits have already started, but I think they are seeing the benefit of using the home row now. Enough about my day and my wonderful students and onto tonight's creation.
After creating a few complex cards for the week, I decided it was time for a simple one. Using my trimmer, I custom cut my card base and overlay. Once those were cut out, I took out my Snow Day stamp set and a few ink pads. Using the masking technique, I stamped five snowmen in different spots on the overlay. Once the body of the snowmen were complete, I added a face, arms, and buttons to them. After completing my snowmen, I noticed I had room for a sentiment so I stamped "Christmas Wishes" in the open space from the Joy to the World stamp set. I still thought something was missing so I add some snowflakes onto the card as well. Tonight's creation was inspired from Pinterest, but I changed it to make it my own. I love how this card turned out and I might have to make a few more since I still have 50 cards left to make before December 1st. Until next time, happy carding everyone.

After creating a few complex cards for the week, I decided it was time for a simple one. Using my trimmer, I custom cut my card base and overlay. Once those were cut out, I took out my Snow Day stamp set and a few ink pads. Using the masking technique, I stamped five snowmen in different spots on the overlay. Once the body of the snowmen were complete, I added a face, arms, and buttons to them. After completing my snowmen, I noticed I had room for a sentiment so I stamped "Christmas Wishes" in the open space from the Joy to the World stamp set. I still thought something was missing so I add some snowflakes onto the card as well. Tonight's creation was inspired from Pinterest, but I changed it to make it my own. I love how this card turned out and I might have to make a few more since I still have 50 cards left to make before December 1st. Until next time, happy carding everyone.

Monday, October 14, 2013
A Twisted Christmas Easel Card
Since I had an awful day at school, I came home and reveled some stress by creating tonight's creation. This card was featured on the Stampin UP Demonstrator page, but she was kind enough to list her directions on Split Coasts Stampers (splitcoaststampers.com). This is a free website that anyone can join and has lots of ideas for everyone. After reading through all of the directions this time, my card turned out exactly the way it should have. The directions for this card will be attached to the bottom of my blog. This women did a wonderful job on this card and I am very happy that she shared the directions with all of us. Until next time, happy carding everyone.

Directions: http://www.splitcoaststampers.com/forums/project-instructions-f142/twisted-easel-card-t579519.html#post20371772

Directions: http://www.splitcoaststampers.com/forums/project-instructions-f142/twisted-easel-card-t579519.html#post20371772
Wednesday, October 9, 2013
Sympathy Card
Tonight's card was a bit of a struggle since I had to make a sympathy card. Sympathy cards are never easy and when you know the person it makes it that much harder. One of my fiance's cousin dad passed away last night. Unfortunately, I only got to meet him once, but he seemed like a great guy just from the one meeting. He will be greatly missed by friends and family that had the honor of knowing him. As a dedication to him, I plan on giving his family this card to them out of our condolences for their loss.
Tonight's creation was created using my Silhouette as well as my paper trimmer. First, I used my Silhouette to cut out the different layers of the fall tree. While my Silhouette was taking its time cutting out the tree, I used my trimmer to custom cut the base as well as the white overlay. Once the Silhouette was finished, I assembled the tree together. I think that every Silhouette file should come with a set of instructions since this tree was not the easiest to put together. There may not have been may pieces, but trying to figure out the order was a challenge all by itself. After the tree was assembled, I used stamping sponges to make the background. I love using new techniques and this technique came out quite well. Even though this card is to show our condolences I hope that the family enjoys the peaceful tranquility, and can remember the positives of the loss of Bill. Until next time, happy carding everyone.

Tonight's creation was created using my Silhouette as well as my paper trimmer. First, I used my Silhouette to cut out the different layers of the fall tree. While my Silhouette was taking its time cutting out the tree, I used my trimmer to custom cut the base as well as the white overlay. Once the Silhouette was finished, I assembled the tree together. I think that every Silhouette file should come with a set of instructions since this tree was not the easiest to put together. There may not have been may pieces, but trying to figure out the order was a challenge all by itself. After the tree was assembled, I used stamping sponges to make the background. I love using new techniques and this technique came out quite well. Even though this card is to show our condolences I hope that the family enjoys the peaceful tranquility, and can remember the positives of the loss of Bill. Until next time, happy carding everyone.

Tuesday, October 8, 2013
Halloween Snowman!
Today was a very long day since I had to get up extra early to attend an award ceremony in Madison. Our school received the School of Recognition Award for the second year in a row. This award goes to schools for their work to break the link between poverty and low academic achievement through rigorous programming and attention to student needs. I was very honored to be able to accept this award on the behalf of my school. Our teachers and students have worked very hard and I am honored to be part of all of the great things that we do for our students. Enough about the pleasures of being a teacher and let's discuss tonight's creation.
Since I woke up in the dark and came home in the dark, I decided that an easy card was in order tonight. I used a pre-made card from my collection to make tonight's creation. I am hoping that I will soon run out of my pre-made cards, but just when I think I've used them all I'll find another box. After picking out the card, I used my trimmer to cut out the white overlay. I then stamped the orange snowman onto the white overlay. Using another stamp set, I stamped the triangle eyes onto the snowman. The stamp set that I have for jack-o-lanterns had a few face choices for the snowman, but they were all too big so I drew the mouth onto the snowman. Once the face was completed, I used the snowman set again to stamp the buttons on him. After the Halloween snowman was finished, I stamped "Happy Halloween" on the top of the overlay. I then used my ink dauber and went around the edges to make the border. When creating this card, I didn't really have a vision in mind. I just started stamping and it lead me tonight's creation. Until next time, happy carding everyone.

Since I woke up in the dark and came home in the dark, I decided that an easy card was in order tonight. I used a pre-made card from my collection to make tonight's creation. I am hoping that I will soon run out of my pre-made cards, but just when I think I've used them all I'll find another box. After picking out the card, I used my trimmer to cut out the white overlay. I then stamped the orange snowman onto the white overlay. Using another stamp set, I stamped the triangle eyes onto the snowman. The stamp set that I have for jack-o-lanterns had a few face choices for the snowman, but they were all too big so I drew the mouth onto the snowman. Once the face was completed, I used the snowman set again to stamp the buttons on him. After the Halloween snowman was finished, I stamped "Happy Halloween" on the top of the overlay. I then used my ink dauber and went around the edges to make the border. When creating this card, I didn't really have a vision in mind. I just started stamping and it lead me tonight's creation. Until next time, happy carding everyone.

Saturday, October 5, 2013
Happy World Cardmaking Day!
Today I planned on making a card that used several of my tools since it is World Cardmaking Day, but after scouting for geese all morning and having a friend over, I decide an easy card was in order. I used my trimmer to custom cut the base of the card and the overlay. Once those were cut out, I used my Silhouette to cut out the tissue box. Using my stamps, I stamped "Get Well Soon" on the overlay. Tonight's card turned out cute even though it was a super easy card. Until next time, happy carding everyone!

Wednesday, October 2, 2013
Recipe for disaster
While I would consider last nights card a total failure, I know that between the pressure of my sinuses and the completion of an Ipad uninstall/reinstall it's been quite the week. These things have been weighing an extra load on me both mentally as well as psychically so I am definitely geared up and ready for the weekend once more. On the brighter side of things, some of my second graders are finally starting to digest what I am teaching. This was most evident today in class as one of them was able to complete a lesson in just over five minutes. Most impressive, and while I am trying to boast my teaching abilities it does make me feel that I am doing my job (which I will admit some days are harder to get through then others). Coming home and making a creation and writing this blog for you is a piece of meditation in itself, so onward with tonight's remarkable creation!
Tonight I decided to create an easy card, not only because I felt I've earned but because I needed to. Last nights castrophe of a card made me feel like I failed as a creative individual. But reminded by my friend Chris, that our failures are what we look back on and know how we've improved. I found the inspiration for this card by searching Pinterest after school, it took a couple tries to get it right so essentially I created two cards for this evening. Stamping out six flowers from the "Flower Shop" collection (a collection that I frequently use in my creations). Once the stamping was completed, I was able to use my punch and create the final product. Colorful flowers with flowers as unique as autumn foliage, it adds variety to the cards I create. Placing the flowers on the cards was simple as I used adhesive and evening spaced them, three to a card. Using a simple "thank you" placed in the center of the card above the flowers tonight's creation was complete. Simple, easy, not so remarkable but fun none the less to make; until next time happy carding everyone!


Tonight I decided to create an easy card, not only because I felt I've earned but because I needed to. Last nights castrophe of a card made me feel like I failed as a creative individual. But reminded by my friend Chris, that our failures are what we look back on and know how we've improved. I found the inspiration for this card by searching Pinterest after school, it took a couple tries to get it right so essentially I created two cards for this evening. Stamping out six flowers from the "Flower Shop" collection (a collection that I frequently use in my creations). Once the stamping was completed, I was able to use my punch and create the final product. Colorful flowers with flowers as unique as autumn foliage, it adds variety to the cards I create. Placing the flowers on the cards was simple as I used adhesive and evening spaced them, three to a card. Using a simple "thank you" placed in the center of the card above the flowers tonight's creation was complete. Simple, easy, not so remarkable but fun none the less to make; until next time happy carding everyone!


Subscribe to:
Posts (Atom)