
Showing posts with label festive flurry. Show all posts
Showing posts with label festive flurry. Show all posts
Tuesday, November 12, 2013
Stampin UP Thinlits
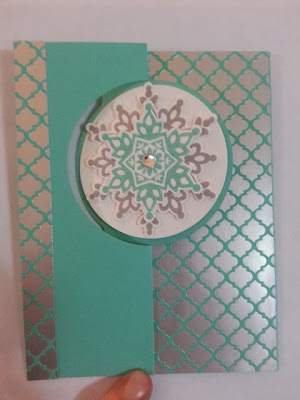
Using my thinlits from Stampin UP, I created tonight's creation. I made the paper extra long instead of the recommend size so that it had an extra flip for someone to write a nice Christmas message. It turned out pretty neat with the Christmas designer paper and the festive flurry snowflakes. Until next time, happy carding everyone.

Thursday, November 7, 2013
Simple Festive Flurry
Today was crazy busy with everything that I had to do at school and after school. Thankfully I didn't get another migraine so I could actually do what I need to get done. After returning home, I decided that it was going to make a simple card since I wanted to go bed at a decent time. Tonight's card was cased from a picture I saw on Stampin' Connections. Since the colors went so well together, I didn't want to change it. Enough about my day and inspiration and let's discuss tonight's creation.
Using my trimmer, I cut out the different card base and the different overlays needed. I then proceeded to stamp the snowflakes from the Festive Flurry stamp set onto white card stock. To cut them out, I used my Big Shot with matching framelits. After everything was cut out, I assembled the card together and stamped "Merry Christmas" on the bottom of the white overlay. I love absolutely love how tonight's card turned out. Until next time, happy carding everyone.

Using my trimmer, I cut out the different card base and the different overlays needed. I then proceeded to stamp the snowflakes from the Festive Flurry stamp set onto white card stock. To cut them out, I used my Big Shot with matching framelits. After everything was cut out, I assembled the card together and stamped "Merry Christmas" on the bottom of the white overlay. I love absolutely love how tonight's card turned out. Until next time, happy carding everyone.

Friday, November 1, 2013
Christmas Stamp-a-Stack
Tonight was such a blast. I couldn't have asked for a better group of people to send 3 hours with creating Christmas cards. It is amazing what you learn from other people that seems so simple, but yet it isn't something you would have thought of. Like last time, I learned a new trick that just amazed me since I didn't think of it before. Instead of using a whole sheet of paper for an overlay, she just cut 2" strips for the edges so that it looked like there was an overlay underneath. It is the little things that just have me in aww lately. Since the cards were pre-cut for me and scored, I won't go into much detail about the cards, but if you have any questions, please don't hesitate to e-mail me. Let's discuss tonight's five creations.
Creating these five cards was a lot of fun since we got to use so many different tools that Stampin UP has to offer. Besides the tools, we got to use a lot of the new holiday stamp sets as well. Just when I thought I was done ordering from the Holiday catalog, I found more things that I want to get now. It was just cool to see how many different tools and stamps you could use for just one card. Until next time, happy carding everyone.


Creating these five cards was a lot of fun since we got to use so many different tools that Stampin UP has to offer. Besides the tools, we got to use a lot of the new holiday stamp sets as well. Just when I thought I was done ordering from the Holiday catalog, I found more things that I want to get now. It was just cool to see how many different tools and stamps you could use for just one card. Until next time, happy carding everyone.


My Personal Favorite


Friday, October 25, 2013
Double Slider Card
Since I have created clean and simple cards this week, I decided to create a card that I haven't created yet for this project. It is called the Double Slider Card. It looks complicated, but if you read the directions before starting, you will have no problem putting it together. Instead of boring you will every direction, I will attach the instructions at the bottom of my blog. This remarkable creation was a lot of fun to make and I will be using it for several different occasions in the future. Creating this card was just what I needed after a very overwhelming day of meetings at school. Until next time, happy carding everyone.


Front of the Card

Card Slide Open
Sunday, October 20, 2013
Snowburst
Today was a great day. I got to spend time with my dad and fiance goose hunting. We didn't get any geese, but we still have fun. I enjoyed hearing all my dad's stories about other hunting trips while sitting in the goose blind. When he was telling a story, I forgot about being cold. It was a quite chilly outside with some rain, but it didn't matter since I was with my dad enjoying each others company and hoping for a dumb goose to fly low enough for us. Even though it was an exhausting day that started at 3:30 a.m., I still had time for a remarkable creation tonight so let's discuss the details of the card.

Keeping with the Christmas theme so that I make sure they are all completed, I made a card using the sunburst technique. I choose various Christmas theme paper to make the sunburst on half of the card. Once the patterns were chosen, I cut them in 2" by 6" strips and then cut them diagonally from point to point which created a nice triangle shape. After I made ten triangles, I placed them in order on the overlay that was ran through my Xyron to apply adhesive to the whole thing. After the paper was placed on the overlay, I trimmed off the excess paper that was hanging over the edge. I then cut off 2" from the bottom of the overlay so that i had room on the card to stamp a salutation once the card was complete. Before completing the card, I stamped two snowflakes and cut them out using the snowflake framelits. Using the same framelits, I cut out the silver glitter snowflake as well. Once the snowflakes were completed, I adhered them together with dimensionals so that it would pop off the paper a little more. I then placed the snowflakes in the middle to cover up the center of the sunburst. Finishing the card, I stamped "Merry Christmas" in the middle. I was hoping to use my new rotary trimmer on this card, but I didn't take that into concentration when I was cutting the overlay. It is something I will have to remember for next time. Until next time, happy carding everyone.

Thursday, October 17, 2013
Joy to the World!
Tonight we had parent teacher conferences until 7. So I will be keeping this blog post as short as possibly since I am exhausted. Since I knew I wasn't getting home until late tonight, I searched Pinterest this morning for some inspiration for an easy card. I have also resorted to triple time stamping when I want to complete an easy card in a short amount of time. Tonight wasn't any different, but I gave it a different look then I have done in the past so let's discuss today's creation.

Using my Stampin UP trimmer, I cut out different sized overlays and a card base. Once they were all cut out, I arranged them on the card the way I want them. I then removed the colored overlay from the back of each white overlay. Using a little bit of tape runner, I adhered them down so that they won't move when I was stamping onto the overlays. I started with the sentiment since I want to make sure there was enough room for it and that it wasn't covering anything up. I then proceeded to stamp snowflakes from the Festive Flurry stamp set to cover up the white area. Once I finished stamping, I adhered the white overlay to the colored overlay. Finishing my card, I aligned the snowflakes up so that and adhered the colored overlay onto the base of the card. I love triple time stamping and this gave a great twist to the technique. Until next time, happy carding everyone.

Monday, October 14, 2013
A Twisted Christmas Easel Card
Since I had an awful day at school, I came home and reveled some stress by creating tonight's creation. This card was featured on the Stampin UP Demonstrator page, but she was kind enough to list her directions on Split Coasts Stampers (splitcoaststampers.com). This is a free website that anyone can join and has lots of ideas for everyone. After reading through all of the directions this time, my card turned out exactly the way it should have. The directions for this card will be attached to the bottom of my blog. This women did a wonderful job on this card and I am very happy that she shared the directions with all of us. Until next time, happy carding everyone.

Directions: http://www.splitcoaststampers.com/forums/project-instructions-f142/twisted-easel-card-t579519.html#post20371772

Directions: http://www.splitcoaststampers.com/forums/project-instructions-f142/twisted-easel-card-t579519.html#post20371772
Friday, October 11, 2013
Floating Snowflakes!
After which seemed like a really long week, it is finally Friday. I decided to make a floating card again, but this time with snowflakes. Instead of boring you with the details of my card, I will attach the video tutorial to the end of my blog as well as the link to my floating flower card. This way you can either watch the video or read my previous blog to learn how to make this remarkable creation. This creation is quite easy to make and can be used for several different occasions. Until next time, happy carding everyone!


Outside of the Card

Inside of the Card
Floating Flower Card: http://remarkable-creations.blogspot.com/2013/09/thinking-of-you.html
Video Tutorial: http://juliedavison.blogspot.com/2013/07/papillion-potpourri-floating-pop-up-card.html
Monday, October 7, 2013
Creative Fold
Lately, I have been on a kick of turning out new folds. Tonight is not any different since I came across this neat fold while looking through samples on Stampin UP Connection. Today's creation comes with a YouTube video that someone has already made. It made creating this card super easy and I got to use my envelope punch for something besides just an envelope. I have posted the YouTube video at the end of my blog so that you can view it if you would like to make this card as well. I would describe how to make the card, but I have a lovely migraine again today. I am hoping that I can go a few days this week without a migraine so that I can put my best effort into writing a blog for you. Until next time, happy carding everyone.


Outside

Inside
YouTube Video: http://www.youtube.com/watch?v=tF8rj__yK6Q
Saturday, September 28, 2013
Snowman!
Today I spent a lot of time in my craft room helping one of my friends with a scrapbook for her husband. Once she was off to a great start, I decided that a nap was in order since I felt a cold coming on. Darn children and their germs and always wanting to share them with me. After my nap, I thought it was time to start my card before the day got too far way from me. So let's talk about tonight's remarkable creation.

I wanted to use my score board tonight since I haven't used it in a while and decided that using it for rosette's would be a great idea. I cut three strips of white cardstock and scored them every 1/4". Once they were scored, I fold them like an accordion. Bringing the two ends together and placing 2-way glue on one end to attach the other now shows a rosette taking shape. I then pushed the sides together to create almost a fan in shape, I pushed the rosette down into the hot glue to help keep it shape. Holding it on top of the glue seems like a waste of time, but after a thirty seconds the rosette peeled right off the silicone pad. This technique worked way better than the one I used last time. I didn't have to fight with the rosette to make it stay glued together. Once the three rosettes were finished, I put them to the side so that I could cut out the card. After the card was cut out, I used a small snowflake from the "Festive Flurry" collection and stamped until the first of the card was completed filled with snowflakes. I then grabbed the three rosettes and placed 3D foam squares on the back of them. Since they are an odd shape, the foam squares were the only thing that would keep them in place I had to overlap them to make sure that the whole snowman fit on the card. Once the snowman was adhered to the card, I was able to finish adding the final touches to help him look more like Frosty the Snowman (no copyright violation intended). Even though this card took me four hours to complete, I would create this card again because it is a new twist on Frosty the Snowman. Until next time, happy carding everyone!

Subscribe to:
Posts (Atom)