
Saturday, November 30, 2013
Sunflower
Since it was a beautiful day and it felt kind of like spring, I decided to make a sunflower card tonight. Using my Hexagon punch with coordinating stamps (Six-Sided Sampler), I created the sunflower. The stem was made of out scraps that I had left over from precious creations. I then used my Blossom Petal punch to create the leaves for the stem. This card turned out just the way I envision. I hope that we have more days like today, but I know that temperatures will be dropping again soon and snow is right around the corner. Until next time, happy carding everyone.

Friday, November 29, 2013
Owl!
Tonight's creation is another owl card since I need to complete an order before I return to school on Monday. This creation was inspired from Pinterest. Using my trimmer, I cut out the different size overlays and the base. It was a little tricky to figure out the middle overlays for the owl, but after a few tries I figure it out. I then used my Owl Punch and Bird Punch to create the design on the teal overlay. I love how the colors came together. This card turned out great and I can't wait to take it to school on Monday. Until next time, happy carding everyone.


Thursday, November 28, 2013
Thank you!
Tonight's creation was suppose to have a Thanksgiving theme, but unfortunately that didn't turn out the way I planned. I had pre-cut an image using my Silhouette to adhere together today since I am way from my craft room for the holiday, but while I was assembling it I ripped one of the pieces. I decided to go with plan B. Plan B is not that exciting. It is hard to make cards when I am way from home since I don't know what supplies I will need and such. Enough with me complaining though and let's discuss tonight's creation.

Using my trimmer, I cut out the overlay and base for the card. I then used my "Another Thank You" photopolymer stamp set to stamp on the overlay. With today being Thanksgiving, there is a lot to be thankful for like our families and friends. Even though this card is not a perfect fit, it will have to do for tonight's creation. Unfortunately, I can't bring my whole craft room with me when I travel away from more than one day. Things like this are bond to happen and out of my control so I just have to roll with the punches. Until next time, happy carding everyone.

Wednesday, November 27, 2013
Thankful!
With Thanksgiving tomorrow, there are so many things that I am thankful for. So I thought tonight's creation was prefect for this occasion. Using my Big Shot, I cut out the word "Thankful" with Stampin UP's expression thinlits. I then cut out the card base and overlay. Once those were cut out, I used the Magnificent Maple stamp to create the background on the overlay. I love how the background turned out and how they came together at the bottom. The expression thinlit helped it come together nicely as well. Until next time, happy carding everyone.


Tuesday, November 26, 2013
Stockings
After sitting at school for an extra 3 hours tonight at Parent-Teacher Conferences, I decided that an easy card was in order since I had to be back at school in less than 12 hours. Using my trimmer, I cut out the two overlays and the base for the card. I then used a few stamps from the Snow Day stamp set. I used a ruler and my black stamp marker to draw the lines to make it appear the images were hanging from the words. This card is simple and I know that some of my cards lately have been simple, but I have to keep reminding myself that I am keeping up with my project and not giving up. There has been days were I have so many things going on where I want to give up, but I just keeping going and that is huge for me. Since tomorrow is a half day, I am hoping I can find my craft table and make a complex card for tomorrow's creation. Until next time, happy carding everyone.


Monday, November 25, 2013
Hoot Hoot!
Tonight's card was pretty simple to create, but it turned out super cute. Using my Silhouette, I cut out the different layers of the owl. Once everything was cut out, I adhered it together following the direction that were provided from Miss Kate Cuttables. That is one thing that I love about her SVG file is that she provides you with directions since there are so many different layers. Sometimes I feel like there are too many layers, but that doesn't stop me from creating the image. This card turned out super cute and this is one of three owls cards that I will be making this week. Until next time, happy carding everyone.


Sunday, November 24, 2013
Thank You!
Today I booked my first Stampin Up workshop so I thought I would make a simple Thank You card for the occasion. Never thought I would be booking workshops, but I am excited. Using my trimmer, I cut out the base and overlay for this card. I then used the Sassy Salutations and Regarding Dahlias to make the front of the card. There is a little more white space then I would have liked, but it still came out pretty good. This would be a great card to give to a customer after they purchased some products from me. Until next time, happy carding everyone.


Saturday, November 23, 2013
Opening of Deer Hunting
Today was the opening of deer hunting and my honey got his first deer. I am so happy for him. After 4 years of hunting with me, he finally got a deer. Since it was opening day, I thought a deer themed card was in order. I used my Silhouette to cut out everything besides the base of the card. I then stamped trees onto the oval and glued the deer on the card. I used my Big Shot to emboss the light brown overlay to make it look like a tree log. This card was pretty simple, but after getting up at 4:30 a.m. it was just what I needed today. Until next time, happy carding everyone.


Friday, November 22, 2013

Thursday, November 21, 2013
Caterpillar
After a long day at school, I came home and finished an order that I will be delivering this weekend. It seems like years since the last time I seen her so it will be nice to catch up. To finish off her order, I needed to make a birthday card for her two year old niece. I thought this caterpillar card was the perfect fit since it is so colorful. Using my Silhouette, I cut out 1.5" circles to make the body of the caterpillar. I then layered it so it appeared like it was inching across the card. Once the caterpillar was finished, I drew on a smile and antennas with a black marker. I added on pink circles to make the antennas stand out a little bit more. I didn't add the eyes yet since I will be getting some googely eyes from one of my fellow elementary teachers tomorrow. To finish my card, I stamped "happy birthday" from the Bring On The Cake stamp set. This card turned out super cute and I can't wait to deliver it this weekend. I hope she enjoys all of the cards that I have created for her. Until next time, happy carding everyone!


Wednesday, November 20, 2013
Baby Train
Tonight's creation is a baby themed card. I got my inspiration from Pinterest for this card. Using my Big Shot, I made the train carts with the smallest Deco Label framelit. I then used my Silhouette to cut out a scalloped border for the top of the train cart. To finish off the train carts, I used circle punches to make the wheels. Once they were adhered together, I stamped the zoo animals from the Zoo Babies stamp set. I made sure that they would be a little bit covered up by the train cart so that it appeared like they were sitting in the train. To finish the card, I stamped Congratulation at the top of the white overlay. I love how this card turned out. The train cards turned out super cute as well. Until next time, happy carding everyone.


Tuesday, November 19, 2013
Minnie Mouse
Tonight's creation is a Minnie Mouse for one of my best friend's niece. This card was pretty easy to make, but a lot of fun at the same time. Using my big shot, I made the bow and circles with the Gift Bow Bigz Die and Circle Framelits. Once all of the pieces were cut, I assembled the bow together. I then adhered the circles together to make it look like a Mickey Mouse head. To finish my card, I stamped "Happy Birthday" from the Sassy Salutation stamp set in white ink. This card turned out super cute. Making cards for children is a lot of fun since sky is the limit with them. They are interested in a lot of different things when they are younger. The hard part is just keeping up with everything, but my students at school help me out sometimes. Until next time, happy carding everyone.


Monday, November 18, 2013
Brayer Sunset Technique
Since I have several orders that I need to complete this week, I decided to get started on one of them tonight. One of my best friends wanted a birthday card for her nephew and he loves hunting so this card fits perfectly. After deciding on a theme, I wanted to try the sunset brayer technique and I thought it would fit the card them nicely. Since I am new to the brayer and the different things it can do, I found this video on Pinterest (http://www.youtube.com/watch?v=z-zHZQISoaw) which helped me create a sunset background with yellow and orange ink. Once the sunset was finished, I added grass to the bottom where it was still white with the brayer as well. I feel that it give it a hill like look when it was completed. I then went ahead and stamped the trees from the Lovely As A Tree stamp set on the overlay. Using my Silhouette, I cut out a buck to be adhered to the card as well. To finish this card, I stamped "Happy Birthday" in the right-hand corner. This card turned out great and my best friend loved it. I am always a little bit scared to try out a new technique when making cards for my customers since I never know if it will turn out or not, but I have to say that it turned out nicely. I can't wait to hear how her nephew liked this card when he opens it on his birthday! Until next time, happy carding everyone!


Sunday, November 17, 2013
Thanksgiving Owl
After a very relaxing morning, I decided that I needed to clean my craft room so I could find the tables. Who would have thought it could get so messy in only a week's time. I didn't get the whole craft room cleaned, but I found the tables which is a plus. But instead of talking about my mess, let's discuss tonight's creation.
Just like last night, tonight's creation is a Thanksgiving theme=since I needed to finish a customer order. After searching through my Silhouette library, I came across this cute Thanksgiving owl. This owl was one of the freebie of the day on Miss Kate Cuttables website a few weeks ago and I thought it was perfect for tonight's creation. Using my Silhouette, I cut out all of the different layers of the owl. Once the owl was cut out, I adhered the different layers together to make it complete. I then used my trimmer to cut the overlay and card base. Instead of using patterned paper for this card, I decided to use a stamp from the Gently Falling stamp collection to make a custom background. One thing that I love about Stampin UP is everything coordinates together and that allows me to make custom backgrounds like this one. Everything came together perfectly for this card and I hope that my customer loves the card as much as I do. Until next time, happy carding.

Just like last night, tonight's creation is a Thanksgiving theme=since I needed to finish a customer order. After searching through my Silhouette library, I came across this cute Thanksgiving owl. This owl was one of the freebie of the day on Miss Kate Cuttables website a few weeks ago and I thought it was perfect for tonight's creation. Using my Silhouette, I cut out all of the different layers of the owl. Once the owl was cut out, I adhered the different layers together to make it complete. I then used my trimmer to cut the overlay and card base. Instead of using patterned paper for this card, I decided to use a stamp from the Gently Falling stamp collection to make a custom background. One thing that I love about Stampin UP is everything coordinates together and that allows me to make custom backgrounds like this one. Everything came together perfectly for this card and I hope that my customer loves the card as much as I do. Until next time, happy carding.

Saturday, November 16, 2013
Gobble Gobble
Today was the craft show and it didn't go as well as I hoped. Everyone has their good and bad days at the craft show, you learn from it and move on. Besides the craft show, I spent the rest of the afternoon relaxing for the first in what seems like weeks. It was very nice and just what I needed after a long week. Enough about my day, let's discuss tonight's creation.
Tonight I decided to create a Thanksgiving card since I have been doing Christmas so much lately. The inspiration for this card came from Pinterest of course. I wanted to make the turkey so it stood out and wasn't like a normal one that you would see on a card. I used my scoring board to score a 1.5" strip of pattern paper. Once it was scored every 1/4", I fold it back and forth until it was finished. Instead of making it into a rosette, I made it into a fan for the turkey's feathers. I then used my Silhouette to cut out the different layers of the turkey body. After the turkey's body was adhered together, I glued it onto the fan. It looked a little weird at first since half of the body was floating in the air. I then embossed the white overlay with leaves using my Big Shot. After the card base was finished, I used my dimensionals to bring down his feet so they were attached to the base of the card and then used one by his head to keep it flat as well. After the turkey was adhered down, I created a banner for the bottom of the card where I stamped "Happy Thanksgiving." To get the ends of the banner somewhat perfect, I used one side of my hexagon punch to create the banner appearance. This card turned out very neat. It is different then traditional Thanksgiving cards that you see in the store, but that is what makes it unique. Until next time, happy carding everyone.

Tonight I decided to create a Thanksgiving card since I have been doing Christmas so much lately. The inspiration for this card came from Pinterest of course. I wanted to make the turkey so it stood out and wasn't like a normal one that you would see on a card. I used my scoring board to score a 1.5" strip of pattern paper. Once it was scored every 1/4", I fold it back and forth until it was finished. Instead of making it into a rosette, I made it into a fan for the turkey's feathers. I then used my Silhouette to cut out the different layers of the turkey body. After the turkey's body was adhered together, I glued it onto the fan. It looked a little weird at first since half of the body was floating in the air. I then embossed the white overlay with leaves using my Big Shot. After the card base was finished, I used my dimensionals to bring down his feet so they were attached to the base of the card and then used one by his head to keep it flat as well. After the turkey was adhered down, I created a banner for the bottom of the card where I stamped "Happy Thanksgiving." To get the ends of the banner somewhat perfect, I used one side of my hexagon punch to create the banner appearance. This card turned out very neat. It is different then traditional Thanksgiving cards that you see in the store, but that is what makes it unique. Until next time, happy carding everyone.

Friday, November 15, 2013
Craft Show Tomorrow
Unfortunately, I still have a few things to do before I am ready for the Craft Show tomorrow so this blog is going to be very short. Getting ready for the craft show has been a lot of work and I hope it pays off tomorrow. I must get back to getting ready so I can get a few hours of sleep. Until next time, happy carding everyone.


Thursday, November 14, 2013
Dahlias
All week I have been preparing for the Craft Show on Saturday. I have made 90 cards in the past 6 days and it has been a lot of work, but I have enjoyed every minute of it. Making cards is a passion of my mine and it is a lot of fun. I hope that I can share my passion with people at the Craft Show. Tonight's creation was inspired/cased from Cynthia Millan, it is very similar but different at the same time. Let's discuss tonight's card.

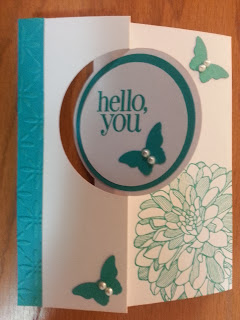

Using my trimmer, I cut a piece of card stock that would fit the thinlit. I then used the Circle Thinlit from Stampin UP to create the base of the card. The card stock was cut extra long so there was an extra flip for someone to write a message. Once the base was cut out, I punch out 2.5" and 2" circles. I then used the Regarding Dahlias stamp set to stamp the flower and "hello, you" onto the card. After the was finished, I punched out butterflies using the Bitty Butterfly Punch and placed two pearls in the center of them. Once everything was put together, I embossed the colored strip of paper and adhered it to the card. Even though this card was cased, it turned out wonderful and it has to be one of my favorite cards that I made this week. I could use this card for a few different occasions or to simply let someone know that I am thinking about them. Until next time, happy carding everyone.


Wednesday, November 13, 2013
Lovely As A Tree Sympathy Card
Tonight I decided that I wanted to use sponges to make my card. I found a card that used sponges that was similar to mine, but I changed it to make it my own creation. Using my trimmer, I cut out the base and overlays. Once that was completed, I embossed the light brown overlay using my Big Shot to make it look like wood. Then I stamped the trees onto the white overlay. I then used the masking technique to sponge the sky and grass. The masking technique helped so that I wasn't sponging green into the sky and vice versus. Before sponging, I adhered a 2" circle in the sky to give the effect of a sun or a shadow being in the sky that I took off once I was finished. To complete my card, I stamped "With Sympathy" in the upper left-hand corner. I love how the sponge technique give the card a realistic look like you are outside. Until next time, happy carding everyone.


Tuesday, November 12, 2013
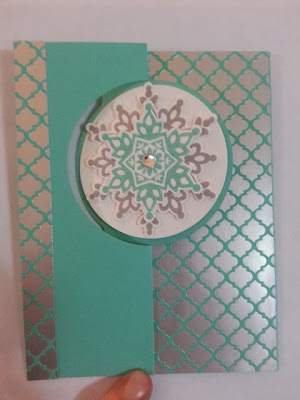
Stampin UP Thinlits
Using my thinlits from Stampin UP, I created tonight's creation. I made the paper extra long instead of the recommend size so that it had an extra flip for someone to write a nice Christmas message. It turned out pretty neat with the Christmas designer paper and the festive flurry snowflakes. Until next time, happy carding everyone.

Monday, November 11, 2013
Criss Cross Christmas Card
My new Silhouette has finally arrived and I am so excited to use it again. But I decided I want to create a criss cross card instead. There is something about using a different fold that I find a lot of fun. It makes the card more exciting for the person receiving it. Here are the intrusions if you want to recreate my creation (http://www.splitcoaststampers.com/resources/tutorials/criss_cross_card/). Time to go make more cards for the craft show and hopefully play with my Silhouette for a little bit. Until next time, happy carding everyone.

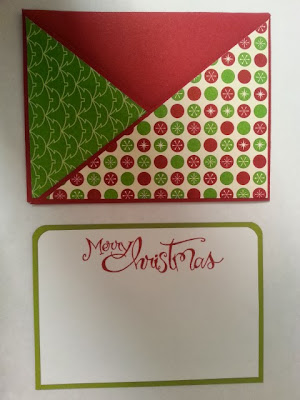

The card all put together.

The inside and outside of the card.
Sunday, November 10, 2013
Pop Up Slider Christmas Card
Another day of making cards for the craft fair and trying out new cards to show off there, I decided to make a pop up slider Christmas card. It had a great video tutorial to walk me through the different steps. Instead of boring you with the step by step instructions, here is the YouTube video tutorial (http://www.youtube.com/watch?v=5-bLf6OaP5Y). The card turned out pretty cool and I can't wait make it for other occasions. After making 50 cards this weekend and still having 50 more to do this week, I am excited to create new cards that will hopefully impress people at the craft fair. Until next time, happy carding everyone.


Saturday, November 9, 2013
Thank You
After making 30 cards today that I have already made before, I decide tonight was going to be a super easy card. I also decided to try a new technique that I have wanted to try for a while. To make the flower and thank you different colors, I took my reinkers and put several drops of each color onto a baby wipe. I then took my stamps and ink them up. When they are stamped on paper, it gives a very cool multi-color look to them. Since the card was pretty bare, I added a bird from the Besty's Blossom stamp set and then used my ink daubers to create a border. I am not overly impressed with tonight's creation, but I love the new technique. I will have to get more creative with this technique in the future. Until next time, happy carding everyone.


Friday, November 8, 2013
Snow Day
Even though we haven't had our first snow storm yet, I could really use a snow day. I better watch what I wish for or we might get more snow days then last year and I don't want that. The work week is finally over, but this weekend is not going to be as relaxing as I hoped for. I need to make 100 cards for a craft show next Saturday. I am off to a good start though since I made 6 cards tonight instead one like I usually do. Enough about me wanting a snow day, let's discuss tonight's creation.
Tonight's creation was inspired from Pinterest. Using my trimmer, I cut out the overlay and the base of the card along with an overlay to go under the brown overlay. After the brown overlay was cut out, I used my Big Shot and square framelits to make the window. It took a little bit of work to get everything lined up, but it gives the card character if everything is not perfect. Once the window was complete, I stamped the snowman and snowflakes onto the blue overlay. I then adhered it to the back of the window. This card turned out exactly how I envisioned it. I love how it appears that you are looking outside at the snowman that someone created. Time for bed so I can wake up and create lots of cards tomorrow. Until next time, happy carding everyone!

Tonight's creation was inspired from Pinterest. Using my trimmer, I cut out the overlay and the base of the card along with an overlay to go under the brown overlay. After the brown overlay was cut out, I used my Big Shot and square framelits to make the window. It took a little bit of work to get everything lined up, but it gives the card character if everything is not perfect. Once the window was complete, I stamped the snowman and snowflakes onto the blue overlay. I then adhered it to the back of the window. This card turned out exactly how I envisioned it. I love how it appears that you are looking outside at the snowman that someone created. Time for bed so I can wake up and create lots of cards tomorrow. Until next time, happy carding everyone!

Thursday, November 7, 2013
Simple Festive Flurry
Today was crazy busy with everything that I had to do at school and after school. Thankfully I didn't get another migraine so I could actually do what I need to get done. After returning home, I decided that it was going to make a simple card since I wanted to go bed at a decent time. Tonight's card was cased from a picture I saw on Stampin' Connections. Since the colors went so well together, I didn't want to change it. Enough about my day and inspiration and let's discuss tonight's creation.
Using my trimmer, I cut out the different card base and the different overlays needed. I then proceeded to stamp the snowflakes from the Festive Flurry stamp set onto white card stock. To cut them out, I used my Big Shot with matching framelits. After everything was cut out, I assembled the card together and stamped "Merry Christmas" on the bottom of the white overlay. I love absolutely love how tonight's card turned out. Until next time, happy carding everyone.

Using my trimmer, I cut out the different card base and the different overlays needed. I then proceeded to stamp the snowflakes from the Festive Flurry stamp set onto white card stock. To cut them out, I used my Big Shot with matching framelits. After everything was cut out, I assembled the card together and stamped "Merry Christmas" on the bottom of the white overlay. I love absolutely love how tonight's card turned out. Until next time, happy carding everyone.

Wednesday, November 6, 2013
Another Migraine
Unfortunately, I have another migraine today so tonight's creation is pretty simple. Searching through Julie Davidson's, I came across this idea. I cased her card, but changed the colors to my liking. Using my artisan label and bitty butterfly punch, I created the main parts of the card. I then used my trimmer to cut out the card. I used dimensionals to make the white artisan labels pop off the card a little bit. To finish my card, I stamped "you are simply wonderful." Even though this card is simple, it could be used for a few different occasions. Until next time, happy carding everyone.


Tuesday, November 5, 2013
Thinking of You
Since I have a migraine, the describe of this card is going to be short and sweet. Using the Betsy Blossom and Teeny Tiny Wishes stamp sets, I stamped the flower and the sentiment for this card. I used my trimmer to cut out the two overlays for the pre-made card. I used my word window to punch out the sentiment and then used the modern label for the background. This card didn't turn out the way I wanted it to, but I don't know if it is the color scheme or something else. Hopefully tomorrow, I won't have a migraine so I can put more effort into my creation and my blog. Until next time, happy carding everyone.


Monday, November 4, 2013
Caroling Mouse
Since my Silhouette is out for repair and I am limited on Christmas stamps, I decided to use my Cricut tonight. I don't even remember the last time I have created a card with it. Using the Create a Critter 2 and Christmas Cheer cartridges, I cut out the mouse, music notes, and the joy banner. Once all of the pieces were cut out, I adhered them together. I then cut the card base and overlay. After everything was assembled, I adhered the mouse, banner, and music notes onto the overlay. Once it was completed, I thought it was still missing something. A friend suggested that I put rhinestones on the music notes to give it some bling and that's exactly what it needed. By not using my Cricut for a long time, I forgot how weird the measurements are and how much you have to play around with it to get the sizes that you need. But the cards still turned out and that's all that matters. Until next time, happy carding everyone.


Sunday, November 3, 2013
Another Snowman!
Today has been a very productive day for me. I have created four cards and that includes the creation for today's blog. On top of being creative I also made pasta salad and washed the sheets (mind you it's Sunday and only 3 p.m.) We should set our clocks back an hour more often as I wish I could be this productive all the time. It helped that I had a friend coming over so that motivated me as well so I wasn't worrying about my card after he went home. But enough about my day and onward with the blog.
This card is a little bit out of my comfort zone since I usually have an overlay on my card base. Cutting a piece of designer paper that was about 2" thick for the top of the card I then cut out the deco label and the word "Merry" from the Deco Label Framelits and Expression Thinlits. These items are very unique in shape and without my trust Big Shot (as the Silhouette is out for repair) I was able to create them with ease. Then I stamped my snowman onto the label using colors that matched with the strip of paper at the top of the card. Once that I was completed, I adhered everything together. I felt like something was missing so I took one of my Merry Christmas stamps and only colored in the word "Christmas." After it was stamped onto a piece of white paper, I cut around the edges so it had the same about of white on all sides. Using my scissors, I cut a triangle off one end to make it look like a banner. I am not exactly sure how I feel about tonight's creation, but it turned out pretty well. It is a little bit different not using an overlay, but I need get out of my shell and be more creative. This will help me grow as a card maker and expand my card collection that much more as well. Until next time, happy carding everyone.

This card is a little bit out of my comfort zone since I usually have an overlay on my card base. Cutting a piece of designer paper that was about 2" thick for the top of the card I then cut out the deco label and the word "Merry" from the Deco Label Framelits and Expression Thinlits. These items are very unique in shape and without my trust Big Shot (as the Silhouette is out for repair) I was able to create them with ease. Then I stamped my snowman onto the label using colors that matched with the strip of paper at the top of the card. Once that I was completed, I adhered everything together. I felt like something was missing so I took one of my Merry Christmas stamps and only colored in the word "Christmas." After it was stamped onto a piece of white paper, I cut around the edges so it had the same about of white on all sides. Using my scissors, I cut a triangle off one end to make it look like a banner. I am not exactly sure how I feel about tonight's creation, but it turned out pretty well. It is a little bit different not using an overlay, but I need get out of my shell and be more creative. This will help me grow as a card maker and expand my card collection that much more as well. Until next time, happy carding everyone.

Saturday, November 2, 2013
Origami Christmas Tree
What a day! It couldn't have went better if I asked. We went to look at the venue for our wedding since it is booking up fast. Even though everything was died, we still fell in love with the place and booked it for June 13th, 2015. They have a lot of projects that want to get down so who knows how it will look come 2015. Non the less, we are super excited to have one thing checked off our list. Enough about the venue and onto tonight's remarkable creation.
Being a person that likes to try new things, I decided tonight was the night to create an origami Christmas tree. After watching a video (which I will post at the bottom of my blog), it was quite easy to make. It looks a lot more complicated then it really is. I started with cutting out four squares that were all different sizes. I then folded each square from one point to the other point and then did the other side as well. I then folded it in half one way and then in half the other way. Using my bone folder, I made sure the folds were creased very well. Once the paper was folded, I pushed in the middle lines on both sides to make a triangle. I then took one of the sides and fold into the center where the middle line is and repeating this on both sides. Once all of the squares were completed, I stacked them to create the tree. After my Christmas tree was created, I punched out a star using my Creative Memories for the top of the tree. This card turned out pretty cool even though it is not perfectly lined up. Even my cat thought it was cool since she tried running off with the pieces several times. Until next time, happy carding everyone.

Measurement Guide
(a) Square: 3" by 3"
(b) Square: 2.5" by 2.5"
(c) Square: 2" by 2"
(d) Square: 1.5" by 1.5"
(e) Card: 5.5" by 4.25"
(f) Overlay: 5.25" by 4"
Video: http://penguinstamper.blogspot.com/2011/12/origami-christmas-tree.html
Friday, November 1, 2013
Christmas Stamp-a-Stack
Tonight was such a blast. I couldn't have asked for a better group of people to send 3 hours with creating Christmas cards. It is amazing what you learn from other people that seems so simple, but yet it isn't something you would have thought of. Like last time, I learned a new trick that just amazed me since I didn't think of it before. Instead of using a whole sheet of paper for an overlay, she just cut 2" strips for the edges so that it looked like there was an overlay underneath. It is the little things that just have me in aww lately. Since the cards were pre-cut for me and scored, I won't go into much detail about the cards, but if you have any questions, please don't hesitate to e-mail me. Let's discuss tonight's five creations.
Creating these five cards was a lot of fun since we got to use so many different tools that Stampin UP has to offer. Besides the tools, we got to use a lot of the new holiday stamp sets as well. Just when I thought I was done ordering from the Holiday catalog, I found more things that I want to get now. It was just cool to see how many different tools and stamps you could use for just one card. Until next time, happy carding everyone.


Creating these five cards was a lot of fun since we got to use so many different tools that Stampin UP has to offer. Besides the tools, we got to use a lot of the new holiday stamp sets as well. Just when I thought I was done ordering from the Holiday catalog, I found more things that I want to get now. It was just cool to see how many different tools and stamps you could use for just one card. Until next time, happy carding everyone.


My Personal Favorite


Subscribe to:
Posts (Atom)