Thursday, October 31, 2013

Happy Halloween!

Halloween is about craving pumpkins, dressing up, and going trick or treating.  The kids at school were super excited to dress up tonight in their costumes and get lots of candy.  I am not completely sure their stomachs have recovered from all of the goodies that they ate at school, but I know that won't stop them from eating more candy.  Tomorrow they will all be crashing from their sugar high.  Enough about Halloween and my student's, let's discuss tonight's creation.

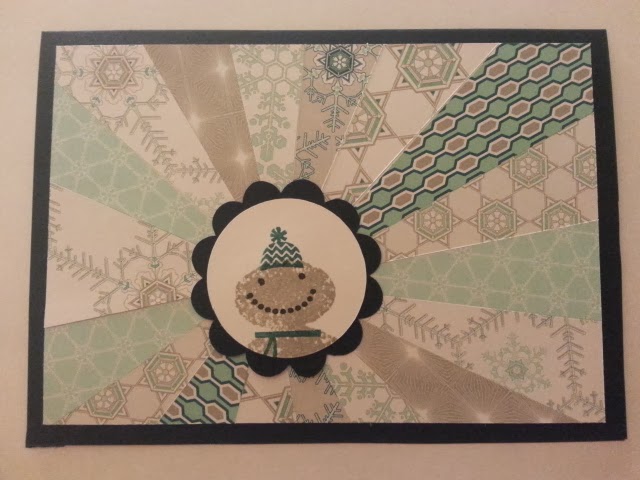
Since it is Halloween, I decided to take a break from Christmas cards and create a card in honor of the holiday.  Using my Big Shot, I used my Deco Label Framelits to create the two overlays.  Once those were cut out, I stamped the pumpkin on the white overlay and then stamped on the face.  I then stamped the hat and star on separate piece.  After they were dry, I used my scissors to cut them out.  Cutting out stamps is not that bad as I thought it was going to be.  My fiance asked why I don't cut out more stamps since it looked so great.  I then adhered the hat and star on top of the pumpkin.  Finishing my card, I stamped "Happy Halloween" on the bottom.  Even though I got called the Grinch of Halloween since I didn't hand out candy tonight, I still enjoyed the holiday and can't wait to celebrate it with a child of my own one day.  Until next time, happy carding everyone!


Wednesday, October 30, 2013

Scrap Hexagon Card

You never realize how important something is until it is gone for repair.  I had several ideas tonight for a card, but most of them required something made with my Silhouette.  Since I made a lot of Christmas cards last week, I had a lot of Christmas paper scraps and I decided to use them to make this creation with hexagons.  I used my hexagon punch to punch out different patterns.  Once all of the hexagons were punched out, I laid them out on the white overlay arranging them so no alike patterns were touching each other.  I then adhered them to the overlay and cut off whatever was hanging over the edge.  To finish my creation, I stamped "Season's Greeting" from the Joy to the World stamp set on the top of my card.  After making tonight's creation, I decided that I need to buy the Stamp-A-Ma-Jig from Stampin UP so that my stamps are actually straight.  Until next time, happy carding everyone.


Tuesday, October 29, 2013

Lovely As a Tree

Tonight's creation didn't take me very long to create.  I just had to experiment a little bit to make the image come out just right.  To get the two shades of trees, I stamped the image twice on a scrap piece of paper and then stamped it onto the white overlay.  Once that was dry. I inked the stamp up again and lined it up with the previous stamped and stamped the image.  It created a nice shadow effect. After the trees were done, I stamped "With Sympathy" in the right-hand corner.  Even though this card was clean and simple, it shows the person that you care and that you are thinking about them.  Until next time, happy carding everyone.


Monday, October 28, 2013

Stampin UP Night!

After a very long day, it was nice to have some time to make cards with a few ladies.  It was just what I needed after my Silhouette died this weekend.  On a positive note, after a long question filled session I will be receiving a new machine (hopefully defect free).  I'm quite relieved since I was not prepared mentally or financially ready to buy a new one.  Since I created three cards tonight, I will be sharing a tip that I was taught by a fellow friend who does work with Stampin UP.

First, let's talk about the new trick that I learned.  We took white string and colored it with an ink dauber and an ink pad.  I laid the string on the ink pad and then placed the ink dauber on top.  With the ink dauber on top of the string, I placed the string and it took the ink from the dauber and the ink pad and colored the string.  It was pretty neat.  We all thought she colored the string before she showed us the cool trick for the first card.  The other two cards are pretty easy as well.  We used the new Thinlits from Stampin UP to make the middle card.  The last card is a gate card and that was probably the easiest card we created tonight.  I had a lot of fun making these three cards.  I can't wait to go to the Christmas Stamp-a-Stack on Friday.  Until next time, happy carding everyone.


Sunday, October 27, 2013

Fall Leaves

Even though my Silhouette locked up on me last night, I decided I couldn't let it get me down today.  It will either get fixed or I will have to buy a new one.  Instead of sitting around doing nothing, I decided to rearrange my craft room.  It didn't turn out exactly the way I wanted, but someday when we own a house, it will be prefect.  For now though, this will have to do.  Enough about my craft room and on wards with tonight's creation.

Tonight's creation was inspired from Pinterest.  I pinned a card that was very similar to the one that I created and one of my co-workers wanted me to make it for her.  Using my trimmer, I cut the base of the card and the two overlays.  I made the second overlay an half of an inch smaller on both sides so that when I cut it in the three sections it lined up.  Once they were cut, I used a dot stamp from the Beyond the Basics to create the yellow dots on the overlay.  I then stamped three fall leaves randomly on the overlay using the Magnificent Maple in three different colors.  To finish the overlay, I stamped "Thinking of You" from the Sassy Salutations stamp set.  Once the overlay was complete, I cut the overlay into three 2" sections.  I then placed them on the white overlay with about a 1/4" in between each section.  This card turned out pretty neat.  The background would have been easier if I would have had the Gorgeous Grunge stamp set, but I used what I had on hand.  Until next time, happy carding everyone.


Saturday, October 26, 2013

Snowman Burst

Today was a great day, but it ended badly since my Silhouette Cameo decided to lock up on me.  The only way to get the noise to stop was turning it off and that didn't fix the problem.  Hopefully, Silhouette will contact me on Monday about a solution.  Unfortunately, I am not in the mood to explain the process of tonight's creation.  Hopefully, tomorrow will be a better day of crafting. Until next time, happy carding everyone.


Friday, October 25, 2013

Double Slider Card

Since I have created clean and simple cards this week, I decided to create a card that I haven't created yet for this project.  It is called the Double Slider Card.  It looks complicated, but if you read the directions before starting, you will have no problem putting it together.  Instead of boring you will every direction, I will attach the instructions at the bottom of my blog.  This remarkable creation was a lot of fun to make and I will be using it for several different occasions in the future.  Creating this card was just what I needed after a very overwhelming day of meetings at school.  Until next time, happy carding everyone.

Front of the Card

Card Slide Open

Thursday, October 24, 2013

Christmas Tree

Even though it is only Thursday, it sure feels like a Friday.  One more day of the work week and then I  finally get to enjoy two days of sleeping in.  Since it has been a long week, I created another simple card tonight, but none the less, it is still a remarkable creation.  Let's discuss tonight's creation.

Using my trimmer, I cut out the two overlays and the base.  Once those were cut out, I stamped the Christmas Tree from the Special Season stamp set onto the white overlay.  After stamping the tree, I used my embossing buddy on the bottom of the card to help unwanted flecks of embossing powder from sticking the paper.  I then used VersaMark to stamp "Christmas Greetings" from the Special Season stamp set as well.  Once that was completed, I put sliver embossing powder over the sentiment making sure their was no unwanted flecks on the paper before heating it up.  I then used my heat gun to give it a shiny finish.  Completing my card, I adhered everything together and added rhinestones onto the tree to make is sparkle more.  Even though this card was simple once again, it is still homemade and comes from the heart.  Until next time, happy carding everyone.


Wednesday, October 23, 2013

Presents!

Today started out slow, but by the time school was out it seemed to pick up stream.  While I had grand plans to do a very remarkable (and rather elaborate one at that), I felt it was in my best interest to take it easy tonight.  While tonight's creation uses elements I've used over the last few months, it seems only fitting that it all comes together nicely for this Christmas card.  Enough wit the excuses already let's get down to business explaining tonight's card.

Using my trimmer, I cut out all of the elements besides the bows for the presents.  I used a flower punch for the bows and then placed a rhinestone in the middle.  After everything was cut out, I embossed the white overlay with snowflakes using my Big Shot.  Once that was done, I adhered everything to the card and then stamped "Happy Holidays to you & yours" from the Joy to the World stamp set.  I absolutely love this card.  It was quite simple to make, but it pops off the paper well.  Until next time, happy carding everyone.


Measurement Guide:
(a)  Solid Square:  1.5" 1.5"
(b)  Patterned Square:  1.25" by 1.25"
(c)  Strip:  .25" by 1.5"
(d)  Green Overlay:  4" by 2.25"
(e)  Small White Overlay:  3.75" by 2"
(f)  White Overlay:  6.75" by 4.75"
(g):  Card Base:  10" by 7"


Tuesday, October 22, 2013

Snowflakes

Tonight's creation was a bit of an experiment since I didn't have a clue what I was doing.  While I did watch a video tutorial before making my card, it didn't help as much as I would have liked.  Using my trimmer, I cut out the base and two overlays.  Once the white overlay was cut out, I used VersaMark ink to stamp different size snowflakes randomly on the overlay.  After that part was finished, I took clear embossing powder and covered the snowflakes.  Then tipping the overlay so that the excess embossing powder would fall into the container (to be reused at a later date).  Once that was done, I used my heat gun to apply heat to the powder until it was a clear and gave a nice shiny color.  I then inked up my brayer with ink from Island Indigo.  I then ran it across the white overlay both ways until it was completed covered.  After brayering the background I felt that the the overlay was still missing something.  This is when I decided to cut out two pieces of paper and stamped "Christmas Wishes" on the white one.  I adhered the sentiment in the middle of the card.  While this card did not turn out the way I had envisioned, I think it was because I did something wrong along the way.  I will have to try this technique again after I do some more research to correct the error of my ways.  Until next time, happy carding everyone!


Monday, October 21, 2013

Snowman!

Unfortunately, I had a migraine when I got home today so I opted to make a simple card tonight.  Using my Stampin' Trimmer Rotary addition, I cut out the card base and the two overlays.  I used the straight blade for the base and the green overlay and then I used the small scallop blade for the white overlay.  The scallop blade gave it card an extra touch that really helped it stand out more.  After the everything was cut out, I used the Snow Day stamp collection to stamp everything on the card.  Even though this card was super easy to create, it is a great card to send to someone this holiday season.  Until next time, happy carding everyone.


Sunday, October 20, 2013

Snowburst

Today was a great day.  I got to spend time with my dad and fiance goose hunting.  We didn't get any geese, but we still have fun.  I enjoyed hearing all my dad's stories about other hunting trips while sitting in the goose blind.  When he was telling a story, I forgot about being cold.  It was a quite chilly outside with some rain, but it didn't matter since I was with my dad enjoying each others company and hoping for a dumb goose to fly low enough for us.  Even though it was an exhausting day that started at 3:30 a.m., I still had time for a remarkable creation tonight so let's discuss the details of the card.

Keeping with the Christmas theme so that I make sure they are all completed, I made a card using the sunburst technique.  I choose various Christmas theme paper to make the sunburst on half of the card.  Once the patterns were chosen, I cut them in 2" by 6" strips and then cut them diagonally from point to point which created a nice triangle shape.  After I made ten triangles, I placed them in order on the overlay that was ran through my Xyron to apply adhesive to the whole thing.  After the paper was placed on the overlay, I trimmed off the excess paper that was hanging over the edge.  I then cut off 2" from the bottom of the overlay so that i had room on the card to stamp a salutation once the card was complete.  Before completing the card, I stamped two snowflakes and cut them out using the snowflake framelits.  Using the same framelits, I cut out the silver glitter snowflake as well.  Once the snowflakes were completed, I adhered them together with dimensionals so that it would pop off the paper a little more.  I then placed the snowflakes in the middle to cover up the center of the sunburst.  Finishing the card, I stamped "Merry Christmas" in the middle.  I was hoping to use my new rotary trimmer on this card, but I didn't take that into concentration when I was cutting the overlay.  It is something I will have to remember for next time.  Until next time, happy carding everyone. 


Saturday, October 19, 2013

Snowman Telescoping Card

Today was a lot of fun.  I got to go wedding dress shopping with one of best friends for her wedding next October.  After trying on several dresses, she said yes to the dress.  It is a beautiful dress and I am glad that I got to be involved in the process.  Once she said yes to the dress, we head home and got some grocery shopping done for the week.  Enough about my day, let's discuss tonight's card.

Using my Big Shot, I cut out the different sized circles with my circle framelets.  Those are very handy to have around since it made this card a lot easier.  Once all of the circles were cut out, I embossed the middle white circle with a snowflake.  I then added buttons and arms to the middle circle.  Once the middle circle was complete, I added the rest of the accessories to the snowman.  After all of the circle were finished, I used my new paper-piercing tool and pierce mat to pierce a whole through the largest circle with the middle circle overlapping onto the largest circle.  I then put a mini silver bard through the hole and closed it.  Then opening up the second circle and laying the smaller circle in the middle, I used my piercing tool again to pierce through the two layers and put another brad trough the hole and closed it.  Once the snowman was finished, I stamped "Happy Holidays to you & yours on the largest circle.  This card didn't completely turn out the way I hoped it would, but there is always next time.  I know what I need to fix.  Until next time, happy carding everyone.


Friday, October 18, 2013

Christmas Bulbs!

It is finally Friday.  I thought this day was never going to come, but it has finally arrived and I am ready for a very busy weekend.  This week has been extremely long with meetings, parent-teacher conferences, and of course the day to day responsibilities of being a teacher.  Even though this week has been exhausting, I have been looking forward to receiving more Stampin UP goodies.  I even used a few of my new goodies on tonight's creations.  Let's discuss tonight's creation.

Using my new Blossom Petals Punch, I punched out four small petals in primary colors to make the Christmas bulbs.  I then used the Modern Label to punch out two separate black labels.  Once that was done, I cut them into thirds so that I could use the two end pieces as the base of the bulbs.  After the bulbs were completed, I used my Bird punch and punched out three branches in black.  Then I removed the leaves to give it the appearance of a power cord.  Once the string of lights were completed, I stamped "Merry Christmas" from the Sassy Salutations stamp set.  Since there was a lot of white space I decided to stamp snowflakes random on the overlay until I was satisfied with it.  This was not the card I planned on creating tonight, but when you talk on the phone for over an hour and play with your new goodies, time seems to get away from.  This is a simple creation and the person receiving it will enjoy it none the less.  Until next time, happy carding everyone!


Thursday, October 17, 2013

Joy to the World!

Tonight we had parent teacher conferences until 7.  So I will be keeping this blog post as short as possibly since I am exhausted.  Since I knew I wasn't getting home until late tonight, I searched Pinterest this morning for some inspiration for an easy card.  I have also resorted to triple time stamping when I want to complete an easy card in a short amount of time.  Tonight wasn't any different, but I gave it a different look then I have done in the past so let's discuss today's creation.

Using my Stampin UP trimmer, I cut out different sized overlays and a card base.  Once they were all cut out, I arranged them on the card the way I want them.  I then removed the colored overlay from the back of each white overlay.  Using a little bit of tape runner, I adhered them down so that they won't move when I was stamping onto the overlays.  I started with the sentiment since I want to make sure there was enough room for it and that it wasn't covering anything up.  I then proceeded to stamp snowflakes from the Festive Flurry stamp set to cover up the white area.  Once I finished stamping, I adhered the white overlay to the colored overlay.  Finishing my card, I aligned the snowflakes up so that and adhered the colored overlay onto the base of the card.  I love triple time stamping and this gave a great twist to the technique.  Until next time, happy carding everyone.


Wednesday, October 16, 2013

Snowman!

Today went pretty fast.  It seemed like I sat down  to write some lesson plans for next week and it was already time for Computer class.  As I walked around the room in my various classes, I was happy to see the students using the home row.  It has been a struggle to keep their hands on the home row since bad habits have already started, but I think they are seeing the benefit of using the home row now.  Enough about my day and my wonderful students and onto tonight's creation.

After creating a few complex cards for the week, I decided it was time for a simple one.  Using my trimmer, I custom cut my card base and overlay.  Once those were cut out, I took out my Snow Day stamp set and a few ink pads.  Using the masking technique, I stamped five snowmen in different spots on the overlay.  Once the body of the snowmen were complete, I added a face, arms, and buttons to them.  After completing my snowmen, I noticed I had room for a sentiment so I stamped "Christmas Wishes" in the open space from the Joy to the World stamp set.  I still thought something was missing so I add some snowflakes onto the card as well.  Tonight's creation was inspired from Pinterest, but I changed it to make it my own.  I love how this card turned out and I might have to make a few more since I still have 50 cards left to make before December 1st.  Until next time, happy carding everyone.


Tuesday, October 15, 2013

Bear in Present

With rain showers and plenty of cold air this morning, it definitely felt like we had finally changed seasons.  Most of the trees in the area have dropped their leaves, and are now naked waiting for that first snow.  I fear that instead of a pretty white coat, we are in for a long winter.  Thankfully when the weather doesn't cooperate outside I can always cuddle up with a cup of hot chocolate.  Plus to keep myself from developing a case of cabin fever, my remarkable creations are a nice break from reality.  Enough talk of seasons that are full of chilly mornings and onto the creations for today.

Since December 1st will be here before I know it, I have created another Christmas card tonight.  Using my Silhouette, I cut out the teddy bear and present.  This image required some assembling like most images that I cut out using my Silhouette do.  After the teddy bear and present were assembled, I used my Stampin UP trimmer to custom cut the card and white overlay.  Using my Big Shot, I embossed the white overlay with candy canes to give it some extra texture.  Once the overlay was completed, I finished assembling my card.  I would have like to included a sentiment, but unfortunately there was not much room left.  Until next time, happy carding everyone.


Monday, October 14, 2013

A Twisted Christmas Easel Card

Since I had an awful day at school, I came home and reveled some stress by creating tonight's creation.  This card was featured on the Stampin UP Demonstrator page, but she was kind enough to list her directions on Split Coasts Stampers (splitcoaststampers.com).  This is a free website that anyone can join and has lots of ideas for everyone.  After reading through all of the directions this time, my card turned out exactly the way it should have.  The directions for this card will be attached to the bottom of my blog.  This women did a wonderful job on this card and I am very happy that she shared the directions with all of us.  Until next time, happy carding everyone.


Directions:  http://www.splitcoaststampers.com/forums/project-instructions-f142/twisted-easel-card-t579519.html#post20371772

Sunday, October 13, 2013

Mini Blind Card

As I was enjoying my Sunday afternoon, I realized that there are only 72 days until Christmas, which means there are only 47 days until December 1st.  Since I try to mail out my Christmas cards on December 1st so that they arrive before the craziness of Christmas begins.  Last year, people didn't receive their card until about 3 weeks after we mailed them since our Post Office decided to hold on to them for an extra two weeks until they mailed them out.  This year I am taking them to a different Post Office to mail them out so that doesn't happen again.  With this being said, I will be making Christmas cards until December 1st since I have over 50 cards to make.  Let's briefly discuss tonight's creation since I had hard time following directions.

Tonight I decided to make a card that was more challenging then my recent cards this past week. This card was pinned awhile ago, but I haven't had the chance to make it yet so I decided to go searching for the instructions. I learned that I should read all of the instructions and not assume that I know how to  make the card just by looking at the pictures.  Since I didn't read the instructions this card not turn out the way I envisioned.  Instead of me telling you how I made the card, I will be providing the link to the instructions.  I thought that would be more helpful since I couldn't follow them in the first place.  Until next time, happy carding everyone.

Blind Closed

Blind Opened


Saturday, October 12, 2013

Mr. Potato Head

Today I was able to spend some quality time with my best friend in the whole world.  As it turns out I received the best news I've had in a while, as she is moving back home in December!  Who needs presents, when you have good friends that you can depend on.  While spending time together for the first time in over 6 months we were able to reconnect and catch up on each others lives.  While social media (mainly Facebook) is a nice way to keep track of friends, nothing matches meeting face to face.  Onward with the creation for tonight, while browsing blogs yesterday I lucked out and found that one of blogs I subscribed to was offering this beautiful "Mr. Potato Head" SVG file.  As he is a very creative individual, I was able to customize a lot of different features and in the next paragraph I will tell you how I did it!

Using my Silhouette, I cut out the different pieces that make up Mr. Potato Head.  After putting him together, I decided that he needed something more and I cut out a birthday hat to go his head.  Once Mr. Potato Head was completed, I then used my Silhouette to cut out some confetti and place it randomly around him.  Using my Sassy Salutations stamp set, I stamped "Happy Birthday" onto the card.  To make the stamp show up the way it does, I used my stamp markers to color the words individually and then cleaned the stamp to stamp the other word.  This card did not turn out the way I envisioned since I cut Mr. Potato Head way to big and had to make a giant card for him.  My nephew will enjoy this card for one of his birthdays and what kid doesn't like to receive an extra large card for their birthday.  This card brought back memories from my childhood like it probably does for most people that had a Mr. or Mrs. Potato Head when growing up.  Until next time, happy carding everyone!


Friday, October 11, 2013

Floating Snowflakes!

After which seemed like a really long week, it is finally Friday.  I decided to make a floating card again, but this time with snowflakes.  Instead of boring you with the details of my card, I will attach the video tutorial to the end of my blog as well as the link to my floating flower card.  This way you can either watch the video or read my previous blog to learn how to make this remarkable creation.  This creation is quite easy to make and can be used for several different occasions.  Until next time, happy carding everyone!

Outside of the Card

Inside of the Card


Thursday, October 10, 2013

Scarecrow!

Today was a great day for a few different reasons.  I didn't get a migraine for the second day in a row so I am hoping my new medication is finally working.  Also, the student that finished her lesson in 5 minutes last week did it again today and I taught her two new letters.  I have a feeling that she is going to be a fast typist if she keeps up the hard work.  Enough about my day and onto tonight's creation.

This morning I downloaded the freebie of the day from Miss Kates Cuttables like I do every morning, but today I got an instant idea in my head for today's card.  While at school I kept thinking about my idea and adding things until I arrived at tonight's creation.  First, I stamped the pumpkins on the bottom of my white overlay.  To get the pumpkins so they were not overlapping, I used a technique called masking.  I stamped the image onto a piece of paper and then cut it out.  I used that to put over the stamp that was already there and when I stamped the next pumpkin whatever was overlapping went onto the scrap piece of paper.  I really like how this technique worked.  Next time, I will be using posted notes that so that is sticky and doesn't move while I am stamping.  Once the pumpkins were finished, I used my stamping sponges again to create the background.  I have fallen in love with that technique as well.  While I was working on the overlay, my Silhouette was cutting out the different pieces for my scarecrow.  After I stamped "Happy Halloween," on the overlay, I assembled my scarecrow.  It was pretty easy to put together the scarecrow tonight unlike the tree from last night.  Once the scarecrow was assembled, I adhered it to the overlay.  I absolutely love how tonight's creation turned out.  I used a new technique and it actually worked out the first time.  Until next time, happy carding everyone.


Wednesday, October 9, 2013

Sympathy Card

Tonight's card was a bit of a struggle since I had to make a sympathy card.  Sympathy cards are never easy and when you know the person it makes it that much harder.  One of my fiance's cousin dad passed away last night.  Unfortunately, I only got to meet him once, but he seemed like a great guy just from the one meeting.  He will be greatly missed by friends and family that had the honor of knowing him.  As a dedication to him, I plan on giving his family this card to them out of our condolences for their loss.

Tonight's creation was created using my Silhouette as well as my paper trimmer.  First, I used my Silhouette to cut out the different layers of the fall tree.  While my Silhouette was taking its time cutting out the tree, I used my trimmer to custom cut the base as well as the white overlay.  Once the Silhouette was finished, I assembled the tree together.  I think that every Silhouette file should come with a set of instructions since this tree was not the easiest to put together.  There may not have been may pieces, but trying to figure out the order was a challenge all by itself.  After the tree was assembled, I used stamping sponges to make the background.  I love using new techniques and this technique came out quite well.  Even though this card is to show our condolences I hope that the family enjoys the peaceful tranquility, and can remember the positives of the loss of Bill.  Until next time, happy carding everyone.


Tuesday, October 8, 2013

Halloween Snowman!

Today was a very long day since I had to get up extra early to attend an award ceremony in Madison.  Our school received the School of Recognition Award for the second year in a row. This award goes to schools for their work to break the link between poverty and low academic achievement through rigorous programming and attention to student needs.  I was very honored to be able to accept this award on the behalf of my school.  Our teachers and students have worked very hard and I am honored to be part of all of the great things that we do for our students.  Enough about the pleasures of being a teacher and let's discuss tonight's creation.

Since I woke up in the dark and came home in the dark, I decided that an easy card was in order tonight.  I used a pre-made card from my collection to make tonight's creation.  I am hoping that I will soon run out of my pre-made cards, but just when I think I've used them all I'll find another box.  After picking out the card, I used my trimmer to cut out the white overlay.  I then stamped the orange snowman onto the white overlay.  Using another stamp set, I stamped the triangle eyes onto the snowman.  The stamp set that I have for jack-o-lanterns had a few face choices for the snowman, but they were all too big so I drew the mouth onto the snowman.  Once the face was completed, I used the snowman set again to stamp the buttons on him.  After the Halloween snowman was finished, I stamped "Happy Halloween" on the top of the overlay.  I then used my ink dauber and went around the edges to make the border.  When creating this card, I didn't really have a vision in mind.  I just started stamping and it lead me tonight's creation.  Until next time, happy carding everyone.


Monday, October 7, 2013

Creative Fold

Lately, I have been on a kick of turning out new folds.  Tonight is not any different since I came across this neat fold while looking through samples on Stampin UP Connection.  Today's creation comes with a YouTube video that someone has already made.  It made creating this card super easy and I got to use my envelope punch for something besides just an envelope.  I have posted the YouTube video at the end of my blog so that you can view it if you would like to make this card as well.  I would describe how to make the card, but I have a lovely migraine again today.  I am hoping that I can go a few days this week without a migraine so that I can put my best effort into writing a blog for you.  Until next time, happy carding everyone.

Outside

Inside


Sunday, October 6, 2013

Wedding!

After spending the morning catching up on the final season of my favorite television shows (Dexter), three o'clock came much quicker then anticipated.  Big plans today, as my fiancee and I sat down with our best man to be and picked out a wedding date.  Although the final date is less then two years away, it's a very rewarding feeling to have a date chosen.  Now it's onto the next big step, choosing a venue and a photographer; as one only knows that the time will fly by and the date will be here before we know it!  Enough details for the day let's get on to the details for tonight's creation.

This evenings creation had a wedding theme as it was a special order from a fellow teacher at school.  It also seemed fitting as with the days special events with the fiancee.  I first used my owl punch to create a special edition "his" and "hers" theme, clearly a tux and white dress were in order to keep with the theme.  I then used the Silhouette to cut out the large red heart for a special shaped overlay, then I followed up by making another overlay.  This time, it was a solid white piece which was cut to size 1" shorter then the base of card.  I had to leave 1" of room so that I was able to place my sentiment on the bottom and have enough separation to help make it stand out more.  Next up on the docket was using my Big Shot, which assisted me in embossing hearts onto the white overlay.  Finishing off the card with my VersaMark to stamp I placed "Congratulation's" on the bottom of the card.  I then sprinkled on black embossing powder and used the my heat gun to give it a nice shine.  I enjoy this creation and hope the happy couple can appreciate my time and efforts put into this remarkable creation.  Until next time, happy carding :)


Saturday, October 5, 2013

Happy World Cardmaking Day!

Today I planned on making a card that used several of my tools since it is World Cardmaking Day, but after scouting for geese all morning and having a friend over, I decide an easy card was in order.  I used my trimmer to custom cut the base of the card and the overlay.  Once those were cut out, I used my Silhouette to cut out the tissue box.  Using my stamps, I stamped "Get Well Soon" on the overlay.  Tonight's card turned out cute even though it was a super easy card.  Until next time, happy carding everyone!

\


Friday, October 4, 2013

Soccer!

First off, let me begin by saying thank you for Friday's.  After a long week at work it was nice to relax and know that I have no major commitments (school related at least) until Monday.  So I decided that in honor of my friend whose coming home to Wisconsin in less then a week, I would create a card for her.  Her favorite sport is soccer to this hexagonal, soccer themed card was the perfect choice to create.  Let's discuss the skinny of tonight's creation.

Using my trimmer, I custom cut the card base and two overlays (one green and one white).  Once those were cut out, I used my Creative Memories Hexagon punch to create the soccer ball appearance.  Once I had a good amount of hexagon's punched out, I embossed the white ones using my Big Shot.  I then placed one black hexagon approximately in the middle of the green overlay.  I then filled in the white hexagons around it.  Repeating this process until the whole overlay was covered.  After gluing down the hexagons and leaving some gap in between them, I cut off the hexagons that were hanging over the edge.  Once all of the overlays were adhered together, I adhered them to the card.  I tired placing a sentiment onto this card, but it didn't look right so I left it off.   This card could be used for several different things like a birthday or as an invitation.  Until next time, happy carding everyone.


Thursday, October 3, 2013

Gift Card Holder

After creating an easy card last night, I decided that I wanted to try something new.  Once again, I went on Julie Davidson's blog and found a neat tutorial for a gift card holder.  Since I have not created one for this project yet, I decided to gave it a try.  With this card, I got to use a few more of my new toys that I haven't been able to use yet like the Gift Bow Die for my Big Shot.  Since Julie has already made a video tutorial, I decided that I am not going to bore you with all step that I took to create this card.  Instead, I will link her video at the end of my blog and give her credit for this great gift card holder.  Until next time, happy carding everyone.

Front

Inside once you left the flap


Wednesday, October 2, 2013

Recipe for disaster

While I would consider last nights card a total failure, I know that between the pressure of my sinuses and the completion of an Ipad uninstall/reinstall it's been quite the week.  These things have been weighing an extra load on me both mentally as well as psychically so I am definitely geared up and ready for the weekend once more.  On the brighter side of things, some of my second graders are finally starting to digest what I am teaching.  This was most evident today in class as one of them was able to complete a lesson in just over five minutes.  Most impressive, and while I am trying to boast my teaching abilities it does make me feel that I am doing my job (which I will admit some days are harder to get through then others).  Coming home and making a creation and writing this blog for you is a piece of meditation in itself, so onward with tonight's remarkable creation!

Tonight I decided to create an easy card, not only because I felt I've earned but because I needed to.  Last nights castrophe of a card made me feel like I failed as a creative individual.  But reminded by my friend Chris, that our failures are what we look back on and know how we've improved.  I found the inspiration for this card by searching Pinterest after school, it took a couple tries to get it right so essentially I created two cards for this evening.  Stamping out six flowers from the "Flower Shop" collection (a collection that I frequently use in my creations).  Once the stamping was completed, I was able to use my punch and create the final product.  Colorful flowers with flowers as unique as autumn foliage, it adds variety to the cards I create.  Placing the flowers on the cards was simple as I used adhesive and evening spaced them, three to a card.  Using a simple "thank you" placed in the center of the card above the flowers tonight's creation was complete.  Simple, easy, not so remarkable but fun none the less to make; until next time happy carding everyone!


Tuesday, October 1, 2013

Shaker Card....Kinda

Tonight I tired to make a shaker card.  Let's just say it didn't turn out the way it was suppose too.  I had the whole card together and I was so excited to shake it, but there was a whole in the frame and the beads went every where.  Even though the card didn't turn out, I decided to finish it anyway since bed was approaching soon.  I added "Merry Christmas" with embossing powder and used my heat gun to make it shiny.  I will be giving this card another shot next week after I do some research and make sure I am assembling it correctly.  Until next time, happy carding everyone.