
Wednesday, July 31, 2013
Zoo Scrapbooking Layout
Besides my card today, I made a zoo themed scrapbooking page. I haven't created scrapbooking pages in a few years. They are way more time consuming then a card, but a great way to capture the memories. This page was of the zoo animals at the Minnesota Zoo. I took 17 photos and punched them into squares. Some of the photos I punched several time since I couldn't get the whole animal in one punch. After punching all of the photos, I laid them out on the light green background giving the photo a border on each side. I used photo squares to adhesive them on the paper. Once the photos were complete, I used my Silhouette to cut out "It's a zoo in here."

For The Newlyweds
Today, I decided to use my Stampin Up Simply Score board with the removable diagonal plate to create a fun frame. Cutting a piece of card stock that was 4" by 4". Because this card required a bit of folding, I used double sided card stock. After cutting a piece of paper, I scored each corner at 2" and 3". Once I scored all four corners, I folded it in on the first score and folded it out on the second score line and then repeat for all sides. I used my bone folder to make sure that all four sides were reinforced. Upon completion of folding a neat box is created. Once the frame was completed, I decided that I wanted to make a wedding card. Then I punched out two hearts in white and one heart in black for the tux. I embossed one heart with flowers for the woman's dress. Also, I added adhesive faux pearls to the white heart. Then I cut the black heart and half and cut a little bit off each side for the tux. After gluing the black pieces on to the heart, I scored the rest of the white heart to make it look like a shirt. Then I drew a blow tie and buttons on the heart as well. I then proceeded to cut out the card and overlay using my Silhouette. I embossed the overlay with flowers to make it pop a little more. Then I used my modern label and window word punch for the sentiment. Once they were glued together, I stamped "For The Newlyweds."


Tuesday, July 30, 2013
You are simply wonderful!
Today I used an early birthday present from my mother to help create a simple yet effective card for a friend. Using two pieces of 3" by 6" card stock of two different varieties I scored each sheet at 1.5" mark. Folding over at the mark of 1.5" I then proceeded to fold the card in half the other way giving me a square shaped perfectly folded pieced evenly shaped on all sides. Repeating with both styles of paper, I then unfolded the sides to apply adhesive to the designer paper. The key here is only to apply adhesive to the center as the card folds still need to be able to flex back and forth. Then taking my solid colored paper I attached that so that my flaps were facing the opposite direction. In the middle which is the solid color, I stamped "You are simply wonderful." After stamping the middle of the card, I folded one of the flaps on the designer paper towards the center of the card. Following that I fold one of the solid color flaps so it overlapped the other paper. Doing the same with the other two pieces, I gently placed one flap of the solid paper under the designer paper to close and complete the overall appearance of one solid piece. After I had it folded up, I stamped "to my friend" on each of the solid corners. Until next time, happy carding everyone!


Monday, July 29, 2013
Turtle Love
Still reeling from last Friday's proposal from my boyfriend, I decided to make a love themed card with him in mind. His favorite creature of all time is turtles, I've seen all sorts of cute designs through the many pages of Pinterest and decided to create one of my very own. The parts that were the easiest were the ones cut from my Silhouette. Including the following pieces: heart (punches), turtle shapes (Silhouette) with some assembly required, log (Silhouette), waves (mostly Silhouette). Thankfully although I cut a lot of pieces with my Silhouette I found that once they were cut and before me they seemingly started to come together right before my very eyes.
Using a new technique never before featured with my Remarkable Creations blog, I used my ink daubers to become more creative with the equipment I have. Creating the appearance clouds in the sky could have been an easy task for the Silhouette but this project is all about trying new techniques we learn, so thus why I decided to try it. The process is simple as covering the daubers in colored ink (here was blue to make the sky on a partly cloudy day), in applying to the paper ever so gently making solid marks and streaking them across the length of the card. As the dauber runs low on ink, I kept rubbing as this gave the appearance of light fluffy clouds and gave a great natural texture boost to the card. Once entirely dry I re-applied ink to the dauber and kept rubbing until the entire top half of the card was complete; it came out quite well if I do say so myself. I repeated this technique on a smaller scale in the ways on the bottom half of the card towards the top and middle of my paper. The darker blue really gave a nice textured and 3-D effect to the water.
All in all I believe that when properly executed this technique can provide some rather interesting results that can't be beat. As this project started as just a simple thing with cards, it has blossomed into a challenge to myself to be more creative (even if I do repeat some techniques from time to time). Love is similar because everyday that I am with now Fiance, I find new reasons to love him more and more each day. Much love and happy carding everybody.

Sunday, July 28, 2013
Thank You For Being You!
Today I used a lot of paper, I had to cut plenty of different designer papers into quarter inch strips (about 9 of each color). After cutting the strips, I used my adhesive machine and layered on adhesive all over the custom cut base card. The key was to make sure that all sides of the card were equally full of adhesive. Taking my first strip of paper I laid it diagonally from top right to bottom left creating two triangles, it doesn't have to be ideally perfect but the key is diagonal lines not horizontal. Using the same color split the two (almost triangles) into four and leave a little bit of space between so it's not perfectly symmetrical. Using the next strip of paper (of a different color) running parallel to the first diagonal line and cut off the extra. As long as the paper was cut long enough left over to connect the corners and complete another layer on the segment. Being nit-picky to the corners after a new layer was put down I trimmed the excess paper promptly with my scissors. Following up in each quadrant I kept the same color theme through out, and then proceeded after completing the other three to use a different color. Once the first three layers of color were completed the card started to take shape, in keeping with my theme of purple, yellow, and pink I continues to cut the strips. As the space grew smaller so did my strips, the hardest part was cutting pieces small enough to fit in the very end of each quadrant. Cutting all the loose ends I now had a completed card ALMOST, I then placed on card stock again custom cut; with just enough color differential to make it pop against the yellow used in my layers.
Adding a simple cut out from my Silhouette library, I used a stamp to add the text and placed in the center of the card. A lot little paper pieces were left behind as waste from this card so maybe I'll find some use for them in a future card. Until next time, happy carding.

Adding a simple cut out from my Silhouette library, I used a stamp to add the text and placed in the center of the card. A lot little paper pieces were left behind as waste from this card so maybe I'll find some use for them in a future card. Until next time, happy carding.

Saturday, July 27, 2013
Engagement
The last week and a half I have been on vacation. My vacation ended with a proposal from my boyfriend of four and a half years. We were out fishing on a cold and windy day. I was ready to call it quits from the moment we got across the lake since I was already cold within the first five minutes. But we found where the fishing were biting and I stuck it out in the cold. After a few hours of fishing, my boyfriend asked me to take off one of his fish. I thought nothing of it since he was taking my off all day. The fish kept moving so I was having a little problem getting it off. My boyfriend give me more line and when he did I noticed the engagement ring hanging from the fishing line. I was in stock as I starred at the ring for a minute. He had to tell me to take off the fish before I killed it. After I through back the fish, I cut the ring off the line. He came over and asked me if "I would be the biggest catch of his life." Of course I said YES! I couldn't have asked for a better proposal.
So I thought making an engagement card was a perfect fit. I cut out everything using my Silhouette and then I stamped "Congratulations" at the top of the card.

So I thought making an engagement card was a perfect fit. I cut out everything using my Silhouette and then I stamped "Congratulations" at the top of the card.

Friday, July 26, 2013
Triple Layer Birthday
What's better then triple layer cake on your birthday? A triple layer card, using the ever effective triple layering design with purple border and white inlay I created a simple birthday card. I feel very much so that I am repeating what I have said many times in this project, but one can never have too many birthday cards. Giving yourself a challenge and sticking to its definitely a hard thing to do; so I found myself repeating the same techniques time and time again. Stamping "Happy Birthday" in the center and surround it with birthday presents and curly q's stamps as well this card is perfect for any birthday.


Thursday, July 25, 2013
Happy Birthday!
As birthdays happen everyday of the year, I feel that a birthday card is something that one can never have too many of. Today's card was created using simple techniques that are very easy to follow and replicate. The two most common "S" in my collection were used today, those being the Silhouette and stamps. On a white overlay, I applied a simple square flower cut out design. I was able to reuse the flowers form one cut out to the next, just one odd duck out left me with a leftover flower which maybe I'll find a home for on my future card. Using a new acquired tool called a Crop-A-Dile by Stampin UP, I applied eyelets to the center of each flower. Stamping to the right "Happy Birthday" in a color close to the flower cut out, I repeated this two more times.


Wednesday, July 24, 2013
Baby!
Following an idea I had drawn out of my head, I created anther baby card today. As my brother and his girlfriend are expecting, I will be waiting for a few more months before I actually get to find out if it's a boy or girl so until that happens I can practice my baby celebration cards. When a new baby is welcomed to the family it can feel stardom so to speak, so with this design cut with my Silhouette I made that the focal point. Baby is thankfully a short word, so I didn't need to make this card excessively long but it was still a unique size care being that it was three times as long as it was tall. Although my Silhouette made cutting the letters within the starts easier then it looks, it was still a challenge to punch them out without ruining any of the curves of the font. The dark base card followed by a simple white overlay seemed a bit empty so to add a bit of flare I cut a piece of light blue ribbon the length of the white overlay and put it as a one sided border on the bottom of the card. This gives great definition and weight and importance of the stars and letters.


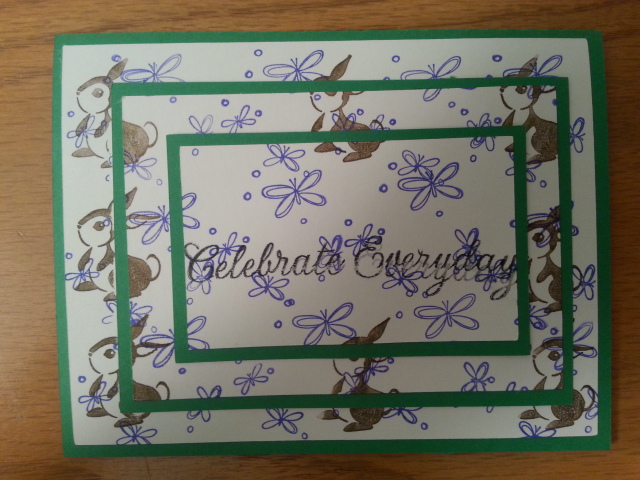
Tuesday, July 23, 2013
Celebrate Everyday!
I believe everyday should be celebrated as we are granted a free pass on this planet and nothing should be taken for granted. Green/white/purple and bunnies are the theme of this triple layer card as these are simple pleasures of life. When I over complicate things I find myself feuding within about much that is out of my control, and that leaves me with many sleepless nights. Deciding on simple techniques that I have done before, and I found to be easy is one of the mail reasons I do them.

Monday, July 22, 2013
Friend
Going for a 3-D effect with this card that could go to just about anyone you could call as a friend, it was really rather simple to assemble. Using a black base and strips of a variety of colors cut out to the same size with my Silhouette, I applied them to the card with glue. Dark to light to dark really helped to accentuate the colors popping against the background, then to make it jump off the page even more I added a vertical mini card within the card. With the classic white overlay, I stamped a heart with the word "friend inside to top it off. This almost was like a cherry on top of a large ice cream sundae, white like vanilla and obviously red like a cherry.


Sunday, July 21, 2013
Smile
This card was quite a challenge, and I kind of screwed up on the placement of the text but yet it still is almost as effective as envisioned. Sketch pens are a great tool when you want to make something simple look rather remarkable, only because the effect is that you have sketched the subject matter onto paper yourself. Camera's have all sorts of pieces that make them unique, and each manufacturer has a piece/design that is slightly different to make it stand out from the competition. While searching on Pinterest I came across this brick looking camera that looks very similar to an old film camera my friend Chris showed me once. An Argus C-Four camera is very similar in design so this simple square sketch with lots of lines (I had to ask Chris to get the name as he is a photographer) and a few circles was perfect to match it. When I create a card that will bring a smile to face of the person receiving the card I often find myself thinking of a camera. We are often forced to smile for pictures, but cards capture natural raw emotions when you give them to a special someone.


Saturday, July 20, 2013
You Did It!
No matter the achievement in life, a card to give props to an individual is always a welcome site. So for this card I decided on simplicity to get the point across. Using a pink base card with a white overlay (as seems to be a running theme) I used my star stamp in a diagonal pattern through the card. Achievements are like shooting stars, they are always full of wonder and bewilderment so pushing this through the card helps draw attention to those details in the card. Using my Silhouette I cut out a floral design, which for this card looks almost as if it's a pin that one would receive at the fair for "best in show" simple while base with a pink petal border for that. Followed up with a piece of ribbon cut in two to be the tail end. Keeping the star them, I gave the pin a five-star stamp treatment and polished it off with text "You did it! CONGRATULATIONS!" both came form the stamp sets I've picked up at rummage sales over the last month.


Friday, July 19, 2013
Happy Valentine's Day
Roses are red and violets are blue, I made this Valentines Day card very early too! It may still be a few seasons away but that doesn't mean one can not create a card for the most special of days. Red and white are common colors when one envisions the Valentines holiday so a triple layer card was in order with a two color theme. The red base with a white overlay creates a nice pleasing card and using the triple layer technique it really helps the card pop. I used my heart stamps to fill in the white so that it wasn't too bland and finished the card off with the "Happy Valentine's Day" text, though I learned that maybe its best to do the inside layer stamping of text first then surround it with hearts so that the two don't get lost within one another. Sending love and happiness to all, happy carding everyone.


Thursday, July 18, 2013
Happy Thoughts
Using leftovers is a technique seldom used, as when I have a Silhouette that must such neat cuts for me I get accustomed to being spoiled. So today I decided to use pieces of paper left from previous creations and cut them in a variety of squares and rectangles alike. With really no regard for perfect dimensions I had at it with my trusty scissors! The only thing I had to do was make sure that the shapes laid neatly on the card and filled in the white space. A dark purple card followed by a white overlay for my impromptu frame provided a nice backdrop to make the complimentary colors pop. After completion of the main portion of the card I used my Silhouette to give my hand a rest and cut out the floral design. Two simple shapes combined for an easy flower, which was topped off with a stamp in the center to complete the look of a flower and "happy thoughts" stamped top and bottom to give more definition.


Wednesday, July 17, 2013
Happy Birthday!
Today's card consisted of two parts: cutting and assembly, as most card require these two things today it was mostly cutting. Using my Silhouette it seemed as if I spent my afternoon sitting and waiting, with lots of little pieces requiring much attention I had my work cut out for me. The style of card today is called a "Step Card," viewing the card it's evident as through the stepping pattern in the layers of the cake. The hardest part in completing this card was just like making a real cake, provided the layers the placement was key. I couldn't place them to low on the card or else they won't be visible but if I placed them too high it would detract from the visual appeal of everything else on the card. The rest of the card was fairly simple of just overlaying one piece over another and really making it pop.


Tuesday, July 16, 2013
Thank You
A busy day with much to learn and lot's more time on the road then I would have liked led me to a simpler card for tonight's remarkable creation. Using a steel blue card stock I cut a slightly smaller white overlay, thus giving the steel blue a nice border effect to the overall card. I knew more color was required so using my stamp markers and my Sparkled Expression Stamp Set I chose a variety of colors. Not nearly a rainbow but close enough, I used the following; red, orange, yellow, green, blue, and purple. A color spectrum visually pleasing both to mind and spirit in a natural arching pattern, reaching it's peak and then back down. Topping the card with "Thank You" from the Sassy Salutations collection in black ink, doing so it really helps everything come together. I've said it before, and will again reiterate again and again countless times before I quit this project; one can never have too many THANK YOU cards. Many occasions call for them and that is why I continue to make more!


Monday, July 15, 2013
The Sky's The Limit!
Today was an amazing day, full of sunshine and plenty of humidity. While I wanted to be outside doing other things, I found myself inside near the University of Wisconsin-Whitewater for a keyboarding workshop. The upside to this is that I get some much deserved me time away from the stresses of everyday life. A nice cozy hotel room all to myself with a great view of a used car lot and air conditioning, how much more could a girl ask for? Enough about my luxurious accommodations provided by the school and onto my card for today. Although summer has just begun, it seems like only yesterday that family and friends celebrated the graduation of someone close by. The theme of this card is that of hot air balloons going up into the sky, where there is plenty of blue and clouds too! Using my Silhouette I cut the clouds by first cutting the clouds I discovered they were way too big for my card so I decreased the size by 50% and had a happy medium. Next using four different colored pieces of paper, using my Creative Memories Heart Punch I made six equal sized hearts. Two hearts were placed on the card as a base and then I folded the other hearts in half to create an open book effect. Gluing down one half of a heart and then applying glue to the open face I stuck half against it and glued the other half down to the base. Giving it a great 3-D effect against the sky blue paper with white fluffy clouds, I finished the card off with a stamp that read "the sky's the limit" as it's true; once you graduate the only place you can go is up!


Sunday, July 14, 2013
Congratulations!
In celebrations of the recent announcement that my brother and his girlfriend are expecting their first child, I created a "congratulations" card for them. Using a technique that I've done a few times now in my month and a half of remarkable creations, I did a tri-layer card. Using a white base, I followed up with pink underlays to give it a border. It's too early to know if it's going to be a boy for girl, but I am hoping for a girl thus the pink border followed up with one of my new stamps. The monkeys came from the same set I picked up that had the giraffe and other assorted animals. Using stamp markers from my collection I also proceeded to included butterflies flying around all over the card. Because I am away from home at a workshop and packed light for my trip, I completely forgot some of the universal items I use on a regular basis. The large open area in the card will be stamped with "CONGRATULATIONS" upon my return. I wish my brother and his girlfriend the best over the next 9 months and look forward to becoming an Aunt!


Saturday, July 13, 2013
Thanks
Today I had a busy day away from home, so when I got home and thought I had time unwind I was reminded that I still had not created my card for the day. After picking up a few new items from the same lady I got a haul from last week, I was able to do a card design that I had pinned on Pinterest a while back when I didn't have the right tools. The shape of this card was rather unique, so I had to cut my own card stock; black paper cut 12" long by 4" tall. The solid black was mainly chosen to help separate the tags from the base. If I had chosen a lighter color, I feel that they would just blend together and not create a good ambiance for the card. Using a punch, I cut out six tags and using my Silhouette I cut the six letters to spell out "THANKS" each with a different color to make it stand out. Using a new tool I acquired today, I punched holes in the tags and then applied the six multicolored eyelets I placed them in the correlating tag (to keep with an even color theme). Then using a glue stick, I affixed the tags to the card stock, but after looking at the card long and hard and getting opinions from a couple of people I should have alternated the letters opposite the way that I did. These sort of things happen and I can only learn from them, but the positives outweigh the negatives and I am rather satisfied with my results all things considered.


Friday, July 12, 2013
Friend to Friend
Today I went with probably the most complicated design of a card that I have done in awhile, many shapes and folds and little details made this quite the challenge. While searching for today's card on Pinterest, I came across a blog for a creation called the "Double Punch Blossom," thankfully the blogger made a great tutorial video to demonstrate the process of creating this card. As I feel the right words will elude me while I attempt to blog with my own take. Either way I must give credit where it's due and link to the blog I found found this wonderful challenge, at the end of this post.
First, I had to cut a piece of of white paper to size at 4" by 12" and scored lines using a scoring board at 2", 4", 8", and 10" this way we have a window pane of sorts. Next, I gently bent the card in half and lined up the creases 2" and 10" make then I placed my Blossom punch directly in the center of the score lines. Then I had to cut two pieces of patterned paper to size at 2" by 4". I glued them on each end of the white base. After I glued them on, I used my punch again to cut out the paper that was hanging over. It was kind of hard to line them up and I was afraid I was going to mess it up or something. Then I stamped a flower for the center and cut it out using the punch again. I punched out a 1" circle and stamped a design on it for the middle of the flower and I added a rhinestone to the center to add a little bling. Then I folded my card up and used foam squares to make the flower pop out more. Finally, I added "Friends to Friends" on the front of the card and in the inside "a friend is someone who makes it easier." I know my words can't give this card justice, so I suggest watching the video (http://juliedavison.blogspot.com/2012/04/double-punched-blossom-card-tutorial.html)


First, I had to cut a piece of of white paper to size at 4" by 12" and scored lines using a scoring board at 2", 4", 8", and 10" this way we have a window pane of sorts. Next, I gently bent the card in half and lined up the creases 2" and 10" make then I placed my Blossom punch directly in the center of the score lines. Then I had to cut two pieces of patterned paper to size at 2" by 4". I glued them on each end of the white base. After I glued them on, I used my punch again to cut out the paper that was hanging over. It was kind of hard to line them up and I was afraid I was going to mess it up or something. Then I stamped a flower for the center and cut it out using the punch again. I punched out a 1" circle and stamped a design on it for the middle of the flower and I added a rhinestone to the center to add a little bling. Then I folded my card up and used foam squares to make the flower pop out more. Finally, I added "Friends to Friends" on the front of the card and in the inside "a friend is someone who makes it easier." I know my words can't give this card justice, so I suggest watching the video (http://juliedavison.blogspot.com/2012/04/double-punched-blossom-card-tutorial.html)


Thursday, July 11, 2013
Baby!
As today was my first full day with my fellow card creator (even if I was teaching for the first half of the day) it made for a great day. While searching through Jessica's library of different Silhouette designs, I came across this rather neat box baby girl design. Using a 5 x 5 card to take full advantage of the amount of squares incorporated into this design. Pink and white are definitely colors one thinks of when they think of a newborn baby girl or celebrating with a baby shower, which made these the definite color choices. Alternating colors and throwing some flowers into the arrangement separated this card from just your ordinary girl card, I had to make sure to use a different color for the border lines just to help keep the solid pink fro the other hues in the card.


Wednesday, July 10, 2013
Thinking of You!
Today my friend Jessica (whose doing the 365/cards project as well) came to visit, she and I will be spending the next five days together. Of course Aunika will be tagging along for the ride, and we will hopefully be able to relax and share tips on making cool cards. But when company comes to visit I have to put card making aside and make everything clean, doing dishes and taking the garage out, etc. Things that seem simple when you have plenty of time in the day, just like tonight's card. Searching the Silhouette store can be rather time consuming if you don't know exactly what it is that you, but I knew what I was looking for so it was quick and easy. I found this simple flower, purchased, and let my sketch pens do the rest of the work. A simple "thinking of you" stamp tops off one of the easier cards I've made in a long while, if only it were this easy to prepare for special visitors. Happy carding everybody! :)


Tuesday, July 9, 2013
Happy Day to You!
Today I decided to go with a very detail orientated design, lot's of pieces and lot's of handy work. In the end the final product shows that hard work can pay off when well executed. Lacking any ideas in my head I turned to the ever reliable Pinterest, and found a great 9 circle flower design. If you search those keywords you too can find similar designs to the one I chose for tonight's card, following the step by step instructions and limiting myself in writing this blog to keep the length down proved quite the challenge. Using my Silhouette I cut nine equal sized circles on double sided paper, the double sided paper is key in doing this design as when the final card is revealed it helps make the petals pop. After the circles finished, I proceeded to fold them into quarters (in half and then in half again). Following the tedious steps in unfolding the circles and refolding the corners to follow the tutorial my petals were now complete. Alternating them around the base circle (so I was left with an even eight). Placement on the base card without a stem was hard, no lines to lead the eyes to the heart of the flower but alas I did my best. Using one of my stamps I purchased over the weekend, I placed the words "happy day to you." This is a great card to just let someone special know you are thinking of them.


Monday, July 8, 2013
Happy Birthday!
Today I decided to make another birthday card, as birthdays are always in season no matter what time of year it is. After being off four days the holiday weekend was officially over and it was back to reality, teach and cards such is my life as of late. Thankfully although I was feeling rather tired, inspiration was running through me like summer perspiration on such a muggy day! Using my Silhouette I started by creating the base of the card, simple really black and white overlays did the trick to put out against the lime main card. Next I used scrap paper left over from cards from the last month to create the hexagons, using my Creative Memories punch I made an assortment of colorful punches. Placing them on the card in a similar fashion to a layout I was inspired by after searching on Pinterest, I left a bit of open space between the hexagons to help give the card the ability to breathe. When I ran out of room on the sides, I found that I had a large gap on a couple of the sections so I proceed to cut my punches in half and place them on the edge of the card. To complete the card I used a "Happy Birthday" stamp and placed it in the center.


Sunday, July 7, 2013
Congratulations on your new baby!
Today I used a technique that was previously introduced last month, in the fact that I triple layered boxes on a base card. Keeping the colors simple, I went with a blue border and white insides to boost what I was to place inside. The theme is driven towards the birth of a baby boy, with giraffes and turtles stamped on. I picked up these wonderful stamps after browsing craigslist looking for rummage sales, I found a lady in Madison selling a bunch of Stampin Up supplies. After exchanging emails, my boyfriend and I ventured into the city to take a look at them. Upon arrival she showed me what was for sale and I purchased 15 stamp sets, paper, ribbon,beads and a punch for a great price. Including these four new stamps, all used on this card. I think it's great that I could put my new supplies to use so effectively and all on one card!

Saturday, July 6, 2013
Just A Note
Pinwheels are similar to fireworks as they come in many shapes, sizes, and colors always bursting with uniqueness. Using two squares, I overlapped them to create the background layer for a pinwheel, I followed that up by cutting eight more smaller squares with my Silhouette. Using different designs to help alternate the flow of the pinwheel I affixed them to the base design. Matching corner to corner, since the boxes were created slightly smaller gave them a nice pop against the background. Once all eight squares were in place and all corners aligned the pinwheel effect was more visually pleasing to the eye. I used a pre-made green card to place the final product on but felt something was missing. Using my Creative Memories punch, I punched four embellishments; placing one as a center stone of sorts for the pinwheel to hide the corners on the inside that looked rather busy. With the leftover flowers, I placed them equal distance apart on the bottom of the card.
The purpose of this card is to just let someone you know you are thinking about them, whether it's a friend you haven't talked to in a long time or a family member. It would be universal for whomever you decided to give it to. On a side note, I took advantage of a beautiful summer afternoon and picked up lots of paper at a real steal of deal. With this paper, I created 90% of today's card as it was double sided so it made for less paper to be used.

The purpose of this card is to just let someone you know you are thinking about them, whether it's a friend you haven't talked to in a long time or a family member. It would be universal for whomever you decided to give it to. On a side note, I took advantage of a beautiful summer afternoon and picked up lots of paper at a real steal of deal. With this paper, I created 90% of today's card as it was double sided so it made for less paper to be used.

Friday, July 5, 2013
Happy Birthday!
Today, we spent time with my parents so we didn't get home until late. A similar card on Pinterest inspired me to create tonight's card. I designed this card using my Silhouette Design Studio Software on the way home from my parents. The design turned out a little different than what was on my computer, but I still think it turned out remarkable. I cut out the balloons, "Happy Birthday", and the hexagon overlay using my Silhouette. The rainbow background is made out of ribbon that is glued to the base of the card. The ribbon didn't line up the way it was suppose too, but live and learn. Next time, I will glue the ribbon on the overlay and not the base of the card.


Thursday, July 4, 2013
Happy 4th of July
Today I decided to make a rather unconventional card for one our nations most celebrated holidays. The birth of the United States of America happened 237 years ago today. It's pretty amazing if you think about what's happened through the years. But enough about that and onto my remarkable creation for the day. I found this cute bear via Miss Kate Cuttables website (www.misskatecuttables.com) and of course I used my ever ready and reliable Silhouette. Although Mr. Bear has a lot of simple shapes, he has lots of intricate details that very tedious in assembly. Keeping with a fourth theme, I went with a red base followed by a blue overlay, topped off with white. I placed white last to keep the bear from blending with the blue, and to give him more definition against the layers. Using a stamp from my collection I added "Happy 4th of July" and that wrapped up my celebration for the fourth. I used my stamp markers so I could alternate the colors but I didn't get enough ink on the stamp so it is a little faded. I would have redone it, but unfortunately I was on a time crunch so that is the best I could do today. I hope everyone has a beary nice time with family and friends, until next time I wish you happy carding.


Wednesday, July 3, 2013
Happy Birthday!
After another long day of teaching, summer finally has a holiday that gives me an extended weekend. With the Fourth of July falling on a Thursday, I was given a natural four day break from everything. Taking advantage of much cooler temperatures then a year ago for the forth, a good friend and I visited Mount Olympus Theme Park. After plenty of body jerking rides including Hades 360 (the world's largest upside wooden roller coaster) and seemingly hours in line, my body was plenty sore and not feeling up to being actively creative with my card. So to keep it simple I picked out a sketch from my Silhouette archives of a giraffe with sunglasses. It definitely brought a smile to my face on the the day before my four days off, obviously the sunglasses definitely add to the element. Using my sketch pens I layered the giraffe in two separate sketches, this way I was able to give him different color sunglasses from his body. Effectively helping making them pop against the white background and mimicking the border placed on the card.

Tuesday, July 2, 2013
Celebrate Everyday!
More long days so more simple cards, the only difficulty I had in creating today's card was finding a happy medium between paper and my personal tastes. Using my Creative Memories heart punch, I created eighteen hearts out of an assortment of colors and sizes. After punching the hearts, I folded them in half so that the design side of the paper was showing (which I now know for next time I use this technique to use solid color paper so there isn't as much of a blend effect), after tirelessly folding hearts for what seemed like forever it was now time to position them on the card. Affixing the cards with the base of the heart pointing inwards, I used a pinwheel effect for placement creating a faux flower in appearance. This didn't come out as I saw it in my head, but it's neat none the less (as that is what card making is all about discovering new ways to make something different even if it is a happy mistake). Finishing off the card I used a stamp to write "Celebrate Everyday" which leaves this card to fit for many different occasions.


Monday, July 1, 2013
Friendship
Today started bright and early with a morning run with my boyfriend, it was a workout that really drained me physically and by the end of the day teaching I was just as drained mentally! Using a new stamp that I got from Stampin up last week, I did the simple effect of stamping it to paper and then punched around them to give nice separation between flower and the background. I then created the purple lace bottom with my Silhouette with similar shapes to help mimic the flowers. After looking at what I had I felt it was too bland so using adhesive squares it really popped off the page. When placed as a complete work on the card stock, I knew it was meant to be. For the word "friendship" I used a simple black sketch pen and a nice cursive font to draw attention to curves in each letter. Large enough to be noticed, but also enough open space in the letters to give a free spirited feeling to the text. Until next time, I float away to sleep and bid you farewell friends, time to unwind.


Subscribe to:
Posts (Atom)