
Sunday, June 30, 2013
Happy Birthday!
Sunshine and the fourth of July, two things I look forward to after the school year is done. We must not forget those with birthdays in the summer, so a fitting card for all summer celebrations. Using a new technique called sunburst, the cards life begins as a circle in the center. To emulate the sun rays I cut rectangle pieces of paper diagonally, and then meticulously placed the sharp end of the newly created triangles into the center of the circle. Alternating colors and paper design give the card a real burst of life. After securing all pieces into place, I then trimmed the left over paper off the edges. Leaving me with a fantastic patterned sunburst. Using my Silhouette, I printed the "happy birthday" text and then embossed with a darker border to help separate the text form the burst. Effective and unique, even a little remarkable if I do say so myself. Happy carding everyone. :)


Saturday, June 29, 2013
Happy Birthday!
As far back as I can remember I've always loved the zoo, so many cool unique animals. So when I decided to create a "happy birthday" them card, I thought of all the different one of a kind creatures and picked one of tall stature. Rising taller then any other animal in the zoo makes for a card as neat as the giraffe.
Following a design I found on Pinterest, with my new punches and the ever reliable Silhouette I began the tedious task of creating the giraffe. I had to be careful not to mess up the proportions between legs/torso/neck and head. Giraffes are the curiosity of the zoo, such a long neck and long legs to boot. I almost felt like I was creating a new creature while sizing up and affixing the legs to the torso. Getting the pieces placed down with glue, I had to keep the card at arms lengths to keep everything in order. While the final card may not be a 100% match to my vision, the only thing my design and creativity can do is go up. (Much like the neck of a growing giraffe.)

Following a design I found on Pinterest, with my new punches and the ever reliable Silhouette I began the tedious task of creating the giraffe. I had to be careful not to mess up the proportions between legs/torso/neck and head. Giraffes are the curiosity of the zoo, such a long neck and long legs to boot. I almost felt like I was creating a new creature while sizing up and affixing the legs to the torso. Getting the pieces placed down with glue, I had to keep the card at arms lengths to keep everything in order. While the final card may not be a 100% match to my vision, the only thing my design and creativity can do is go up. (Much like the neck of a growing giraffe.)

Friday, June 28, 2013
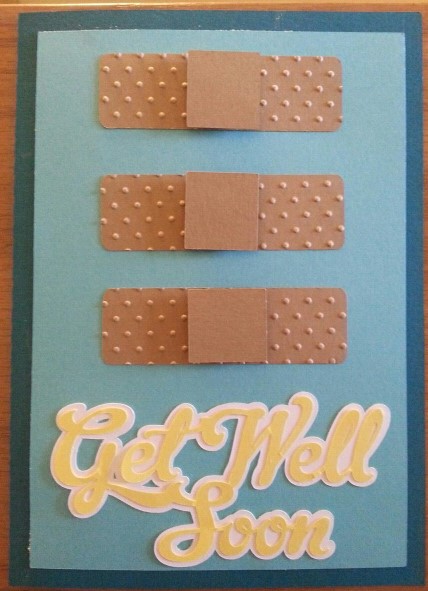
Get Well Soon!
My friend who is doing the same card project as I was suppose to come visit this weekend but unfortunately she was a bit under the weather so she had to postpone her plans to come and visit. So I decided to make a get well card for her, to let her know that even if she isn't her with me creating a card; she is at least here in spirit. Using my Silhouette I was able to create all the elements of the card, the text and band aids included. I felt that using a lighter color theme would help accentuate the feeling better or the "get well" portion to the recipient. Band aids have always signified the "get well" feel for me through out the years, although they can't always heal what ails us I am always remind of getting better soon. Using my Cuttlebug, I embossed the paper to make it stand out a bit more, and found using foam adhesive squares for the center of the band aids really made them pop nicely.

Thursday, June 27, 2013
Thinking of You
Today I had the hope of going to Mt. Olympus with my friend, unfortunately due to some things out of our control, we ended up not going. Probably a good thing though since we would have gotten rained out for a small portion of it. To let her know I was thinking of her on this humid/wet day, I created this fitting "thinking of you card. Using my Silhouette, I cut out the card and the borders and then triple layered the stamps. Putting my newly acquired stamps to use, I applied to white card stock. When doing this unique technique, I had to make sure to not make the teal borders too large or else the stamping would not display as well. Each layer gives a frame within a frame feel, to prefecture execute triple layering. I hope that everyone is enjoying summer (at least here in the Northern Hemisphere). Stay cool, stay dry, and happy carding. :)


Wednesday, June 26, 2013
Happy Birthday!
I am happy to say that my defective punches were returned and as luck may have it I received my new punches in the mail today. It was great to be able to put them to use right way, and I look forward to more experimentation in the coming weeks. This card would be perfect for a birthday for either a boy or girl, but it order to keep the front less cluttered I will hand write in "Happy Birthday" with other text at a later date.

Tuesday, June 25, 2013
Thinking of You
Sometimes inspiration comes natural and sometimes I must rely on other sources to help me do so. Today I searched through the Silhouette Online Store, I found a new item yet to be included in my creations. Today I found "sketch pen images," being that I have never been much for an artist with a pen I decided to purchase a floral design. There were lots of very intricate details which took what seemed like forever to to print, honestly just like the only saying "I'd rather watch paint dry" rang very true. Thankfully sketch pens are effective and neat, completing the card with a simple "thinking of you" at the bottom with a clear-mount stamp.


Monday, June 24, 2013
Thank You
Today I wasn't satisfied with the original card I created for you to see, so out with the old and in with the new. Although I was not on a time crunch to get my card totally finished, Monday's are always a rough day for me. After a long weekend soaking up the sun (I wish), it's hard to come back to reality and find myself back to work. But such is life and the more things change the more they stay the same. Simplicity was key for a quick card today, going with purple boxes complimented by lighter border. I did alternate this only to not create too much of a checkerboard look and to give separation between the squares. A simple white card and stamping "thank you" placed bottom right corner completed one of these easier cards I've made in a while.


Subscribe to:
Posts (Atom)